In March 2025, Vozo EHR will be upgraded with enhanced UI and workflow improvements, making it more user-friendly and efficient for healthcare providers.
Previously, providers were required to set up “In Office” availability before scheduling appointments. This validation has been removed, allowing users to schedule appointments freely without any mandatory input in setting up provider availability.
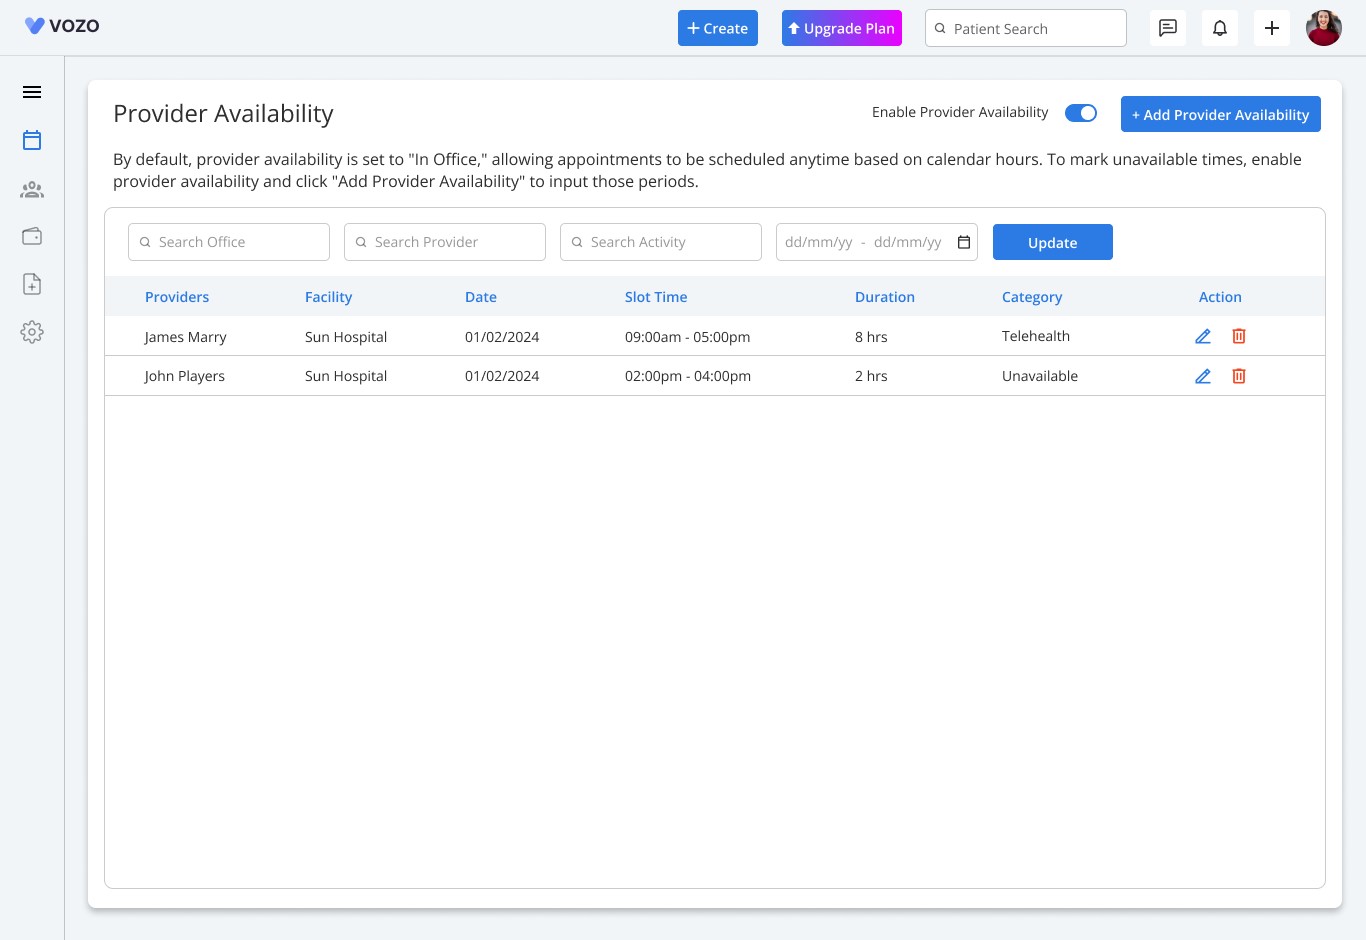
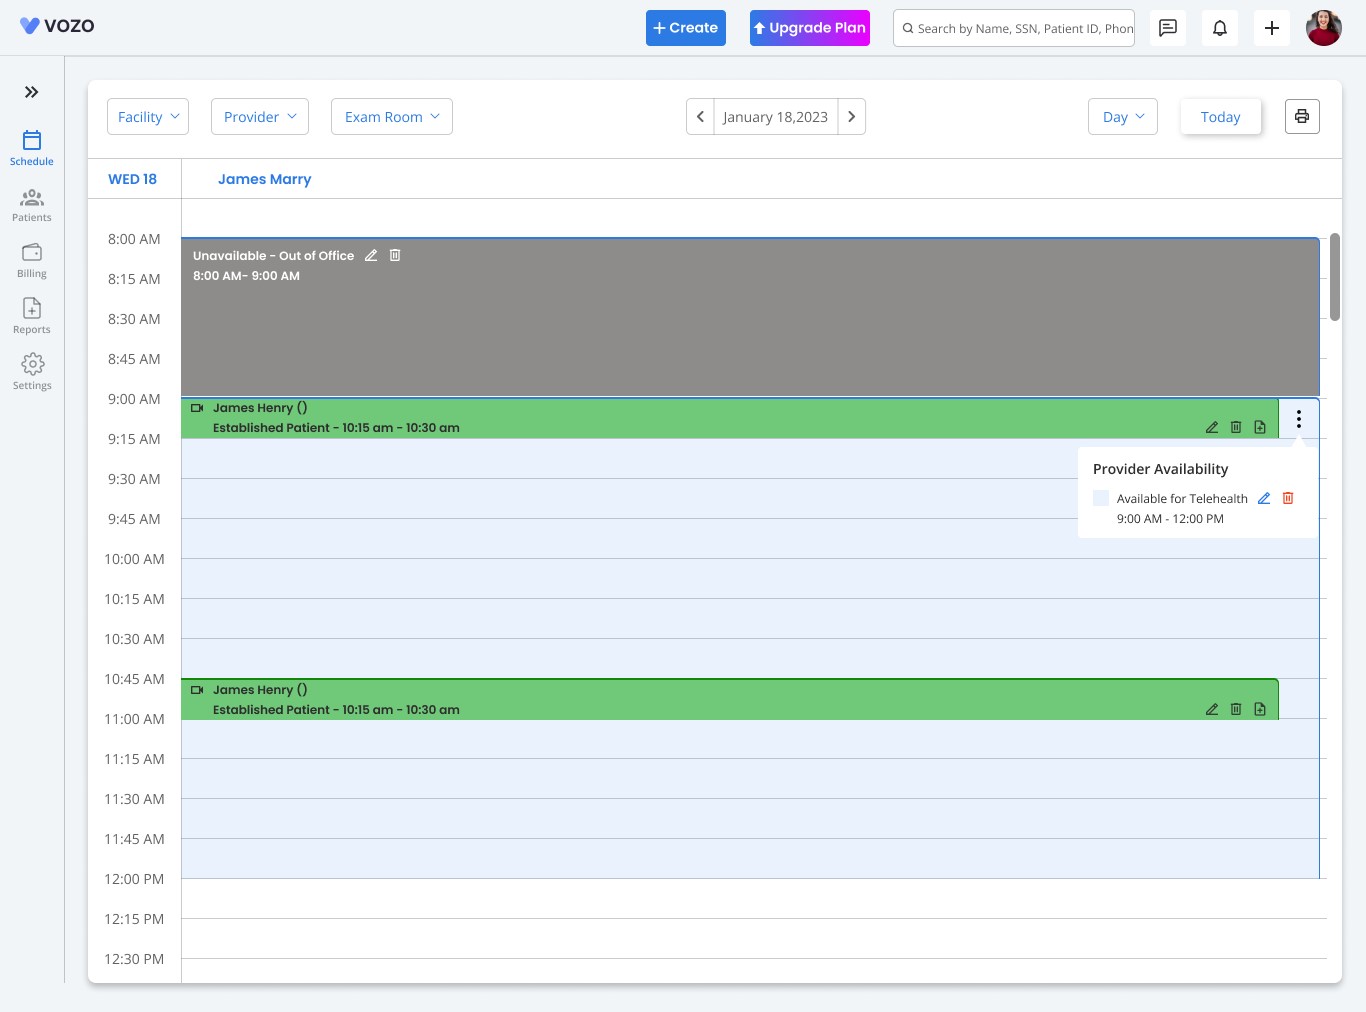
By default, Provider Availability will be disabled, enabling users to schedule appointments at any time without restrictions.
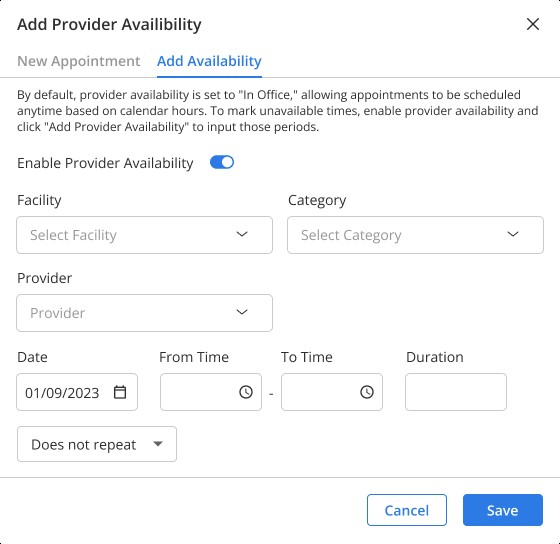
Users can enable Provider Availability by switching on the Enable Provider Availability toggle. This allows them to configure provider availability based on their preferences.
Previously, multiple availability categories existed (In Office, Out of Office, Lunch, Break, Counseling, Miscellaneous). Now, only two options are available:
Telehealth
Unavailable
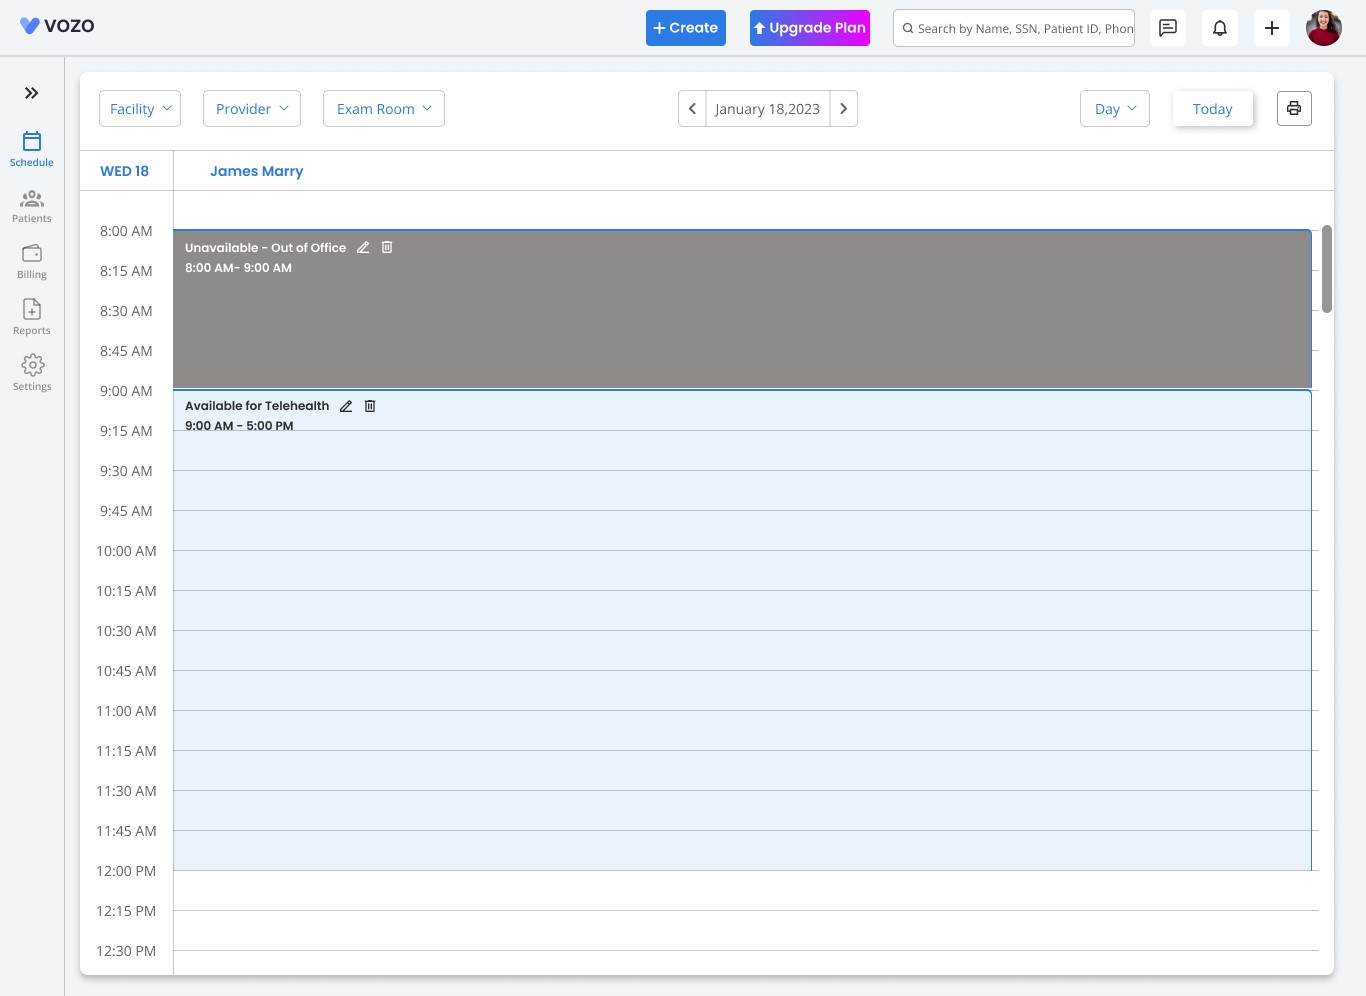
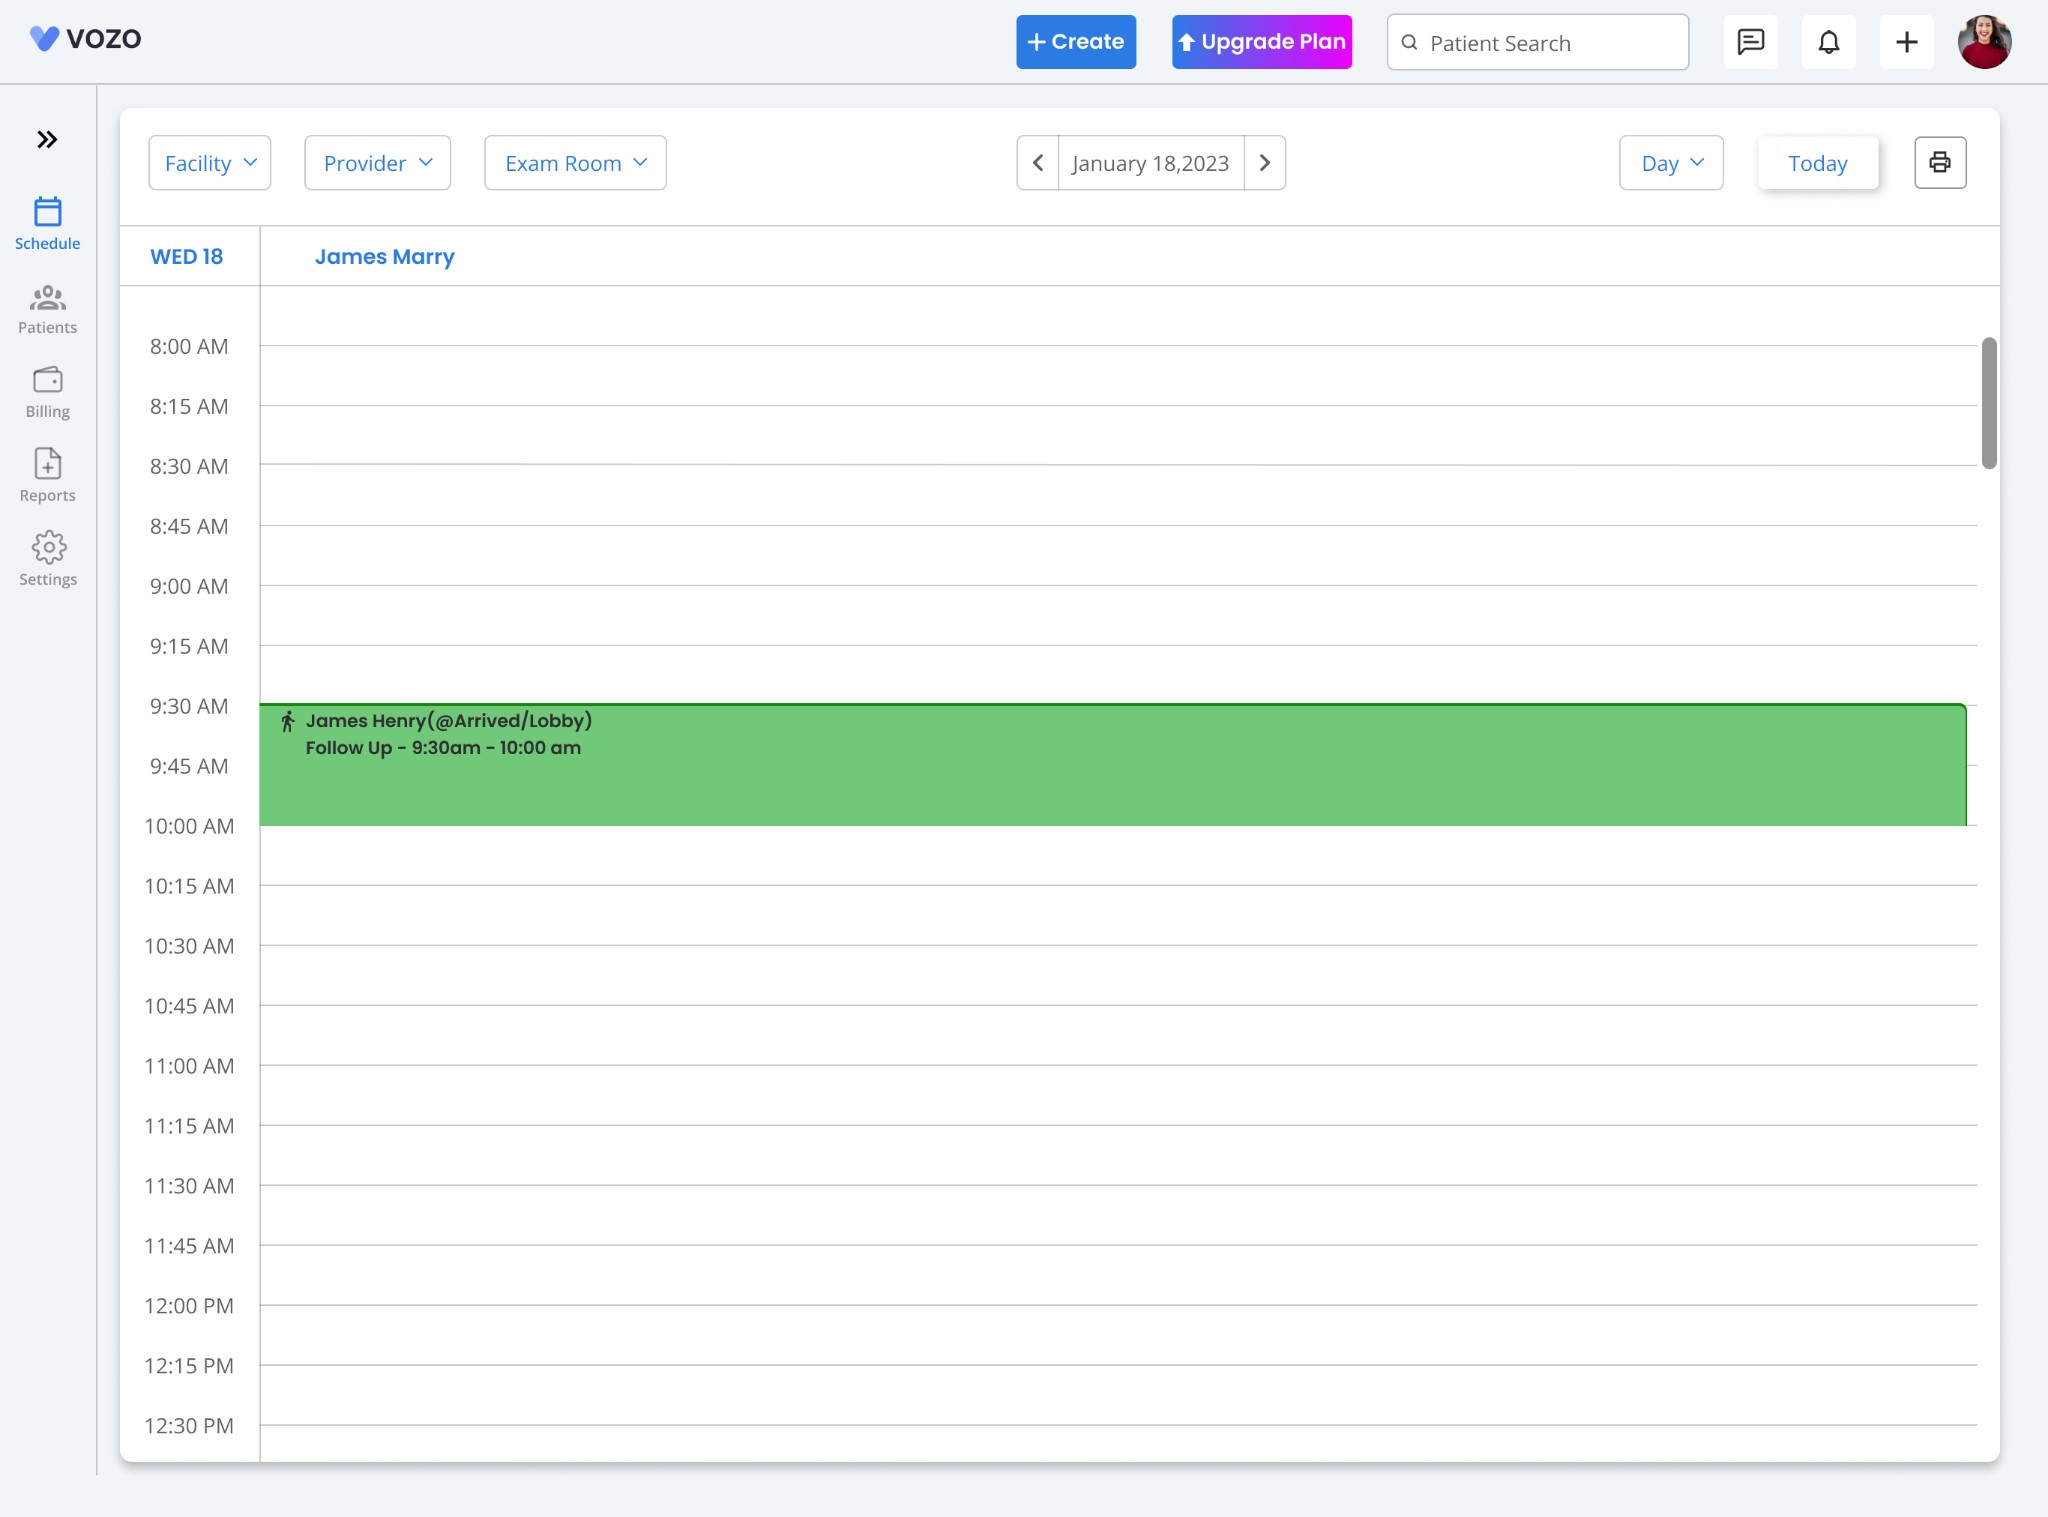
Unavailable time slots will be displayed in gray on the calendar, preventing any appointment bookings during those periods.
Appointments can still be scheduled in all non-grayed time slots without any restrictions.
Generally, the users can schedule appointments for both walk-in and telehealth. If a user prefers to schedule or consult only telehealth-based appointments.
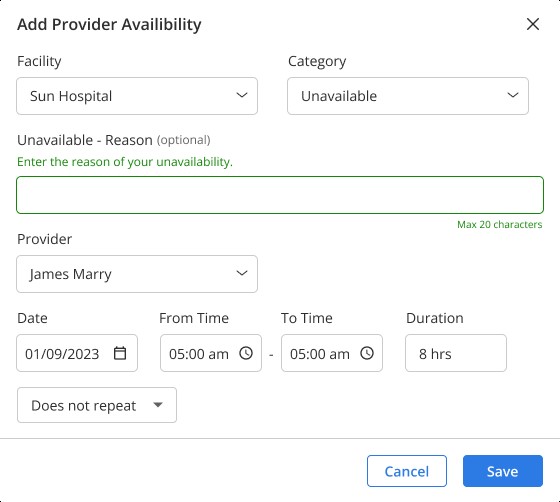
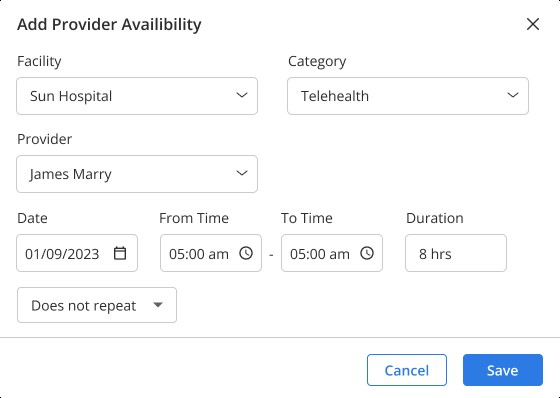
It is possible to set up availability for only Telehealth-based appointments by selecting the “Telehealth” category and filling out the necessary details.
Time slots reserved for Telehealth appointments will be highlighted in light blue. In these slots, only Telehealth appointments can be scheduled.
All added availability will be listed on the Provider Availability page. Users can edit availability by clicking the Edit icon on either the Provider Availability page or the Calendar page.
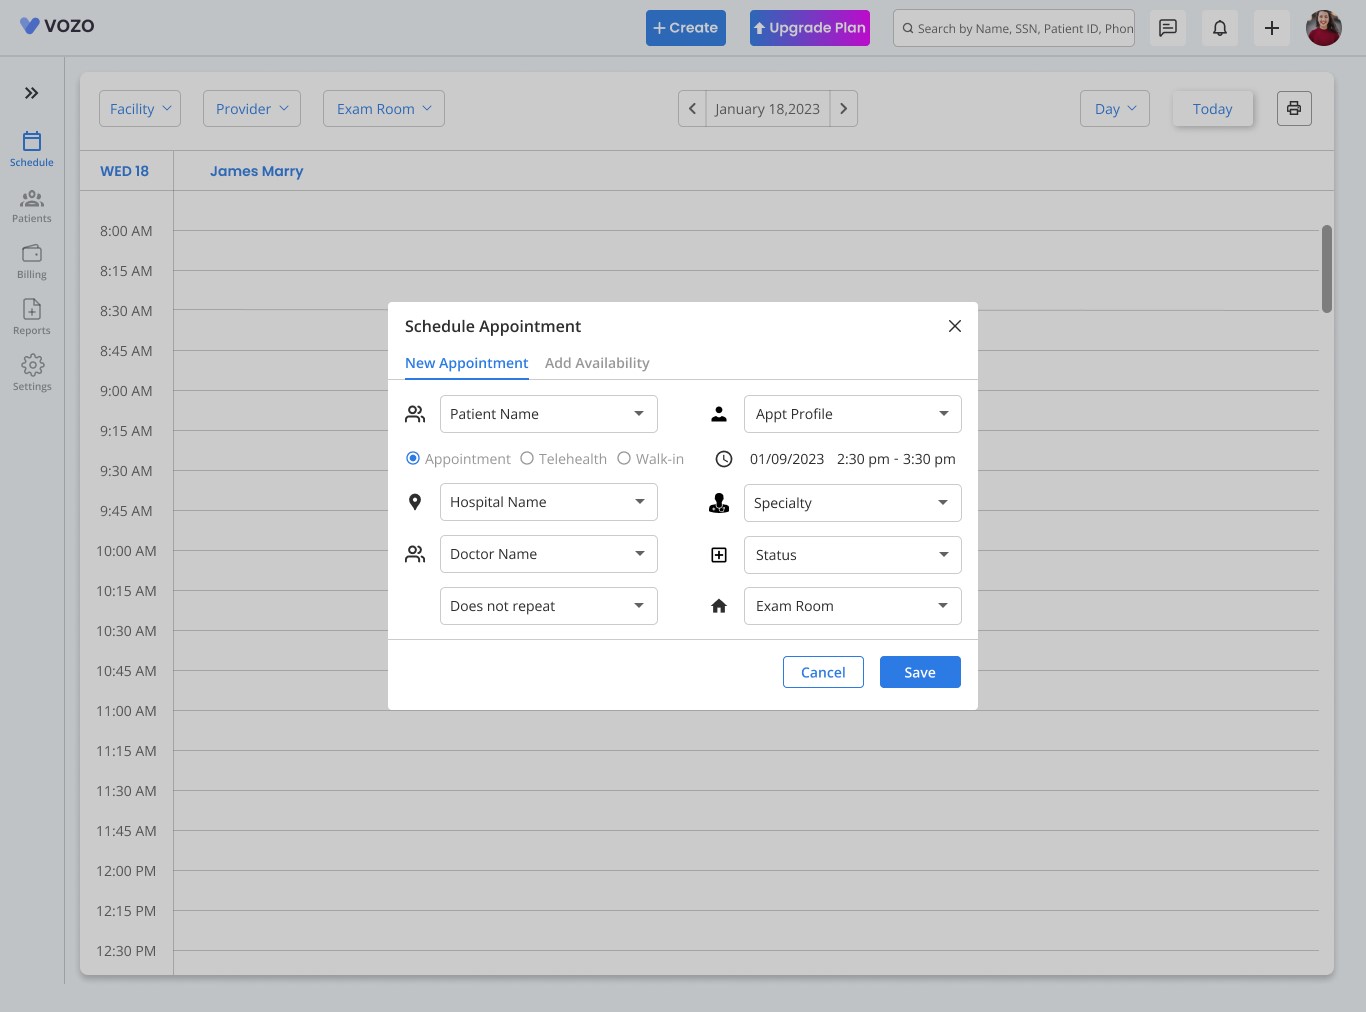
The Schedule Appointment pop-up has been updated to align with the Provider Availability functionality.
The pop-up now includes two tabs:
New Appointment – Contains input fields for scheduling an appointment.
Add Availability – Allows users to set up provider availability.
For first-time users, the Provider Availability toggle in the “Add Availability” tab and in the provider availability page will be disabled.
For existing users, the availability settings in the “Add Availability” tab will match those on the Provider Availability page.
The toggle switch for enabling Provider Availability will be the same in both the “Add Availability” tab and the Provider Availability page. Any changes made in one section will be reflected in the other.
Users can set availability for both “Unavailable” and “Telehealth” directly from the Add Availability tab, following the same steps as in the Provider Availability page.
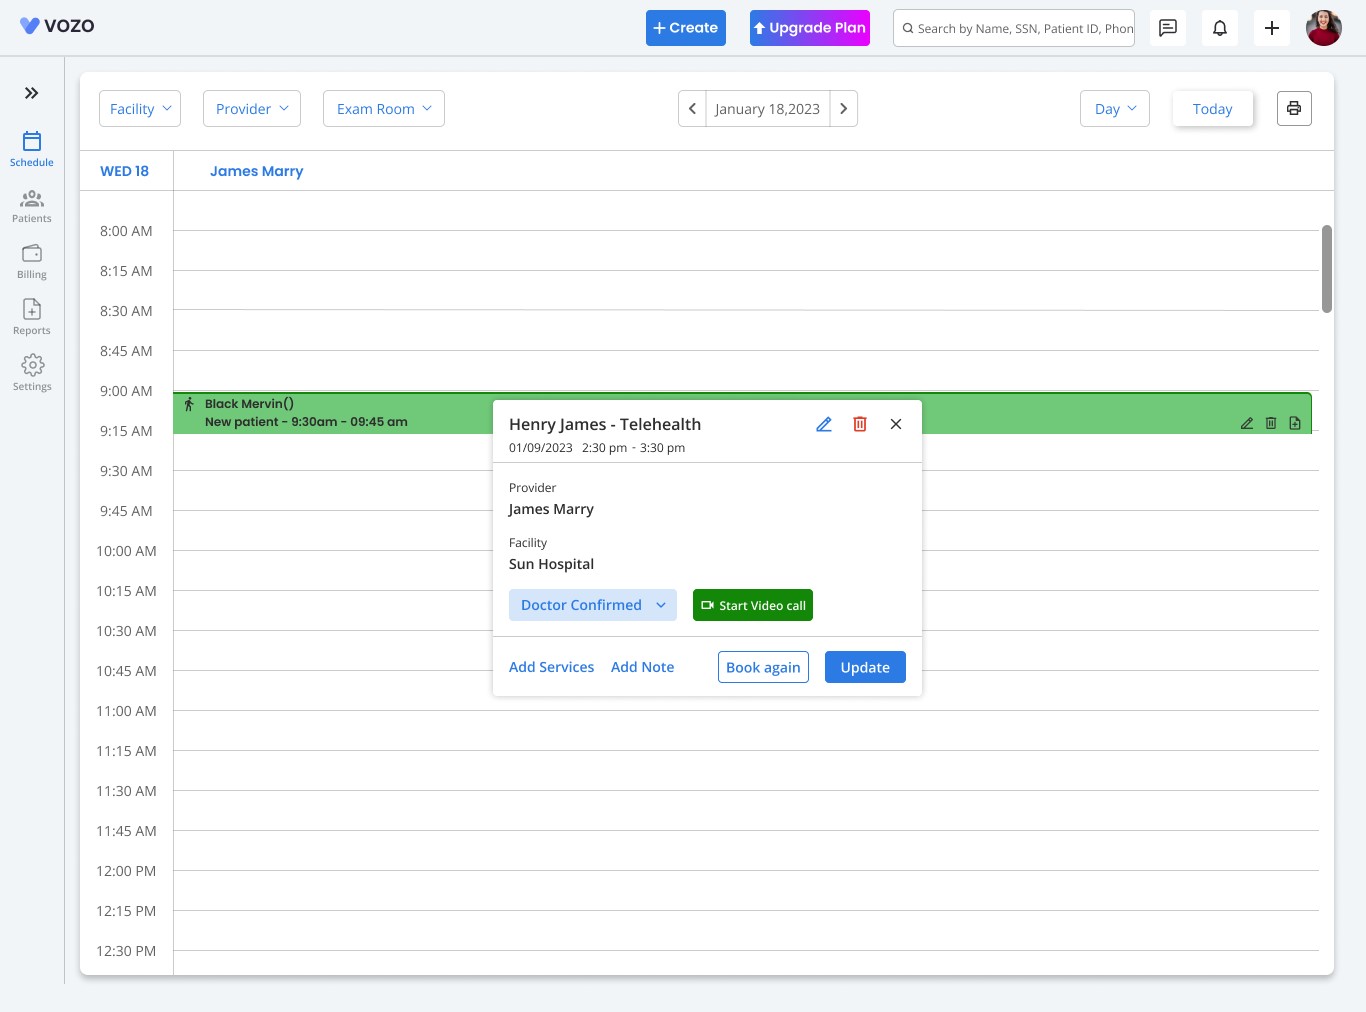
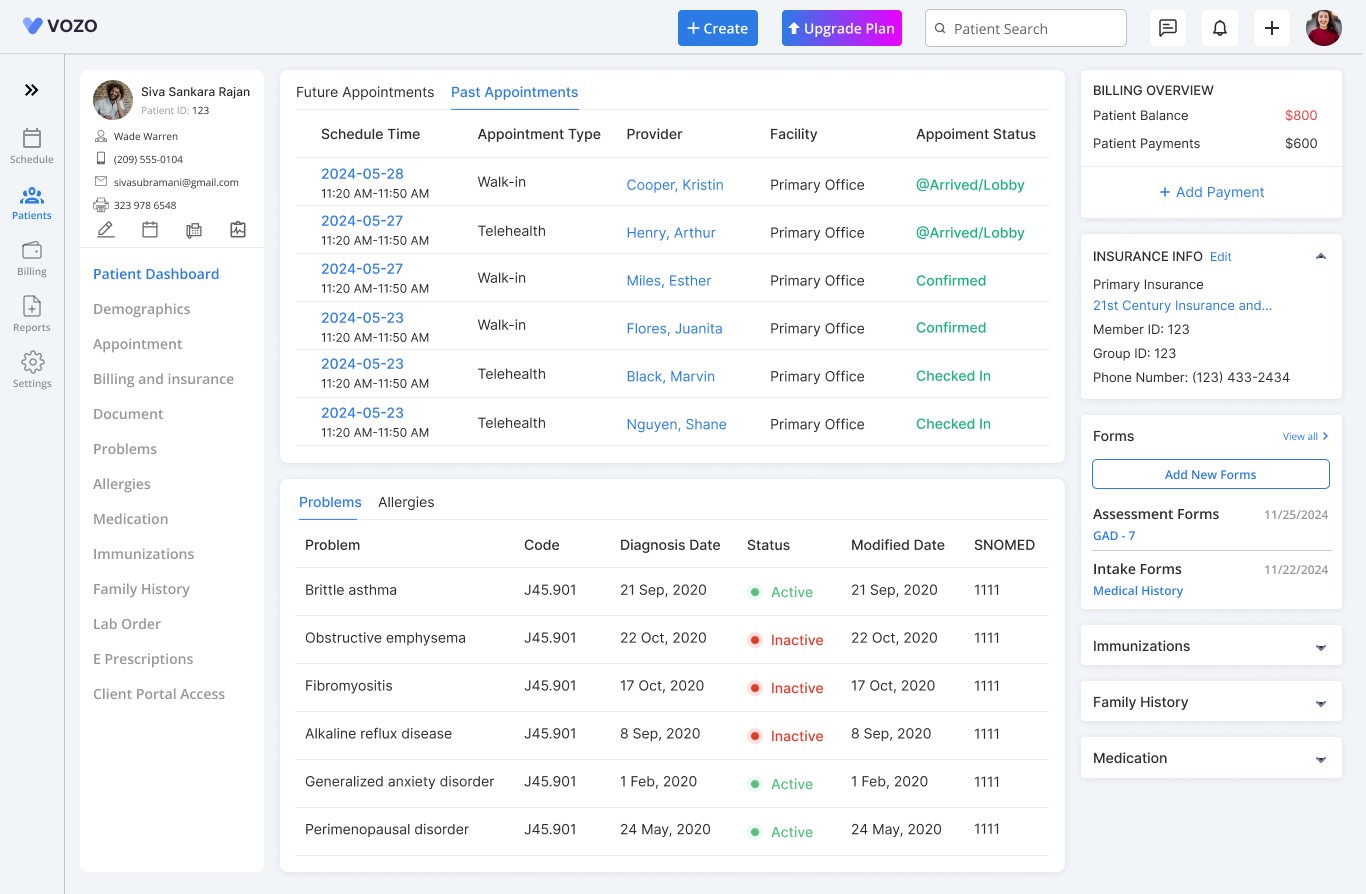
Appointment Details workflow
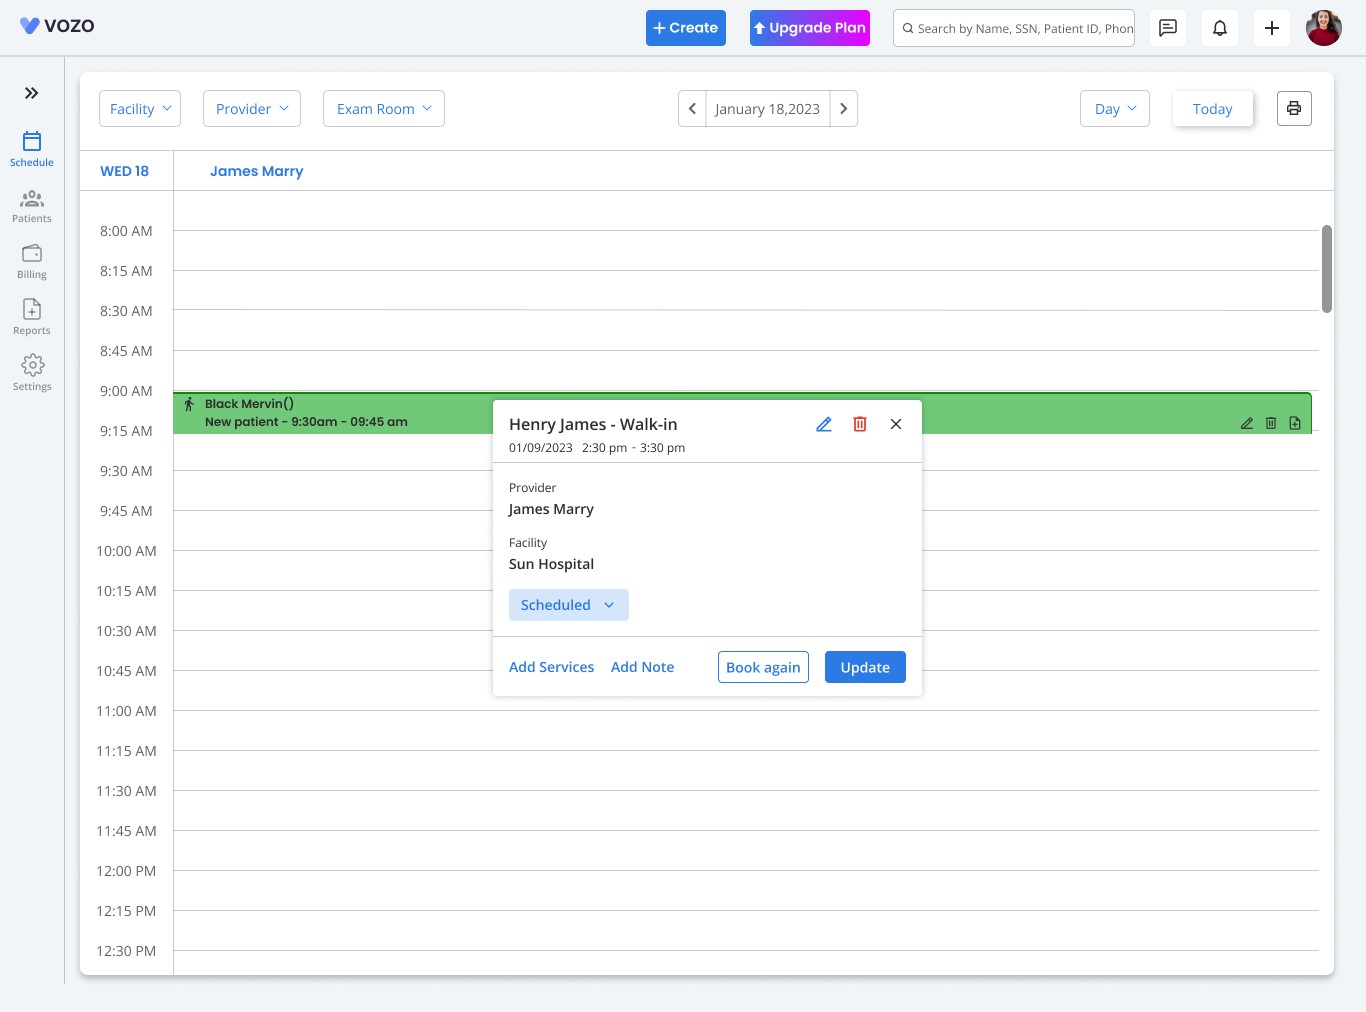
After scheduling an appointment, clicking on the scheduled time slot will now display a summary popup instead of opening the full Appointment Details page. The summary popup includes:
Patient Name
Appointment Type
Date & Time of Appointment
Provider Name
Facility
Status Dropdown (Scheduled, Arrived, No Show, Canceled, Rescheduled)
Edit, Delete, and Cancel Icons
Add Services Button
Add Note Button
Book Again Button
Update Button
For Telehealth Appointments, the popup includes an additional “Start Video Call” button next to the Status dropdown. Providers can update the appointment status using the dropdown and clicking the Update button. For Telehealth appointments, the status options include:
Doctor Confirmed
Meet Completed
Meet Canceled
Meet Requested
Meet Rescheduled
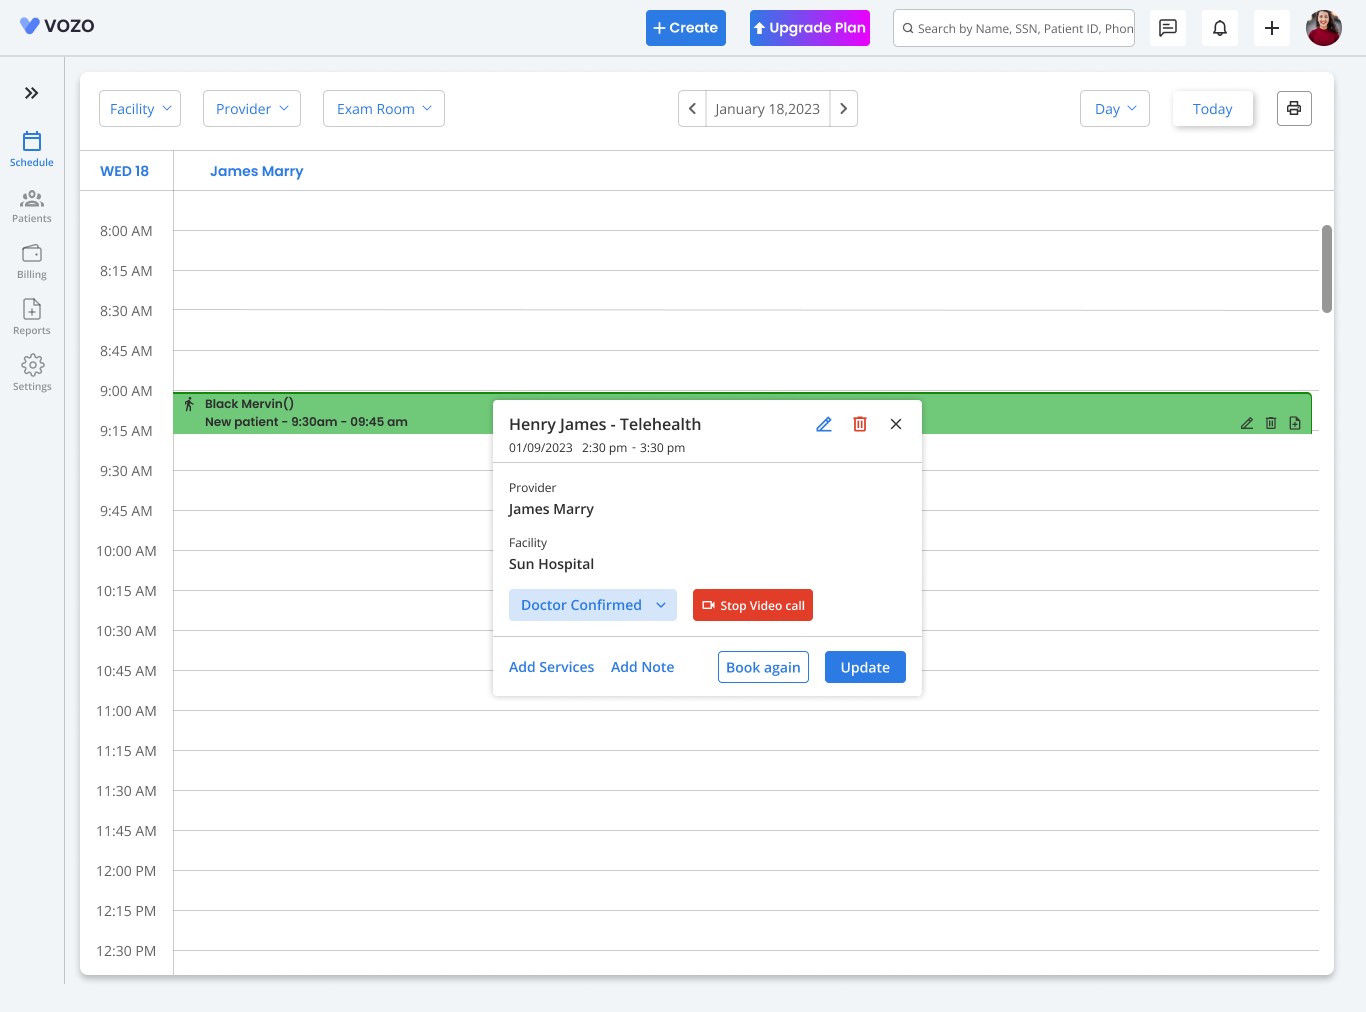
If the appointment status is “Arrived” or “Meet Completed”, clicking the appointment time slot will now open the full-page Appointment Details instead of the popup.
For Telehealth Appointments, the “Start Video Call” button will appear only when the status of the appointment is Doctor Confirmed. Clicking this button allows providers to start the telehealth session.
If the Telehealth appointment status is not “Doctor Confirmed,” the Start Video Call button will not be visible.
After completing a telehealth session and returning to the appointment detail popup, the “Start Video Call” changes to the “Stop Video Call” button.
Clicking this button will end the session and allow the provider to update the status of the appointment to “Meet Completed”.
Clicking on “Add Services” or “Add Notes” will automatically update the appointment status to “Arrived” or “Meet completed” and redirect the provider to either the Clinical Notes or Appointment Details page.
Clicking “Book Again” will schedule the same appointment for the next week at the same time and with the same provider.
To edit an appointment, providers can click the Edit icon, which opens the New Appointment popup in edit mode with the existing details.
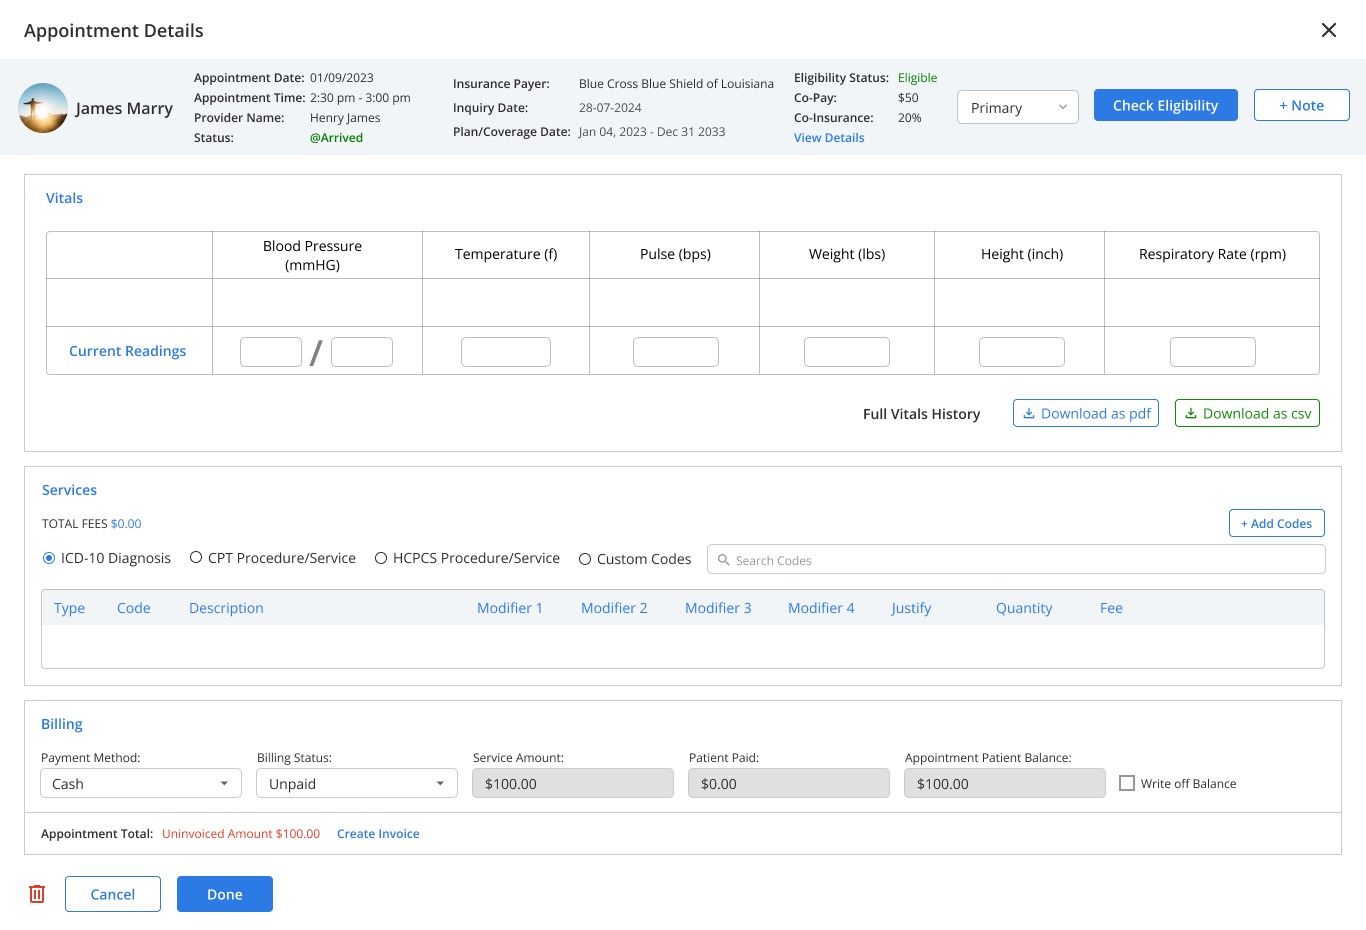
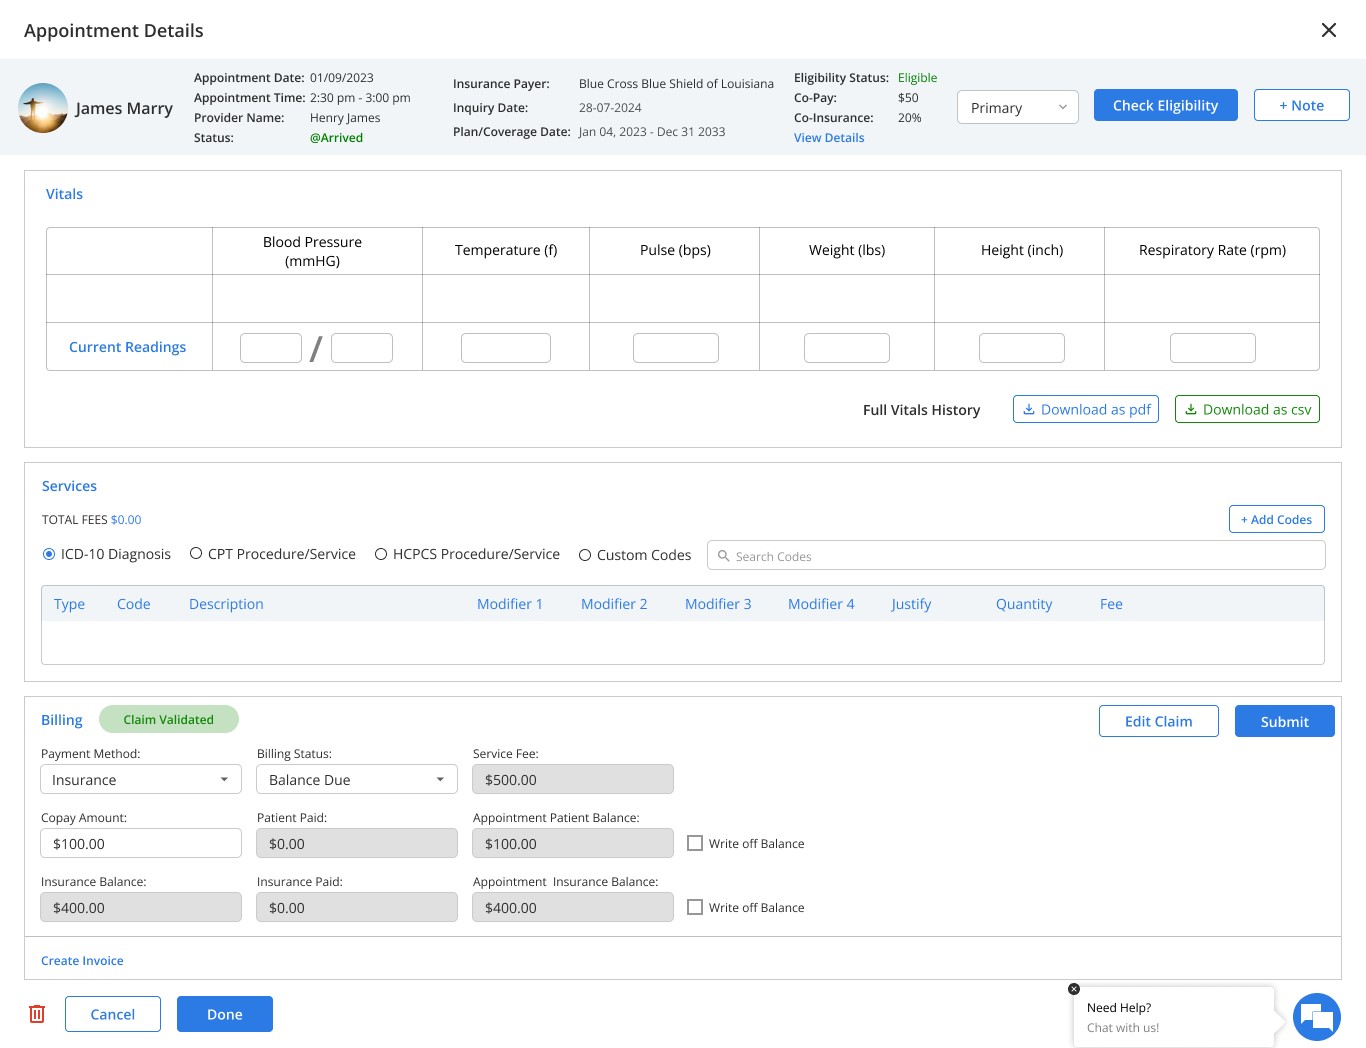
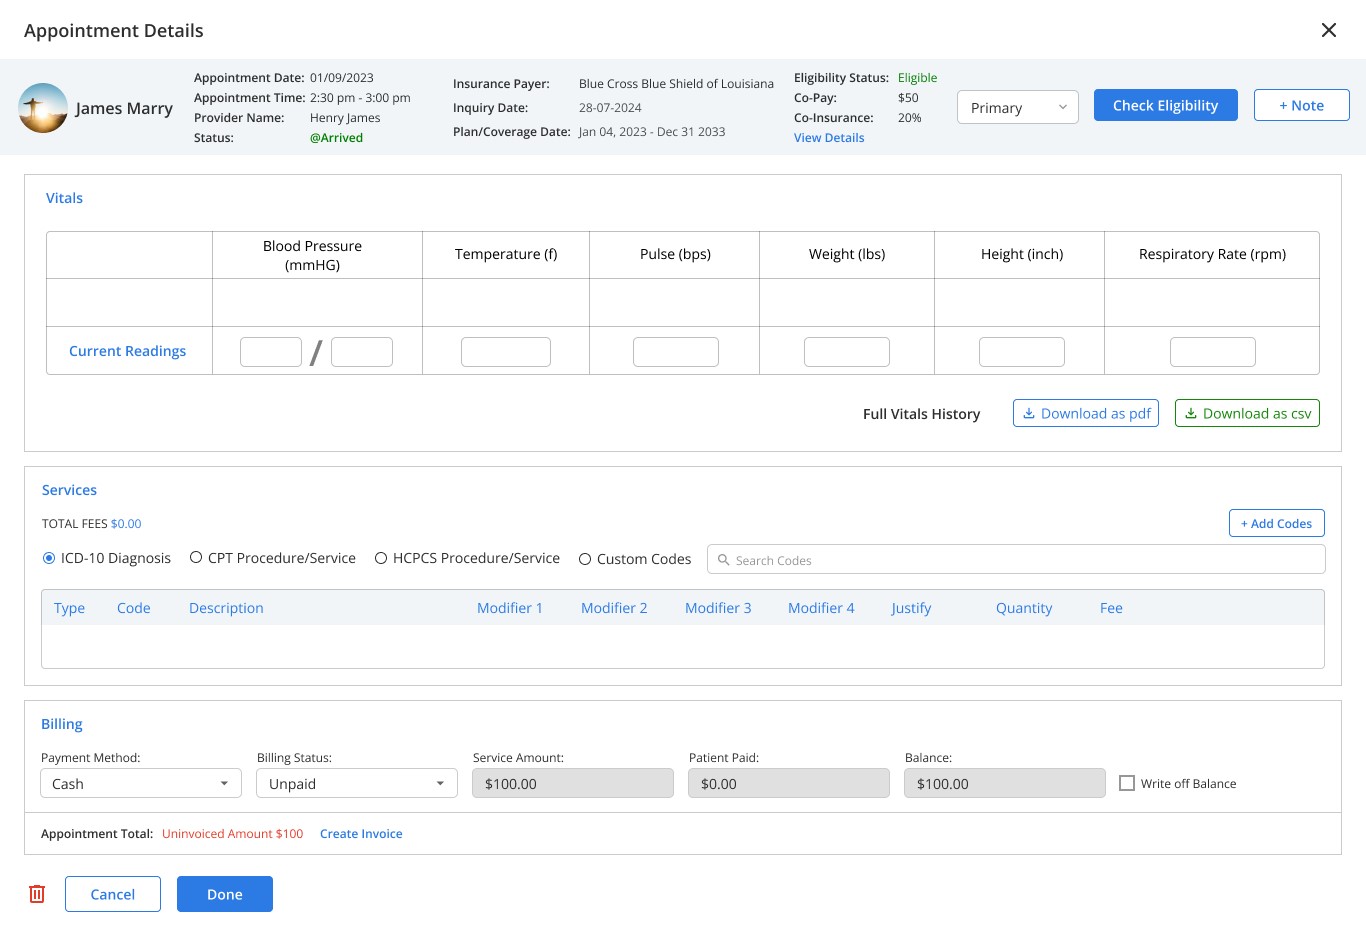
The Appointment Section has been removed from the Appointment Details page. Instead, key details are now displayed at the top, next to the patient’s name.
The remaining sections on the Appointment Details page have been rearranged in the order of vitals, services, and billing of the appointment workflow.
Appointment Detail - Billing section
As for the changes in the billing section of the appointment detail, it is made based on the changes and the insurance workflow as well as to decrease the repetition process.
The input fields in the Billing Section now dynamically adjust based on the selected Payment Method (Cash or Insurance). For Cash Payments, the following details will be displayed:
Payment Method
Billing Status
Service Amount
Patient Paid
Appointment Patient Balance
Write-off Option
For Insurance Payments, the following additional fields will be displayed:
Payment Method
Billing Status
Service Amount
Copay Amount
Patient Paid
Appointment Patient Balance
Write-off Option (Cash)
Insurance Amount
Insurance Paid
Appointment Insurance Balance
Write off option (Insurance)
For cash payment, the workflow remains the same as creating an invoice for services provided and proceeding with the payments using either Cash, Cheque, Credit Card or Stripe.
In addition to this, we have also implemented a write-off concept for the patient payment. If the user prefers, they can write off the patient balance for any specific appointments.
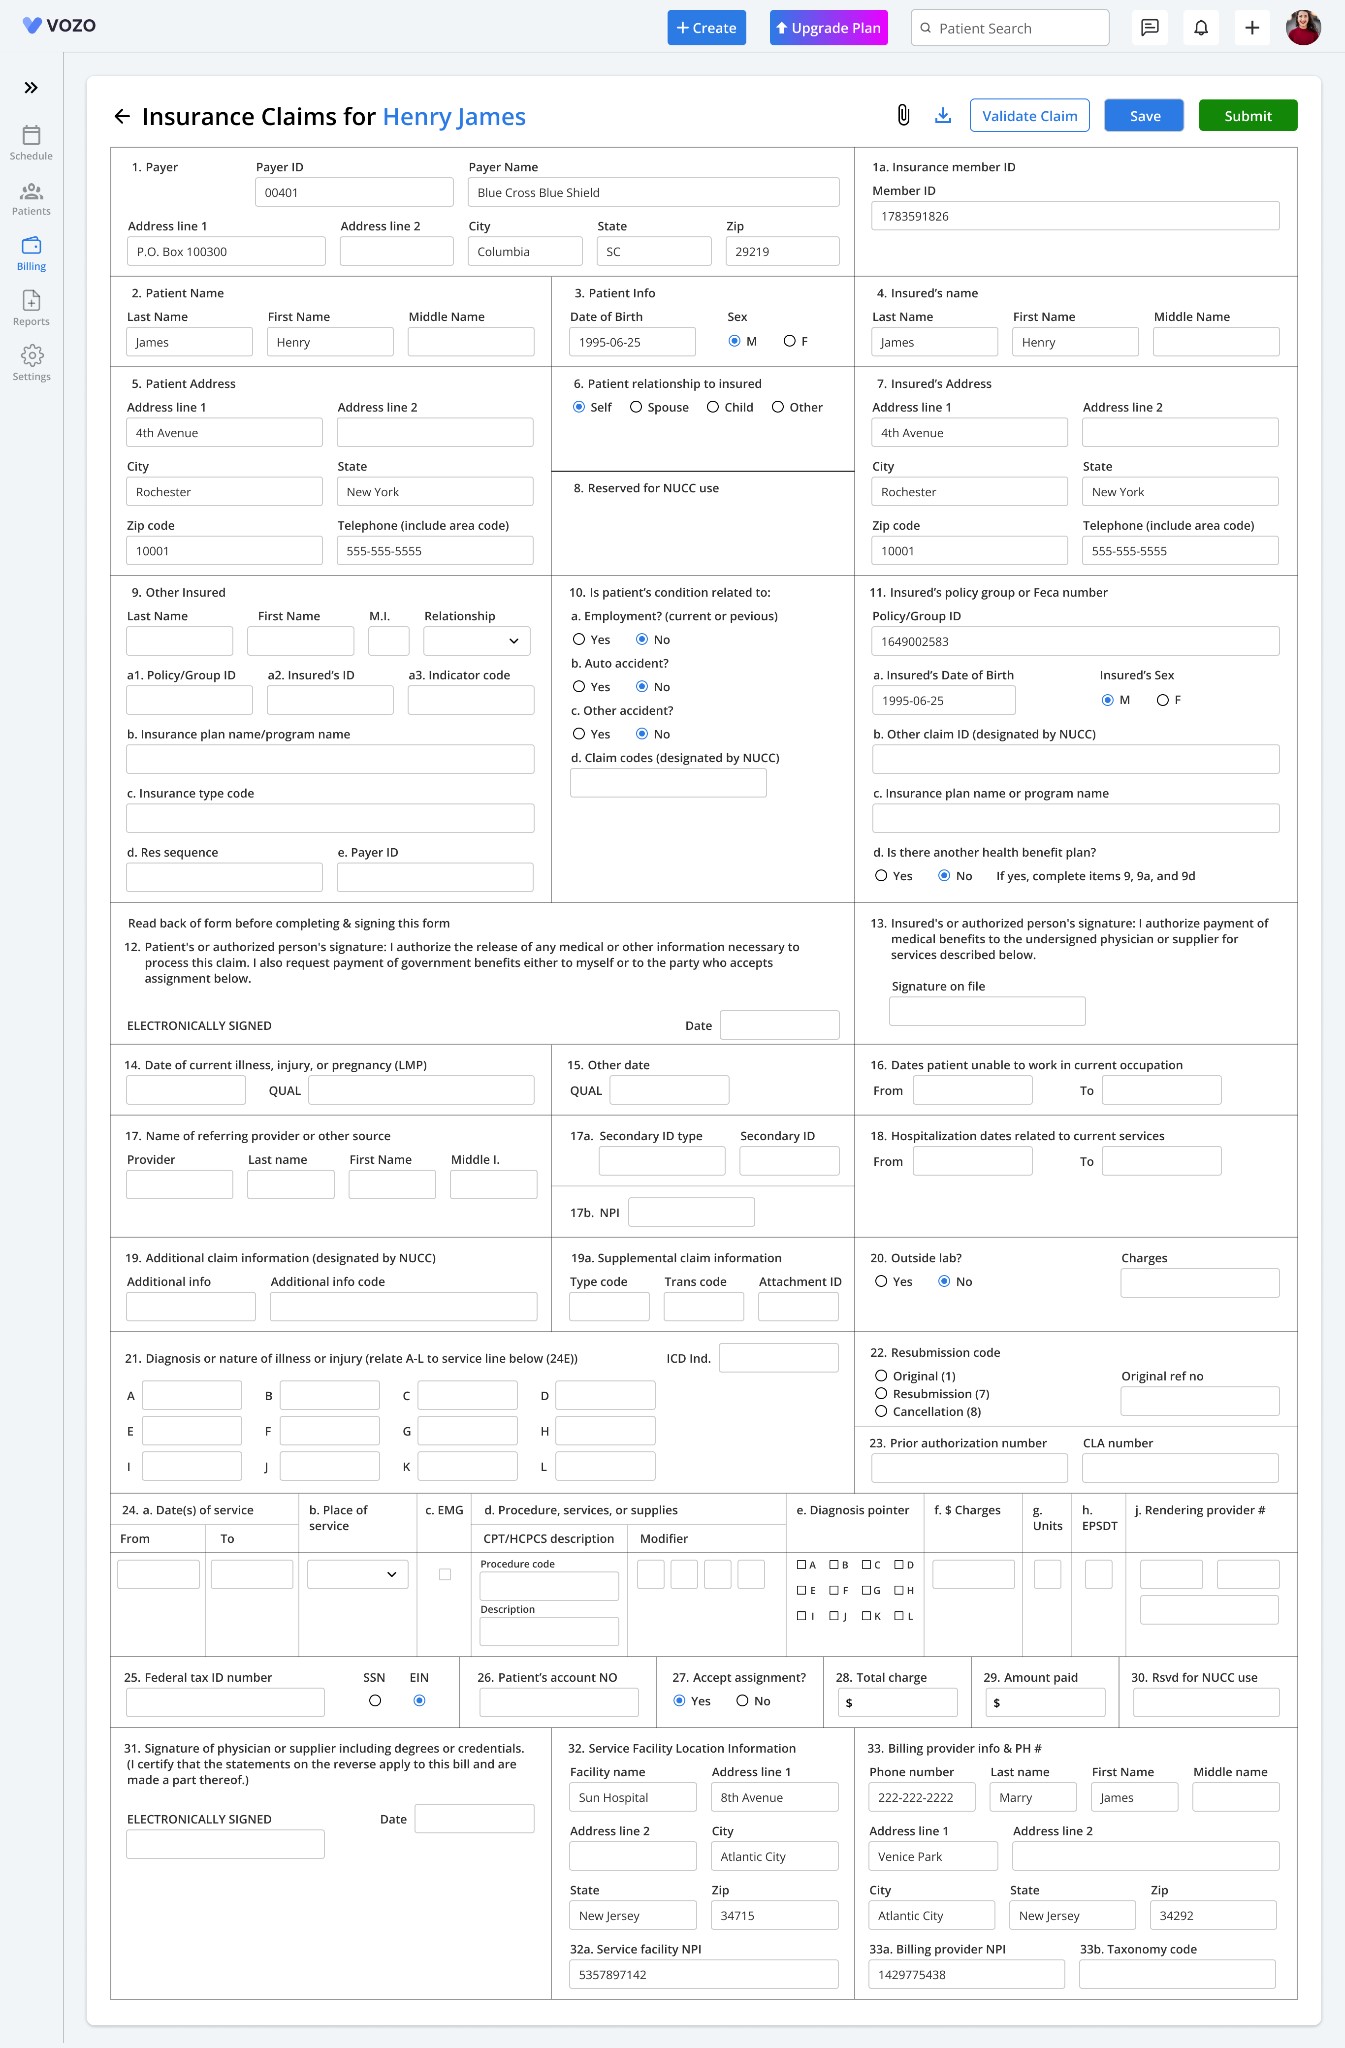
The new update introduces a claim generation workflow directly within the Appointment Details page for insurance-based payments.
Steps to Generate and Submit Claims:
Click on “Generate Claim” in the Billing section.
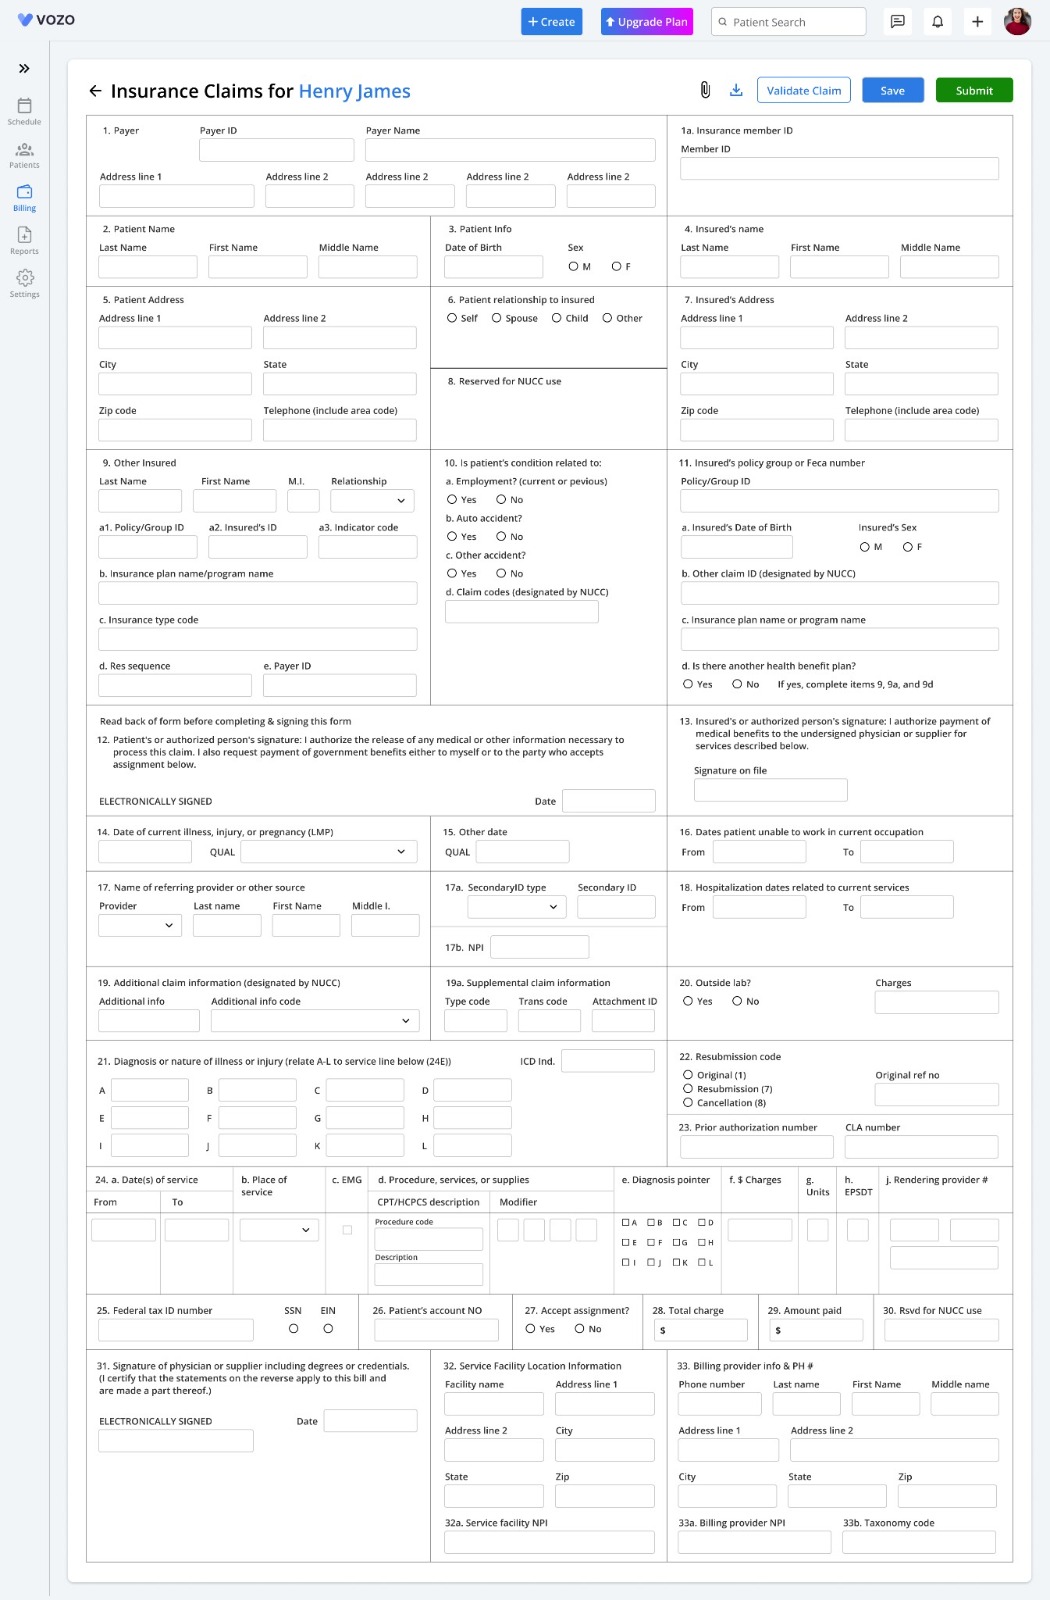
The claim form opens with auto-fetched appointments and patient details.
Edit or add necessary claim details directly in the form without navigating away.
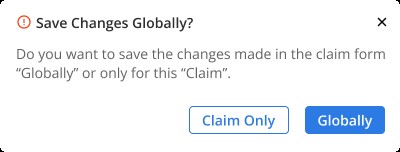
Save or submit the claim. You will be prompted to save changes globally or only for this claim.
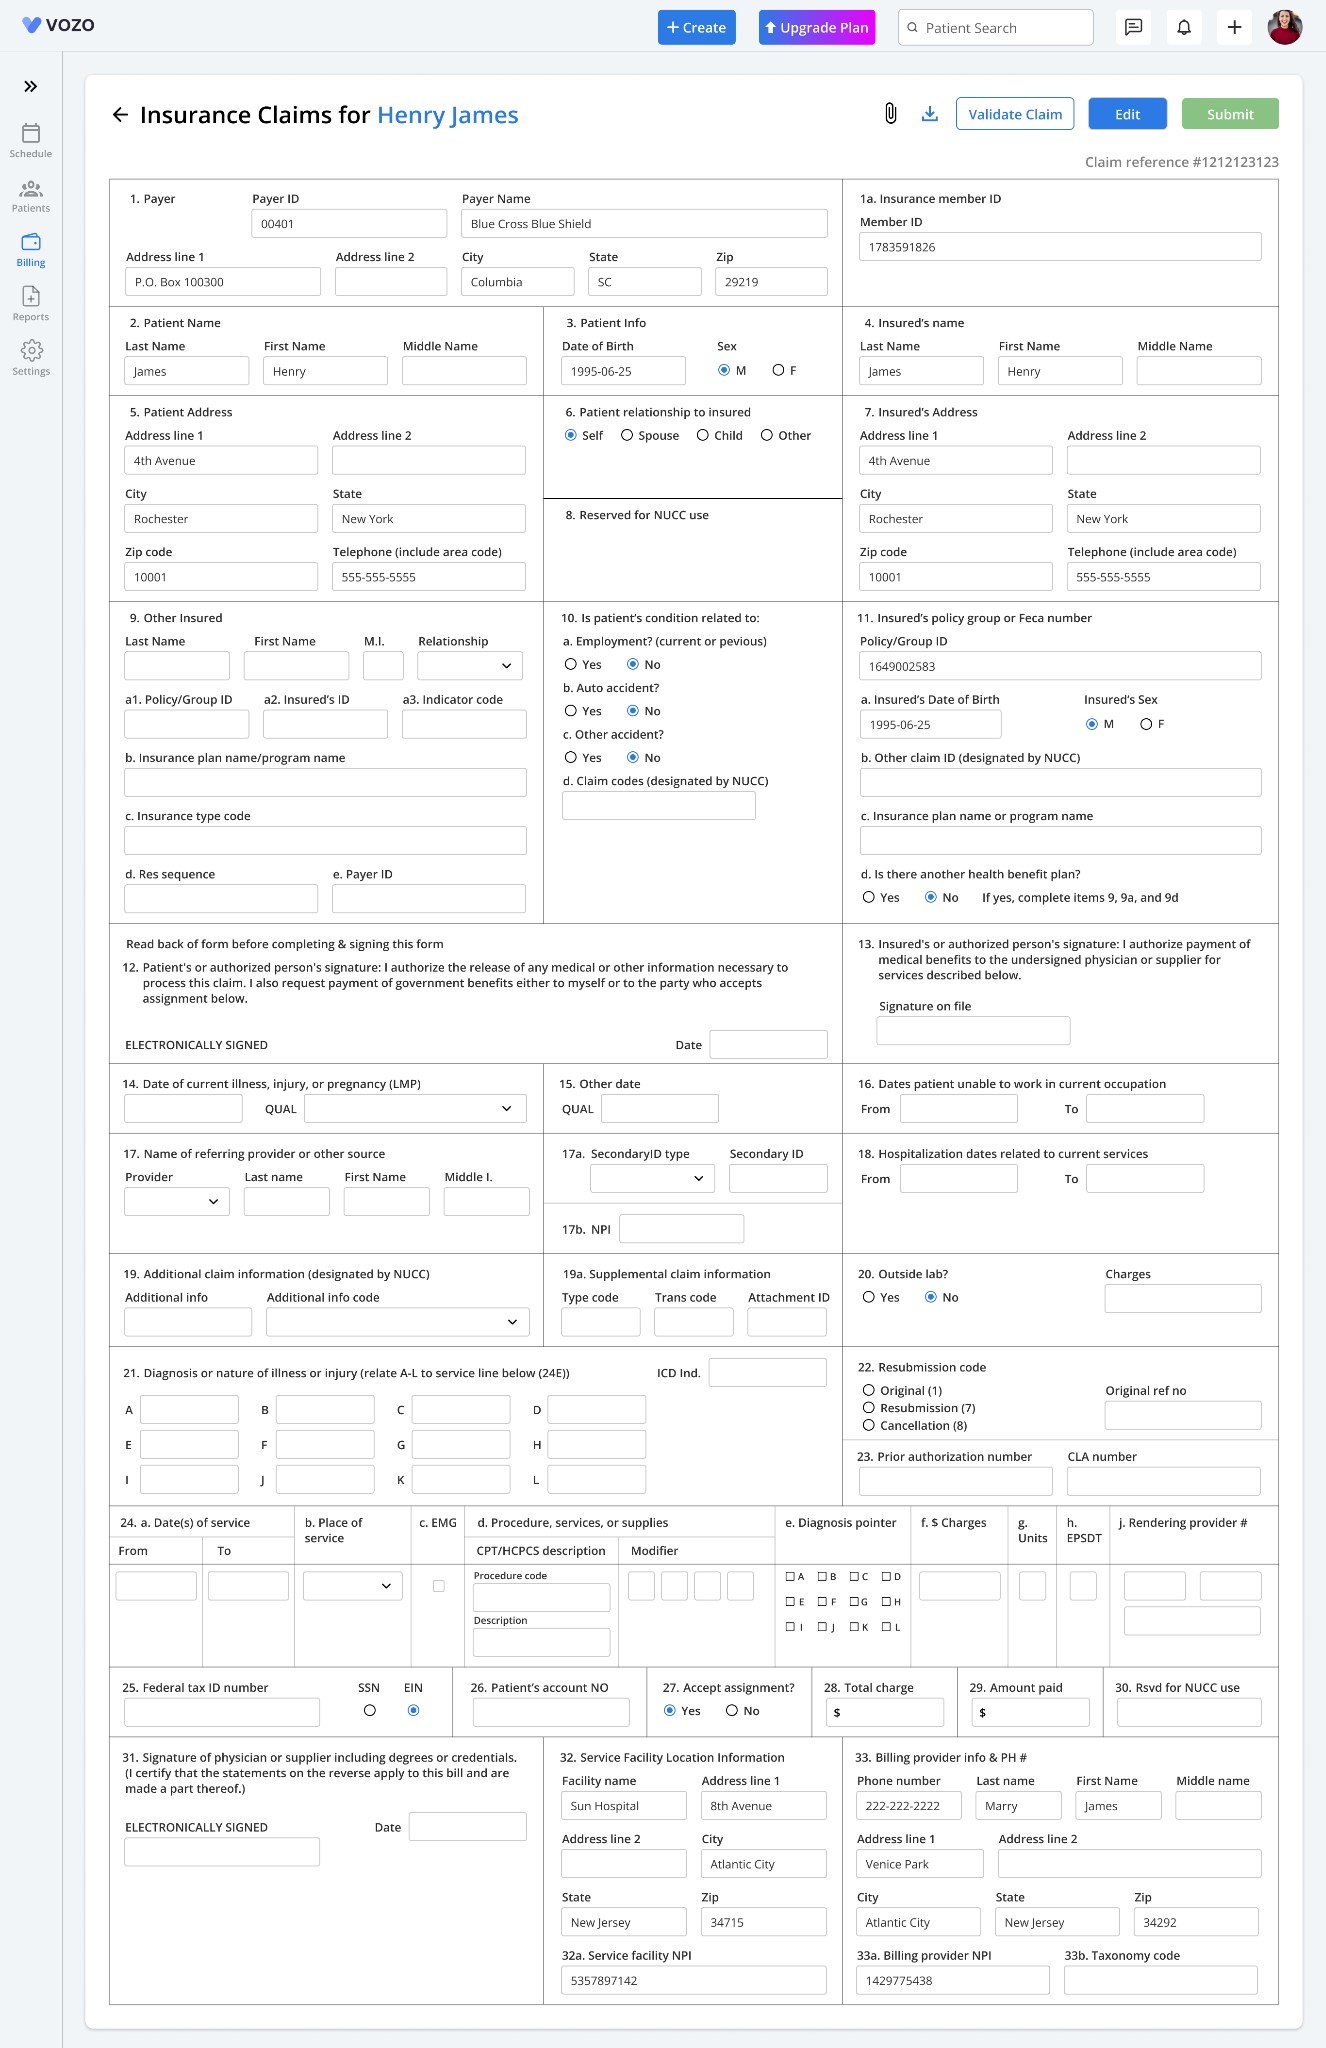
Once the claim is generated, a “Claim Generated” tag appears.
The “Generate Claim” button changes to “Edit Claim” and “Submit” options.
Clicking “Submit” sends the claim to the clearinghouse after validation.
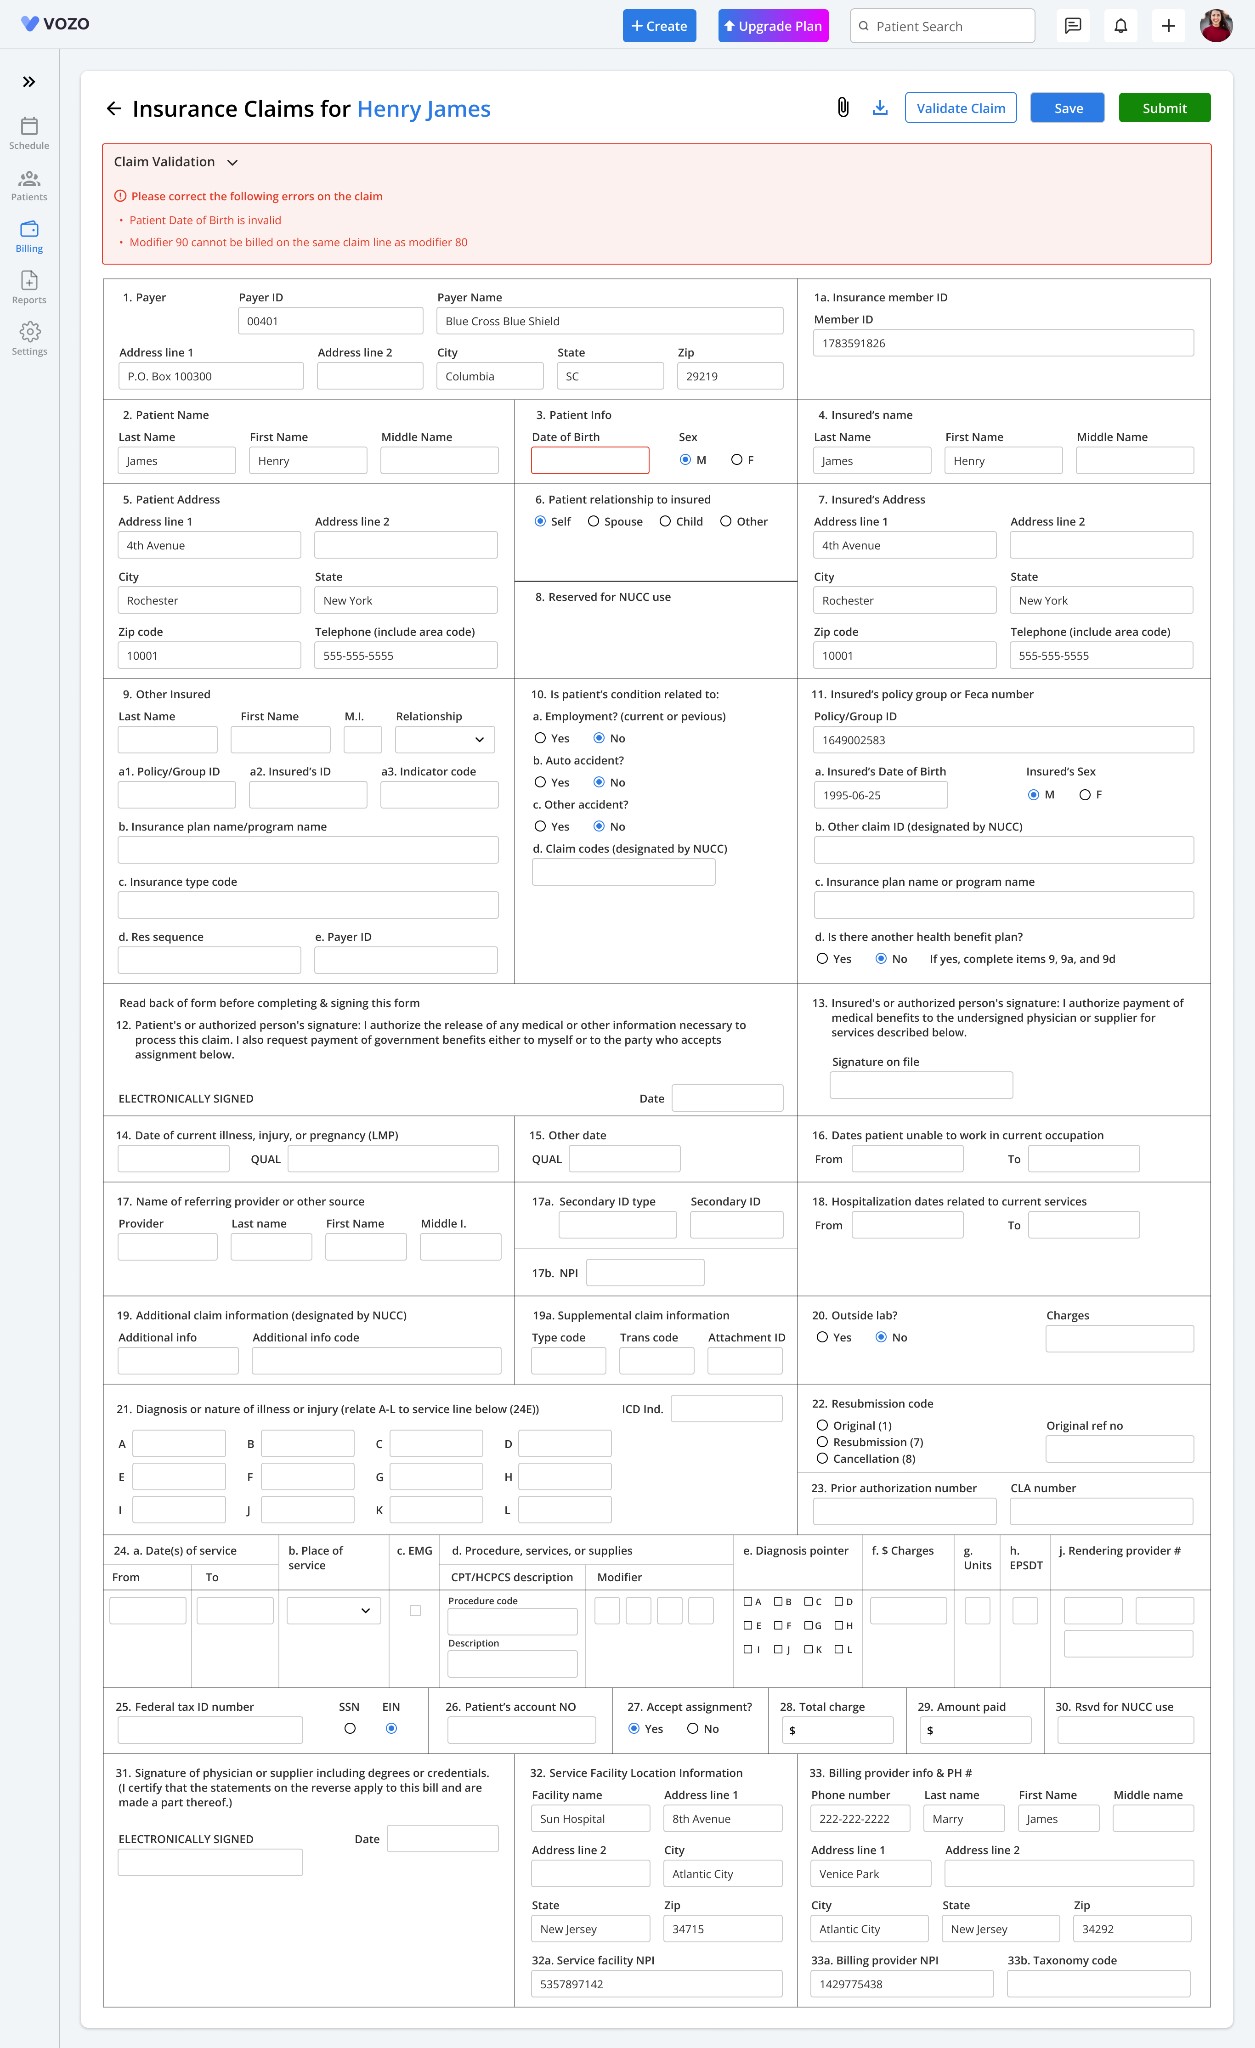
Before submission, users can validate the claim using the “Validate Claim” button.
The system will check for missing or incorrect details and highlight any errors.
Once validated, the claim status changes to “Claim Validated”.
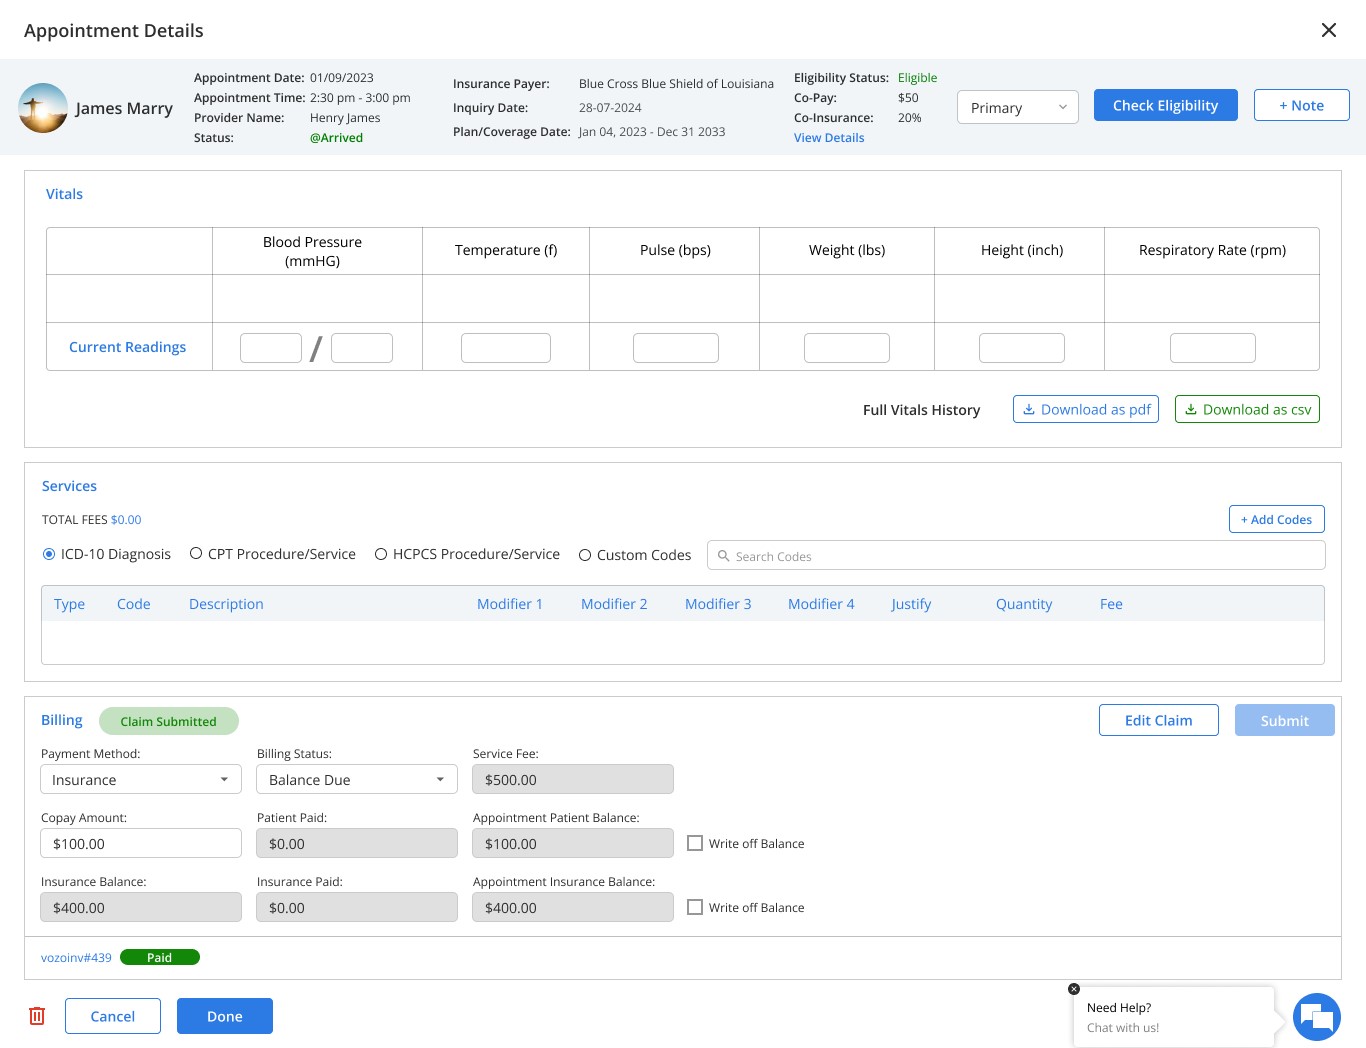
After submission, the claim status updates to “Claim Submitted”, and the Submit button is disabled.
Once the insurance payer processes the claim, either an EOB or ERA is received.
The insurance-paid amount and balance due are updated in the Billing Section.
If there is an outstanding insurance balance, users can:
Write off the remaining balance using the write-off checkbox.
Transfer the balance to the patient’s responsibility, generate an invoice, and collect payment.
Billing Module Update
Vozo EHR now features significant Billing Module enhancements to improve insurance claims processing, payment management, and patient statement handling.
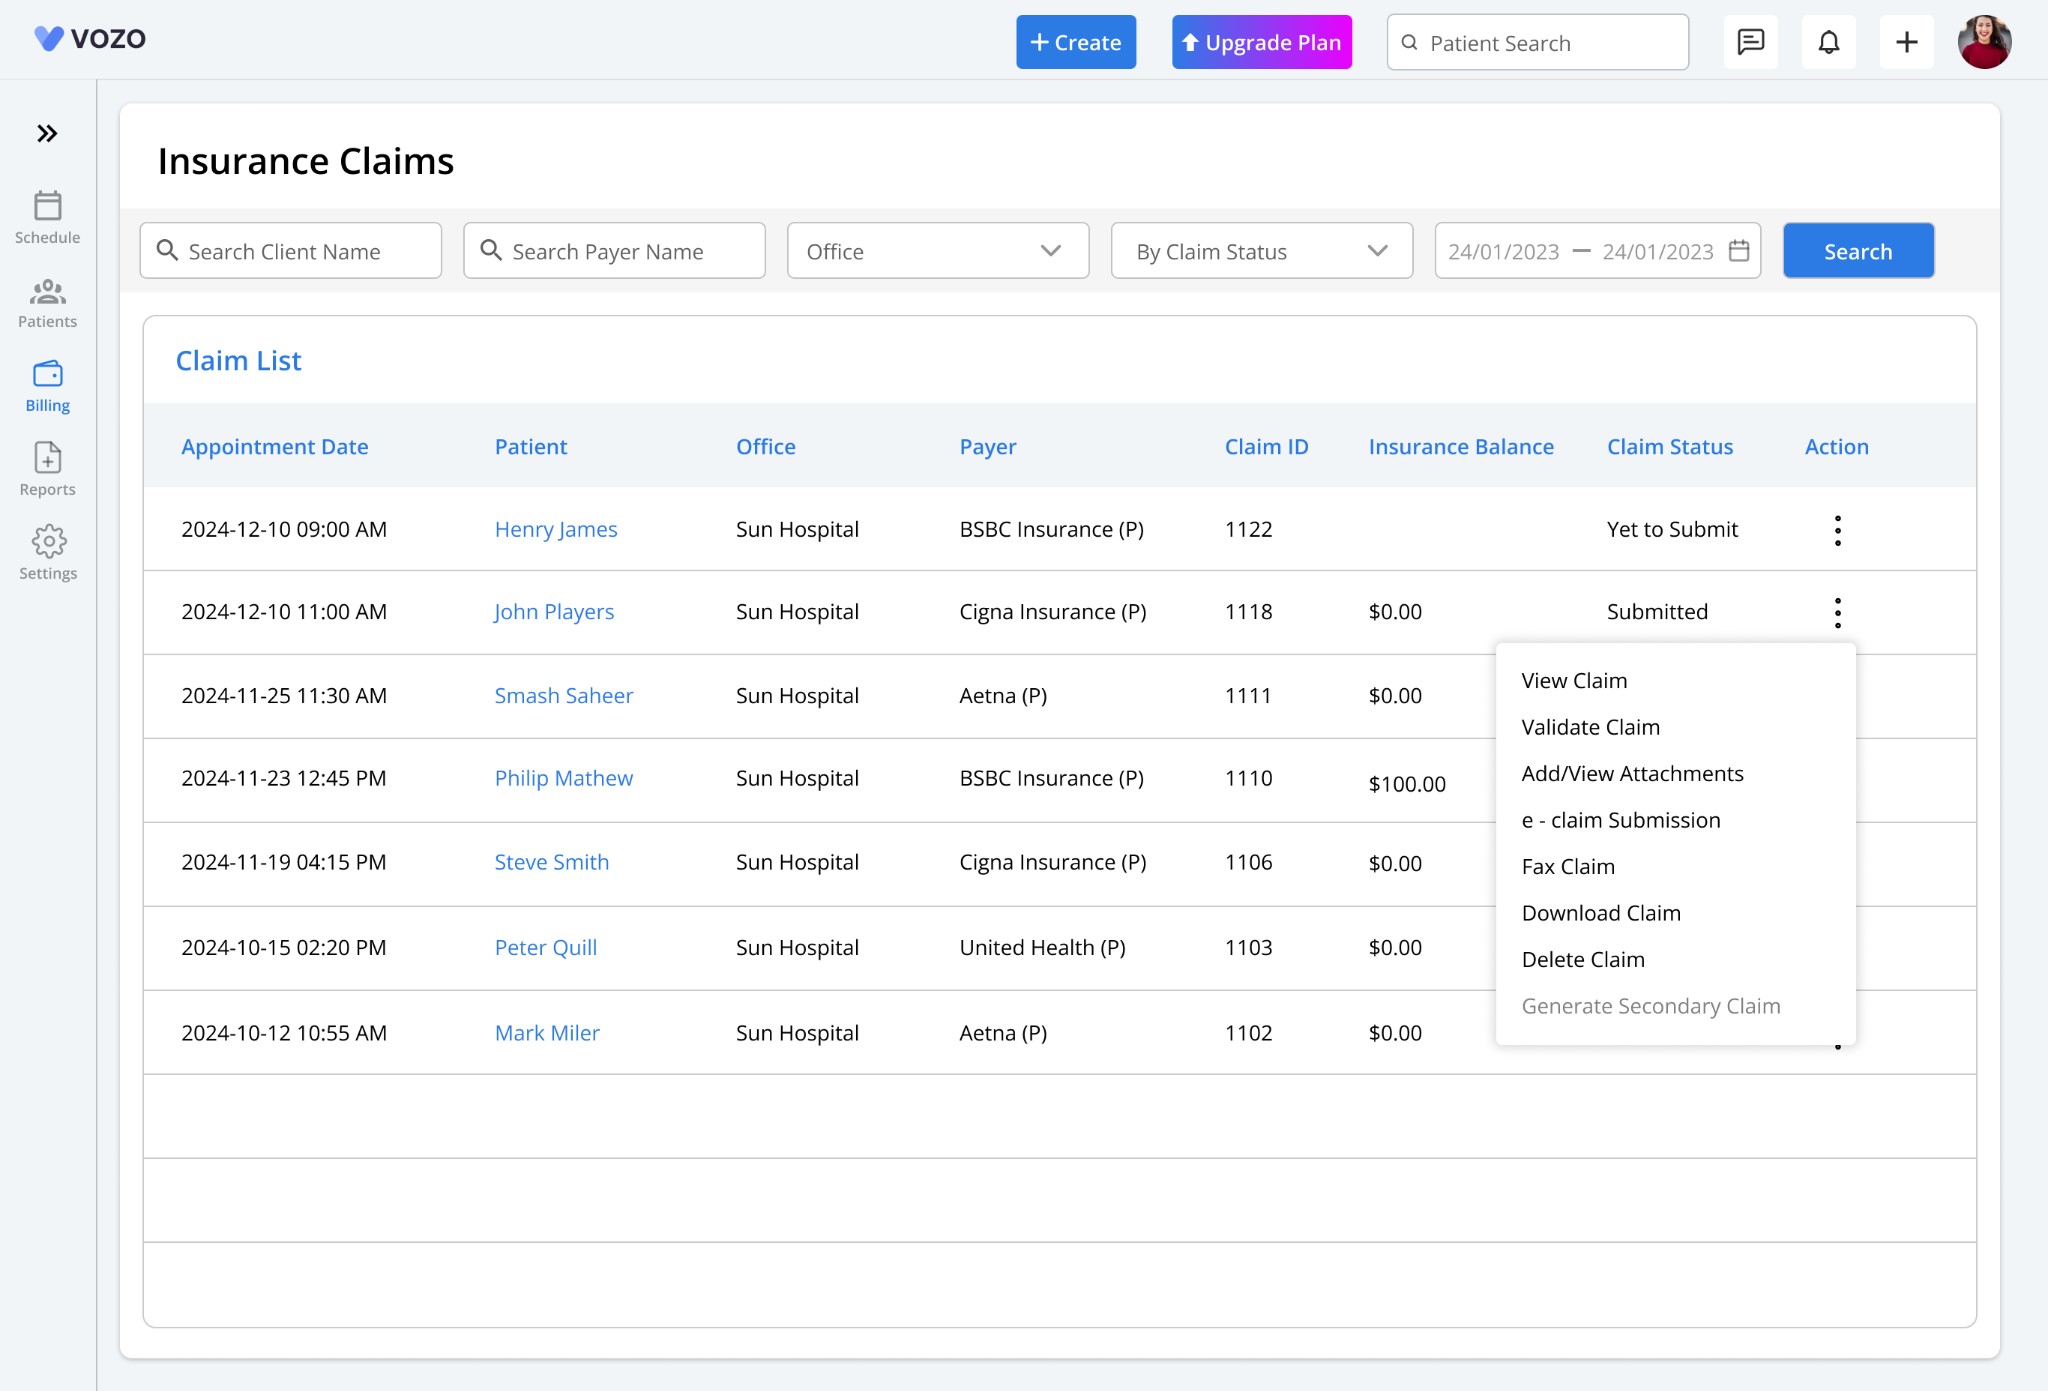
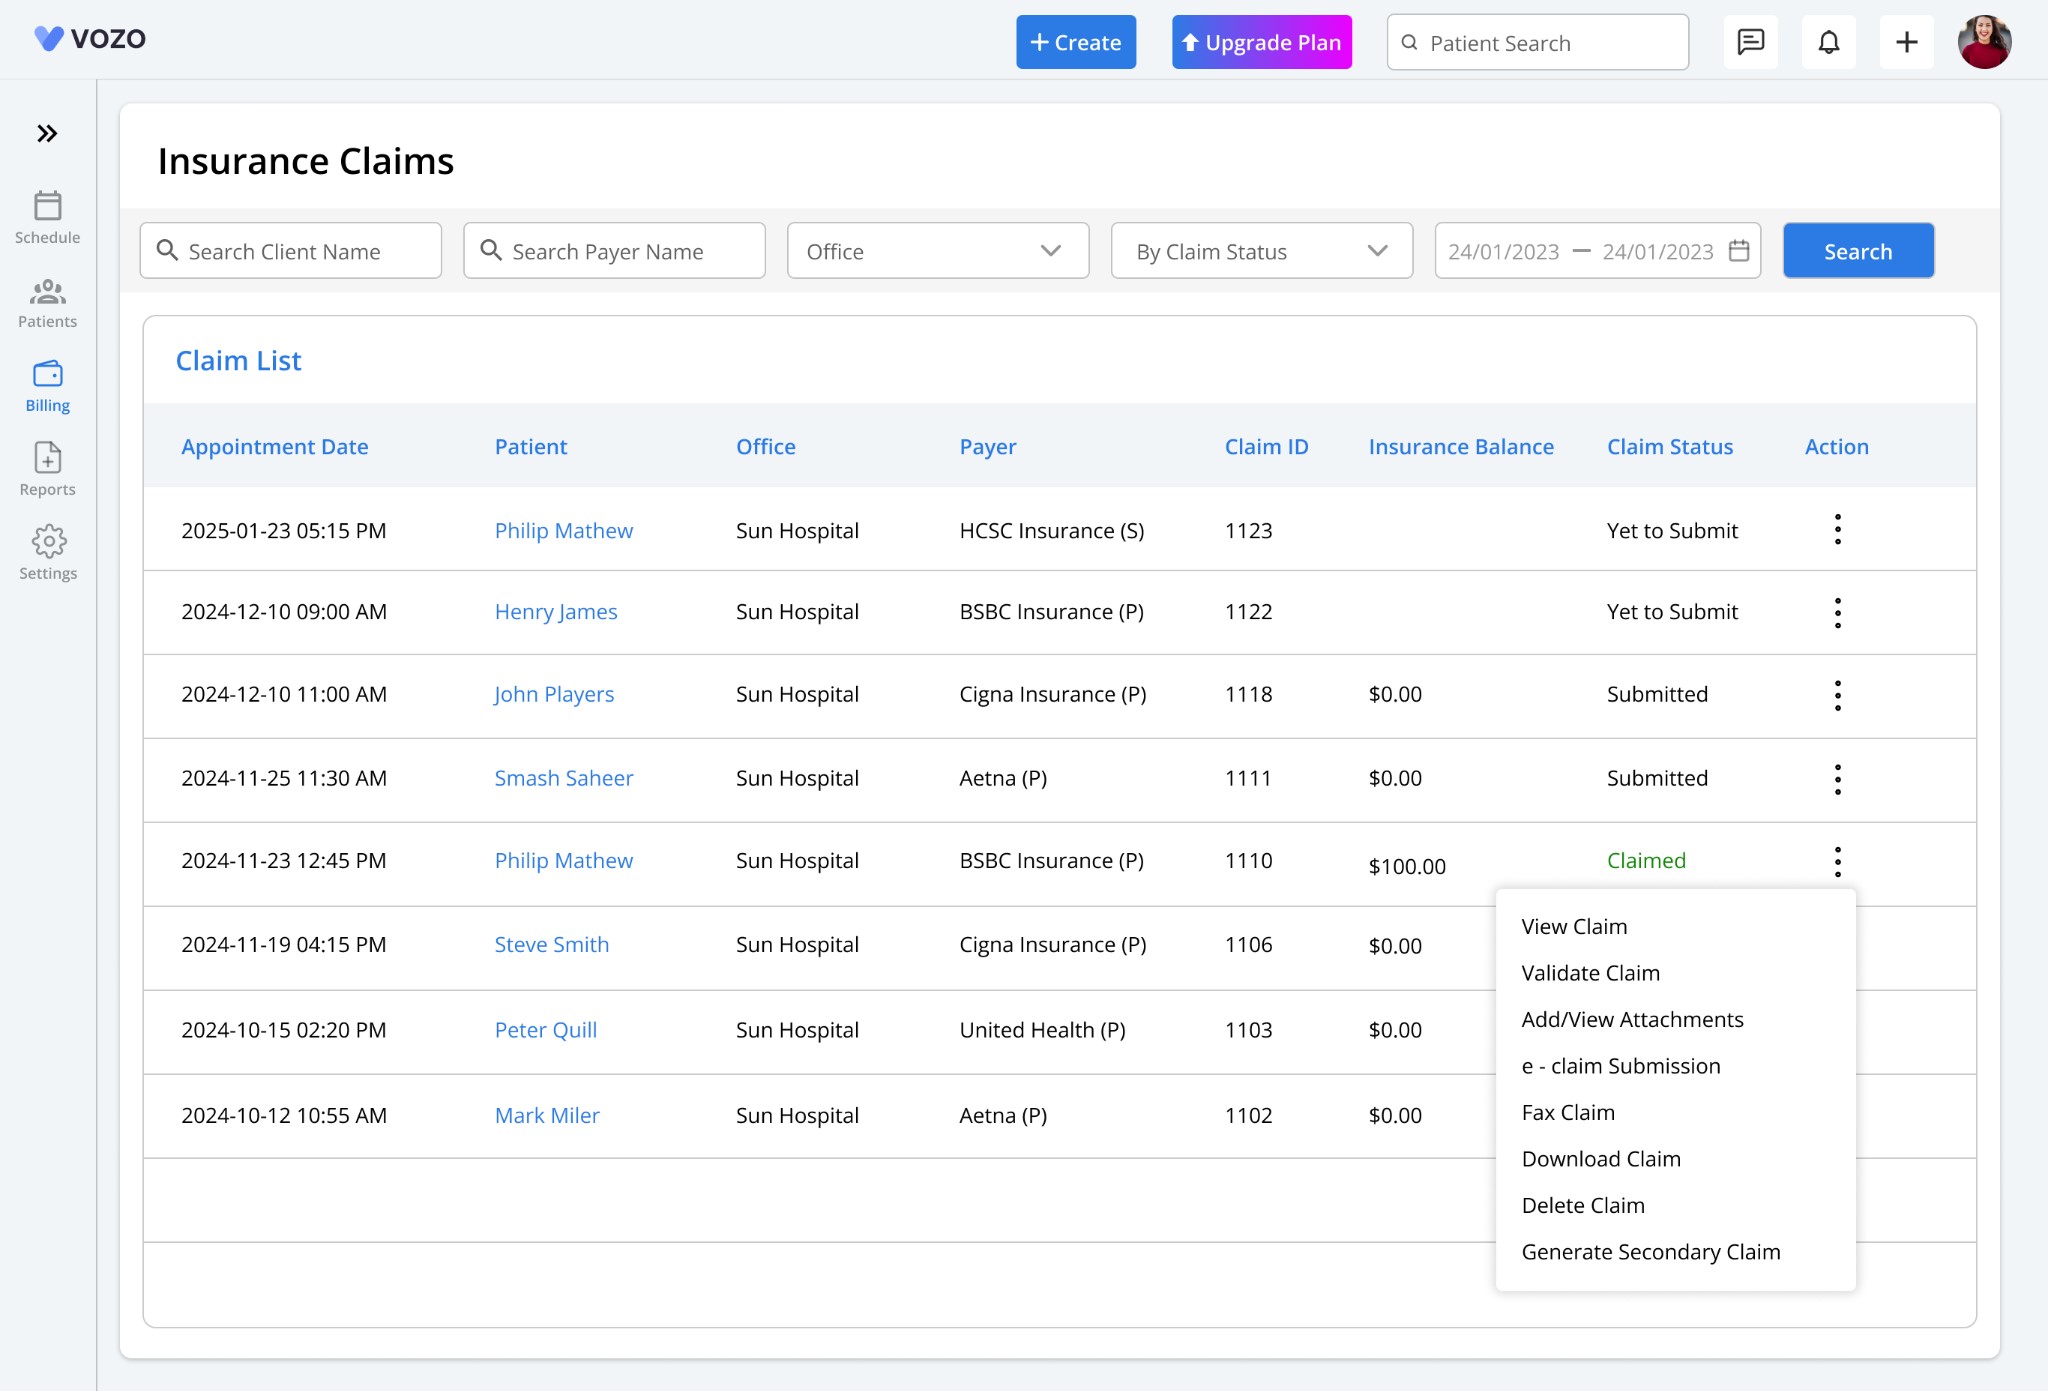
Insurance Claim Workflow
Appointments with the insurance payment method will be listed under the Insurance Claim section.
To generate a claim, click the Dotted Action button on an appointment marked as “Yet to Submit.”
Select Generate Claim from the popup.
View Claim
Validate Claim
Add/View Attachments
E-Claim Submission
Fax Claim
Download Claim
Delete Claim
Generate a Secondary Claim (Based on certain conditions)
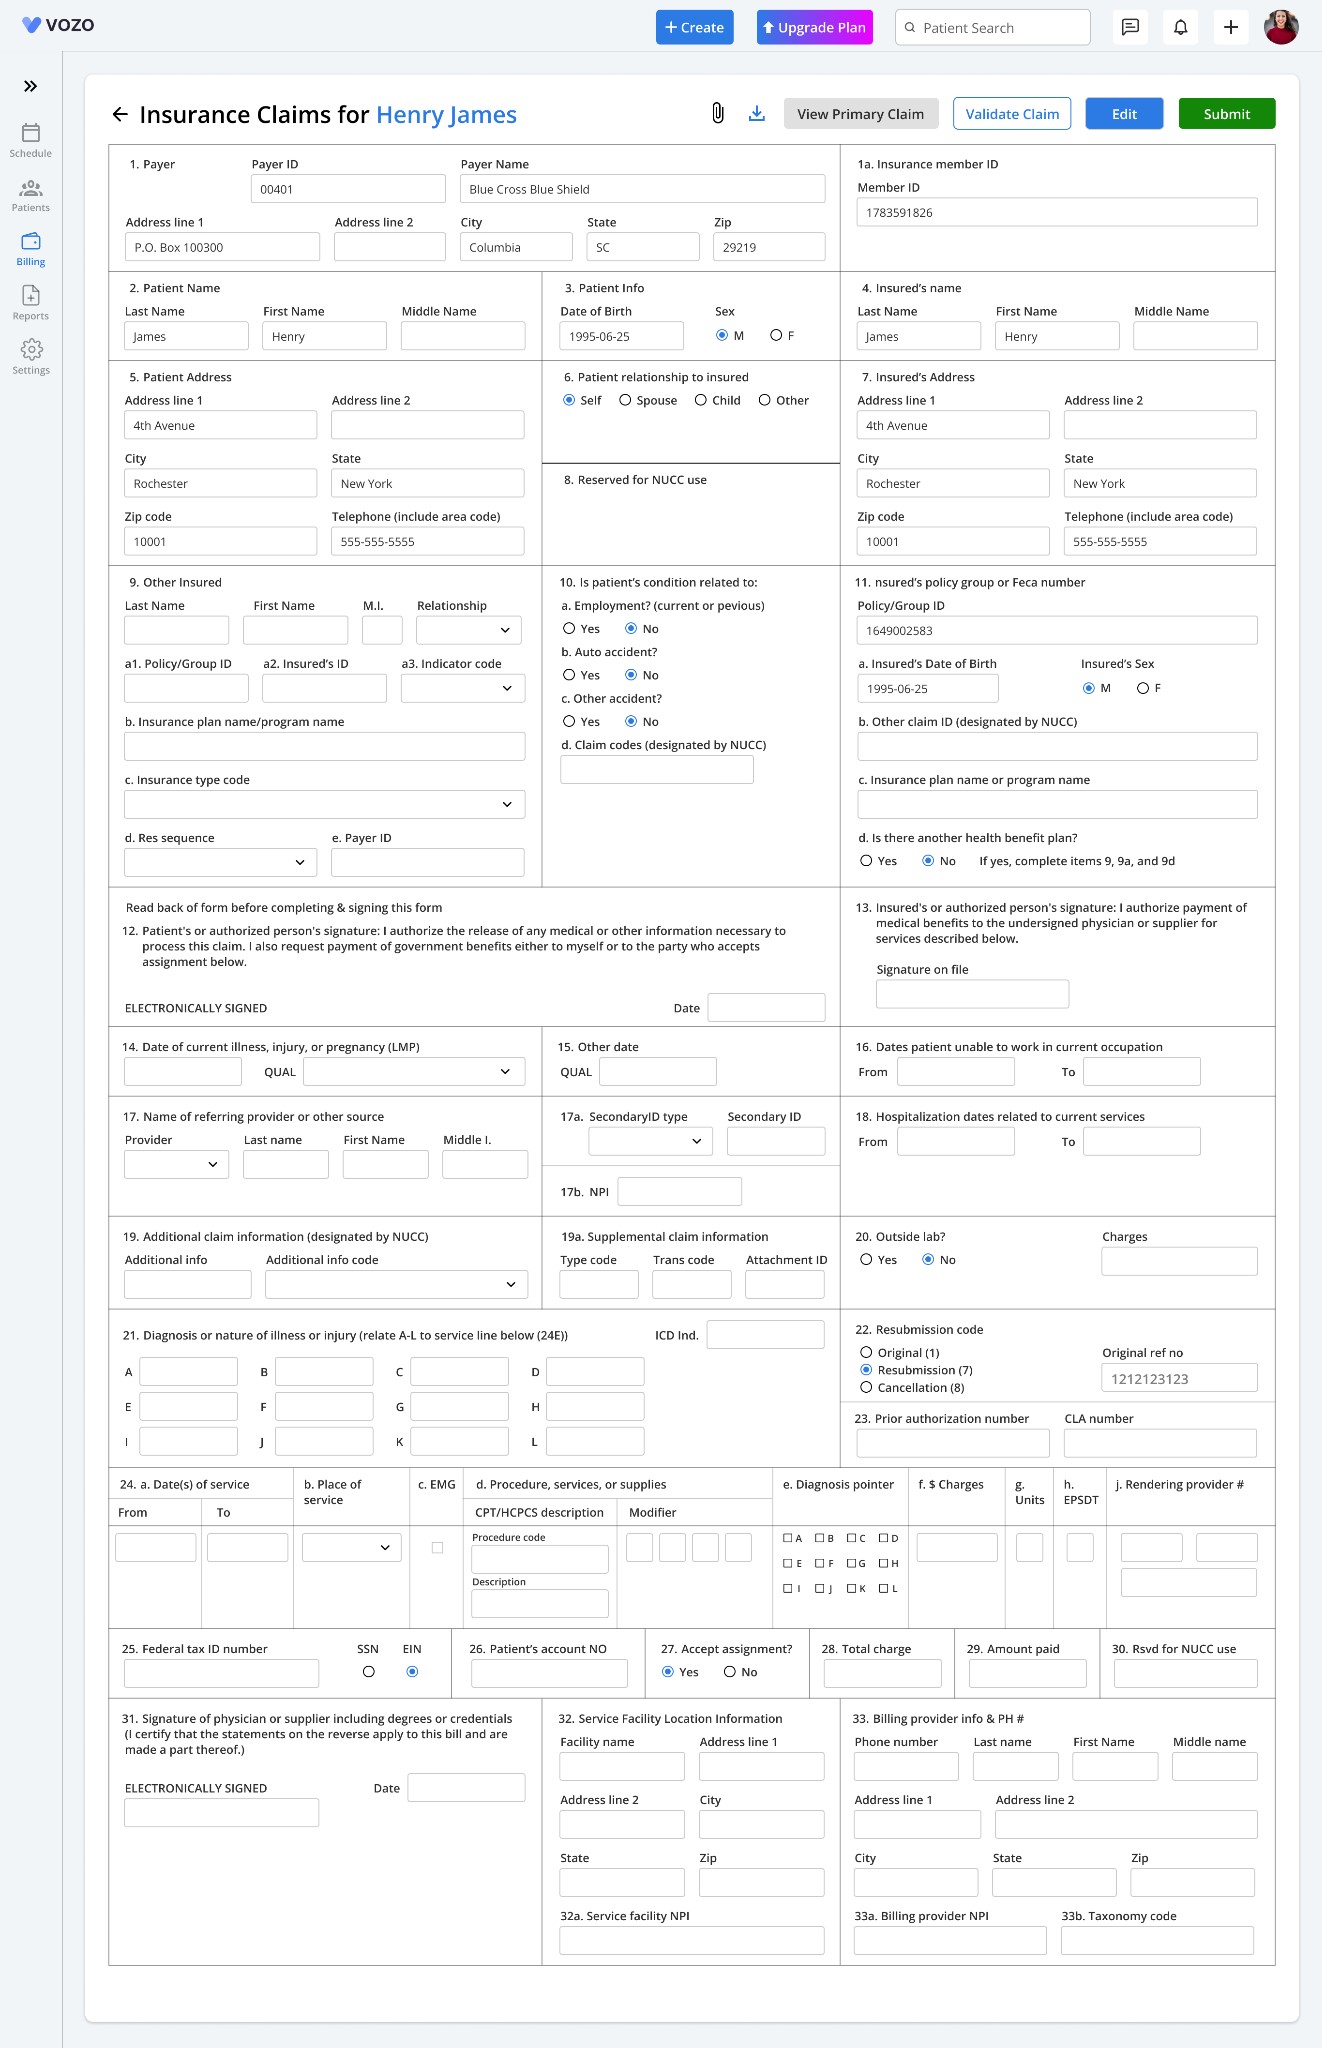
The editable claim form will open with auto-fetched details from the system.
Users can update claim details and save them by clicking the Save button.
Upon saving, users can choose to apply changes globally across the application or only within the claim form.
Users can validate the claim by clicking the Validate Claim button, either within the claim form or from the Dotted Action menu.
Users can edit the claim details by selecting View Claim and making the necessary modifications.
Any missing or invalid details in the claim will be highlighted during validation.
Users can submit the claim to the insurance payer by clicking E-Claim Submission in the Dotted Action menu or by clicking on the “Submit” button in the editable claim form. Claims can also be faxed to providers or patients via the Fax Claim option.
Users can download the claim form in CMS 1500 format using the Download Claim button. Once submitted, the Claim Reference Number will be displayed in the top right of the claim form.
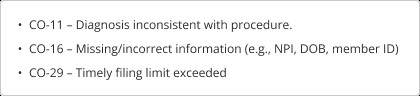
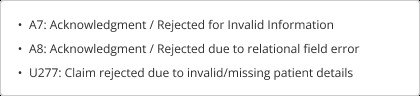
If the claim is rejected or denied, the insurance status will reflect the issue. Hovering over the status will display the rejection or denial reason.
Users can correct errors directly in the claim form and choose to save changes globally or within the claim. After making corrections, users must validate and resubmit the claim to the insurance payer.
If the primary insurance payment results in a remaining balance, the Generate Secondary Claim option will be enabled.
Clicking this button will create a duplicate claim under the Secondary Insurance Payer.
The secondary claim form will auto-fetch details from the primary claim, excluding specific fields that belong to the primary insurance.
A View Primary Claim button will be available for reference.
In the Primary Claim Form, the Generate Secondary Claim button will change to View Secondary Claim, allowing easy navigation.
If the secondary insurance payment also leaves a balance, the Generate Tertiary Claim option will be enabled. Once processed, payments will follow the same workflow as primary and secondary claims.
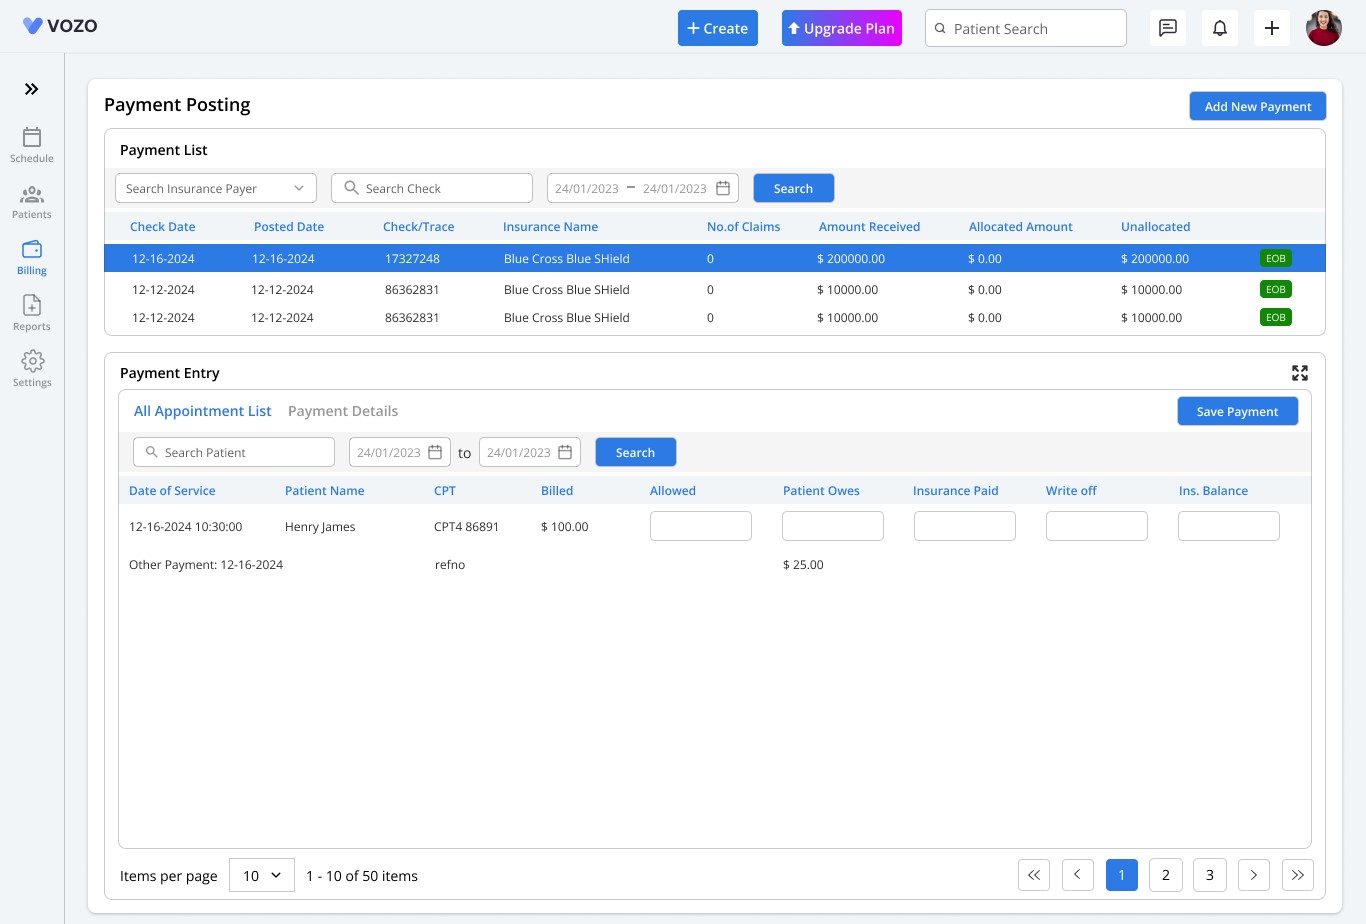
EOB
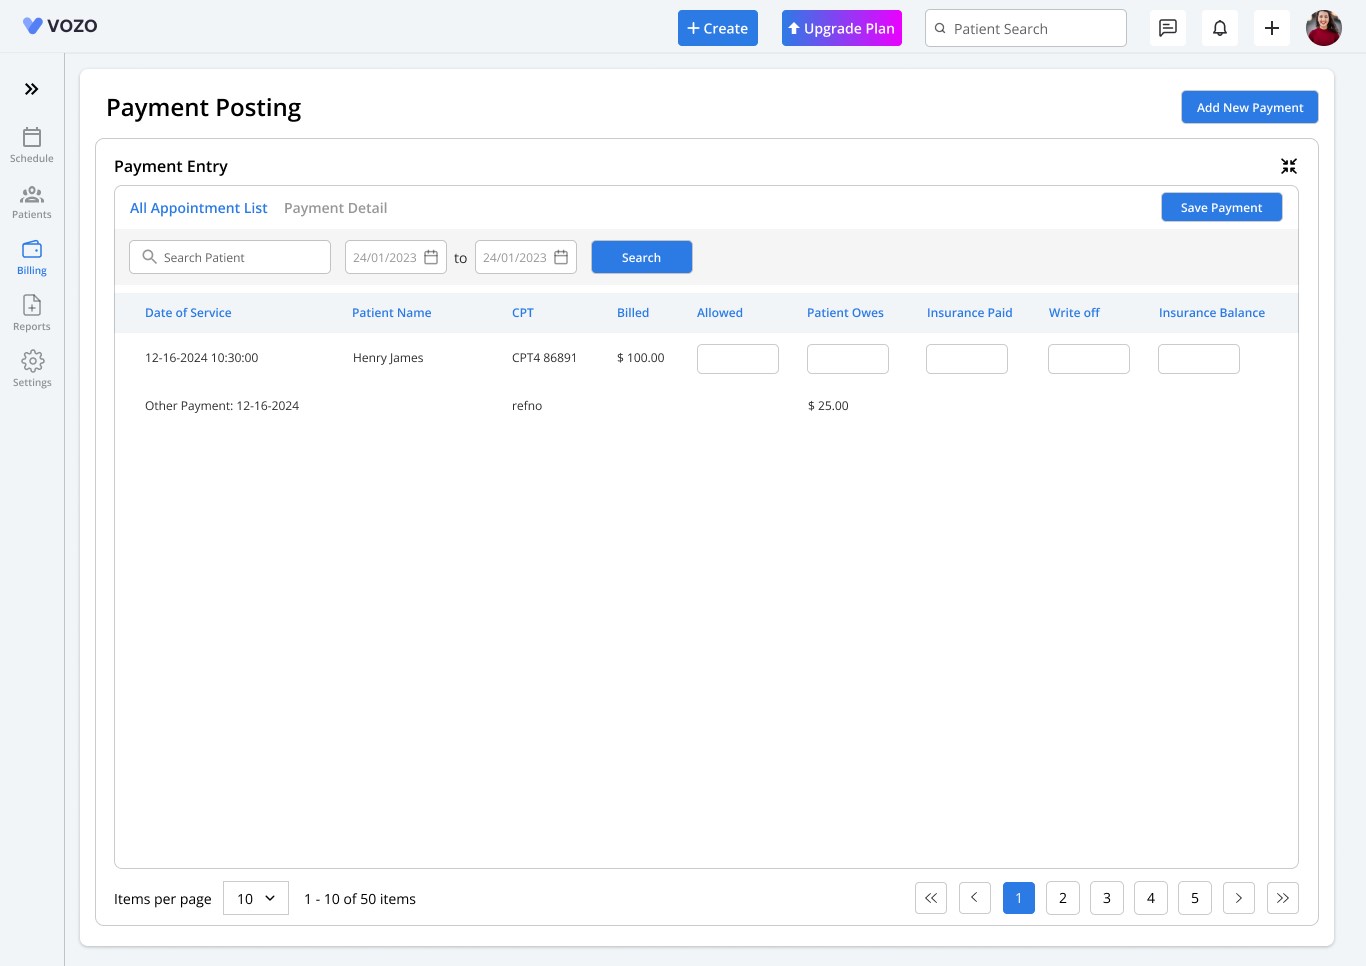
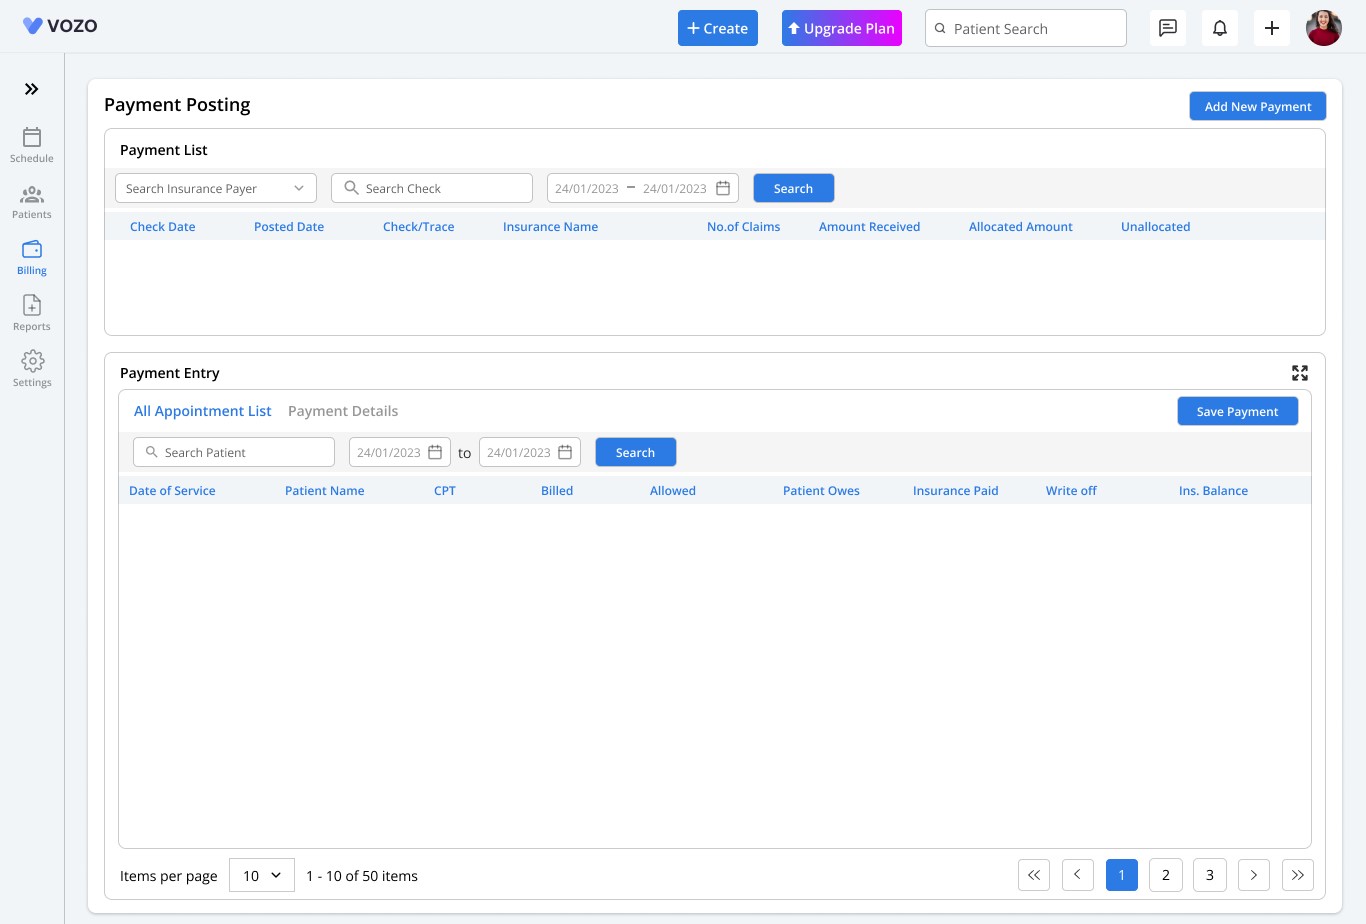
The new EOB layout consists of two sections: Payment List and Payment Entry.
Under Payment Entry, two tabs are available: All Appointment List and Payment Details, providing a structured view of payment information.
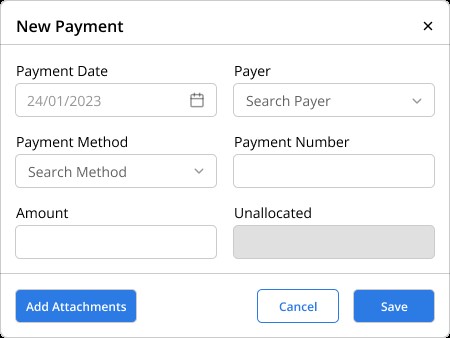
Click on "Add New Payment" to open a pop-up for entering payment details. Enter the Payment Date, Payer Name, Payment Method, Payment Number (Check), and Amount.
Click "Save" to store the payment information.
Users can upload EOB documents related to payments by clicking "Add Attachments".
A pop-up will appear where users can select and upload the EOB file. Once uploaded, the Payment List section will display an EOB tag indicating an attachment.
Clicking the EOB tag opens a popup showing the attached document.
Users can view or delete the document using the "View" and "Delete" buttons.
When an EOB is added, appointments associated with the insurance payer are listed in the "All Appointment List" tab.
Two new fields, "Allowed" and "Insurance Balance," are included in the payment list, allowing users to enter the payer’s allowed payment amount and the remaining balance.
After entering the details, click "Save Payment" to finalize the transaction.
The Payment Entry section can be expanded for a detailed view by clicking the "Expand" icon.
To revert to the default size, click the "Minimize" button.
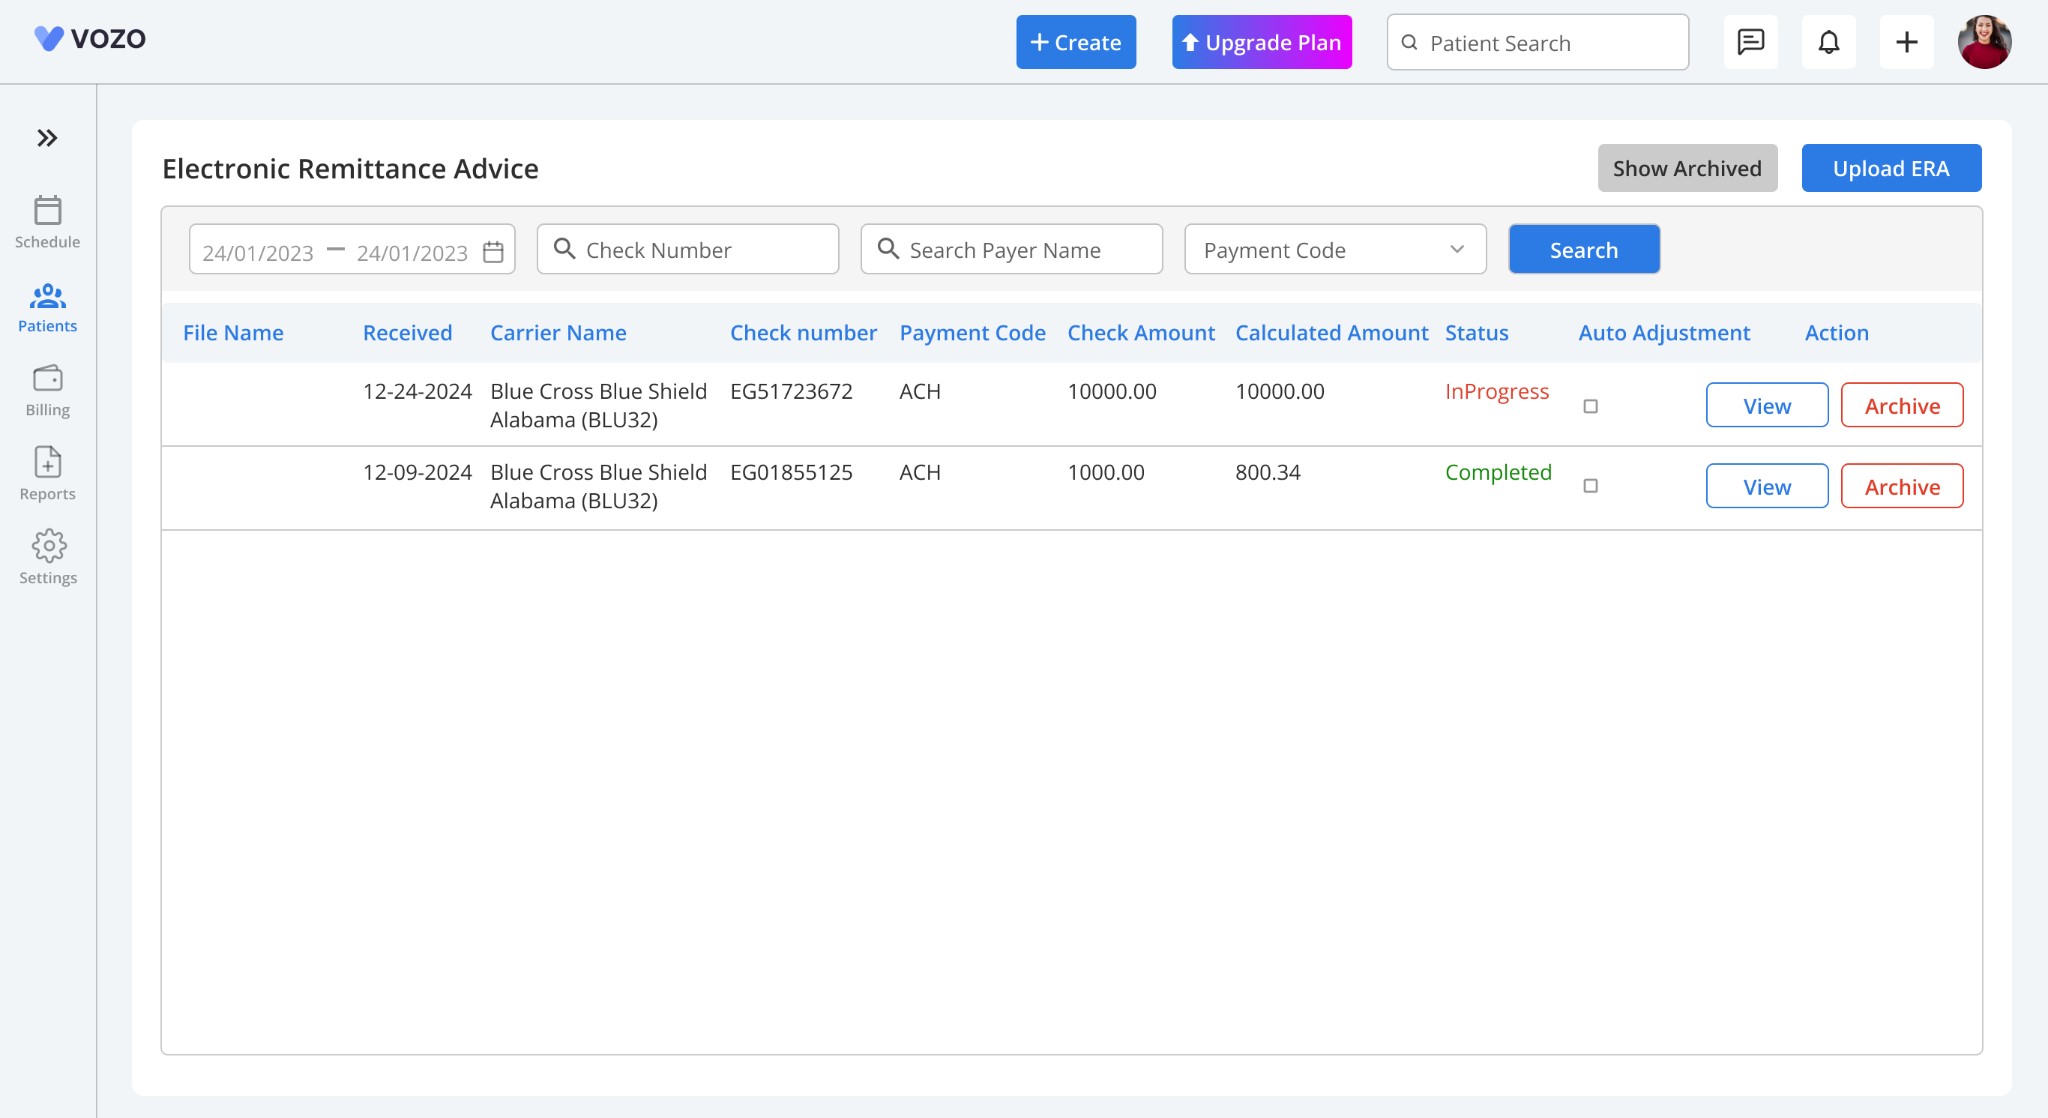
ERA
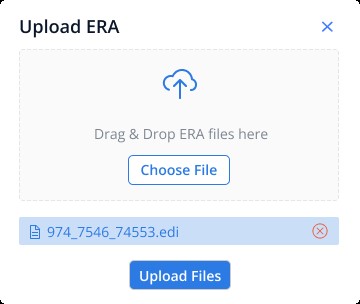
The "Upload ERA" field is now a button for a more intuitive interface.
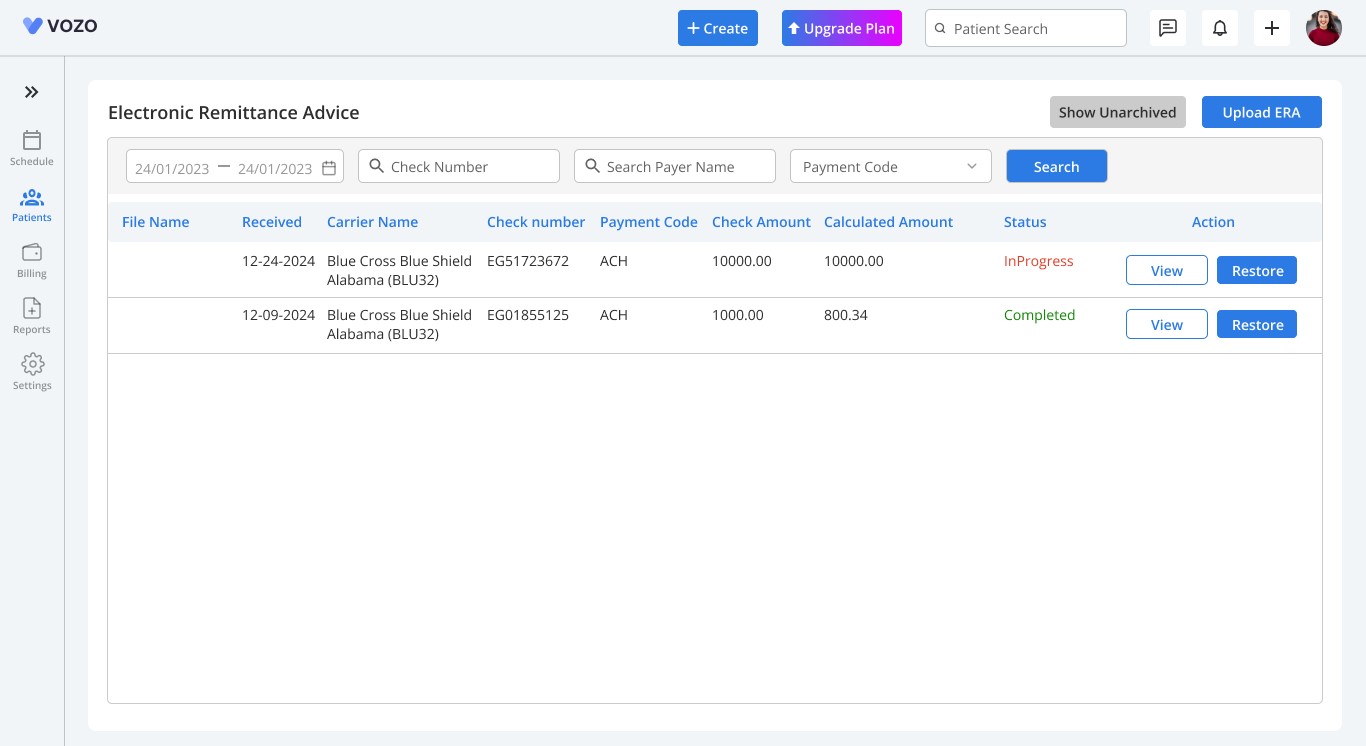
A new ERA list displays uploaded files based on the cheques present in the uploaded ERA file.
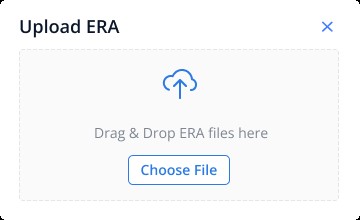
Click the "Upload ERA" button to open a pop-up.
Select and upload the ERA file.
The system will automatically read the file and display details, including:
File Name
Received Date
Carrier Name (Payer)
Check Number
Payment Code
Check Amount
Calculated Amount
Status
Auto Adjustment (Checkbox)
View & Archive (Buttons)
Archived ERA files move to the "Show Archived" section.
Files marked "Completed" can still be viewed.
The Restore option allows users to bring back an archived file while maintaining its original date for easy retrieval.
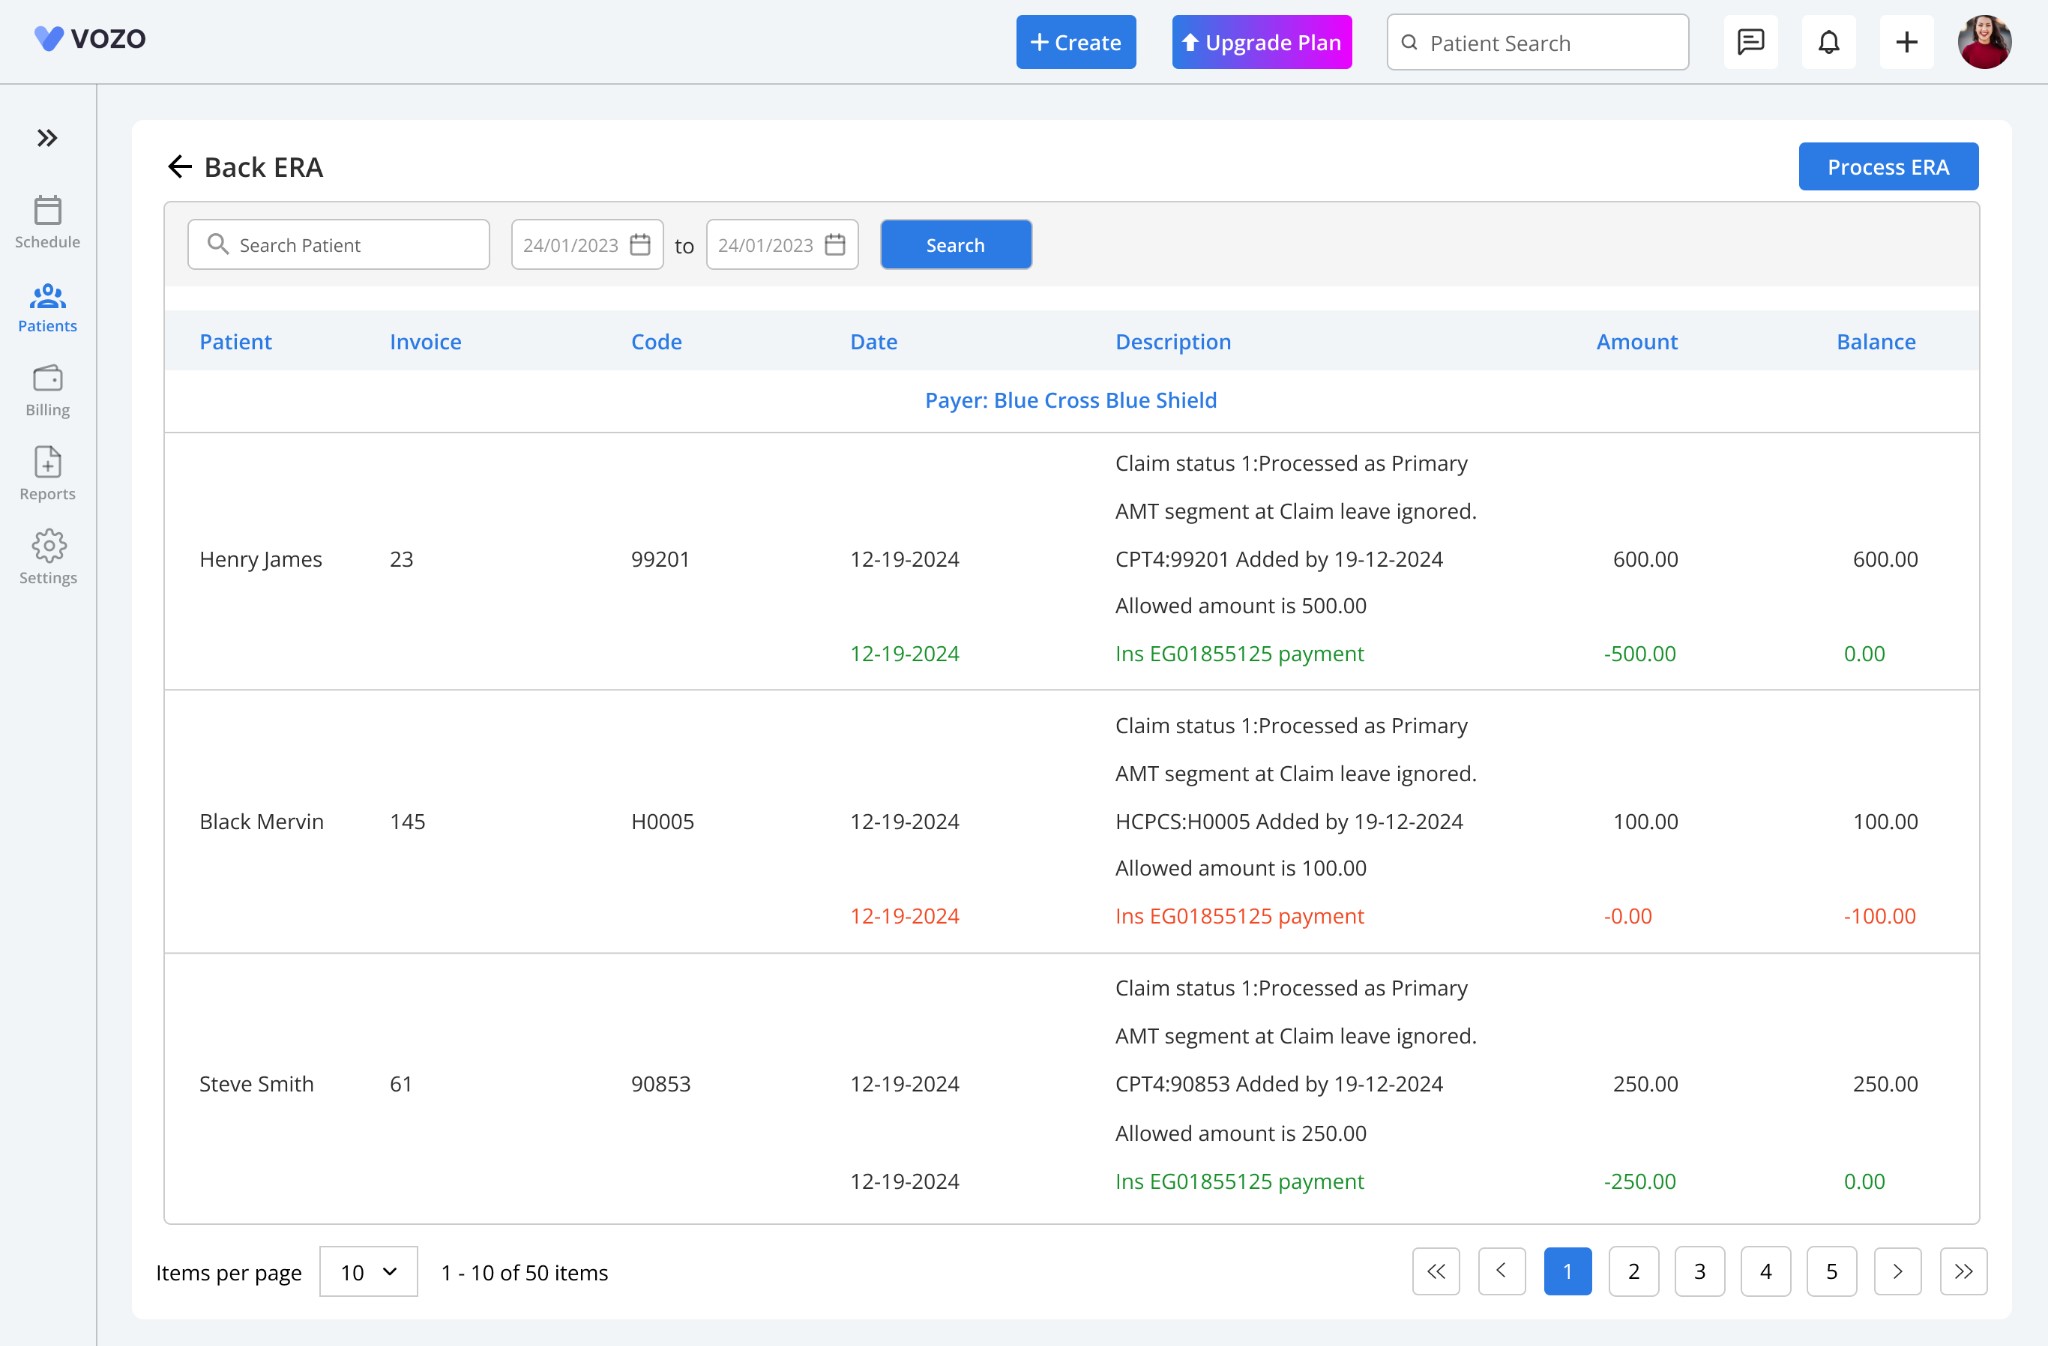
Click "View" on a check to preview payment details based on patient appointments before processing.
Click "Process ERA" to allocate payments based on the insurer's designated amount.
If "Auto Adjustment" is enabled, the system will automatically write off the remaining insurance balance.
The Status will update to "Completed" when payment processing is finished, otherwise, it remains "In-progress".
To delete and reupload an ERA file, click "Archive". Archived files can be accessed via "Show Archived".
ERA payments can be reviewed and edited on the "Payment Posting (EOB)" page.
Users can search for ERA files using the Check Number in the EOB section.
Payments can be adjusted in the "Payment Entry" section and saved.
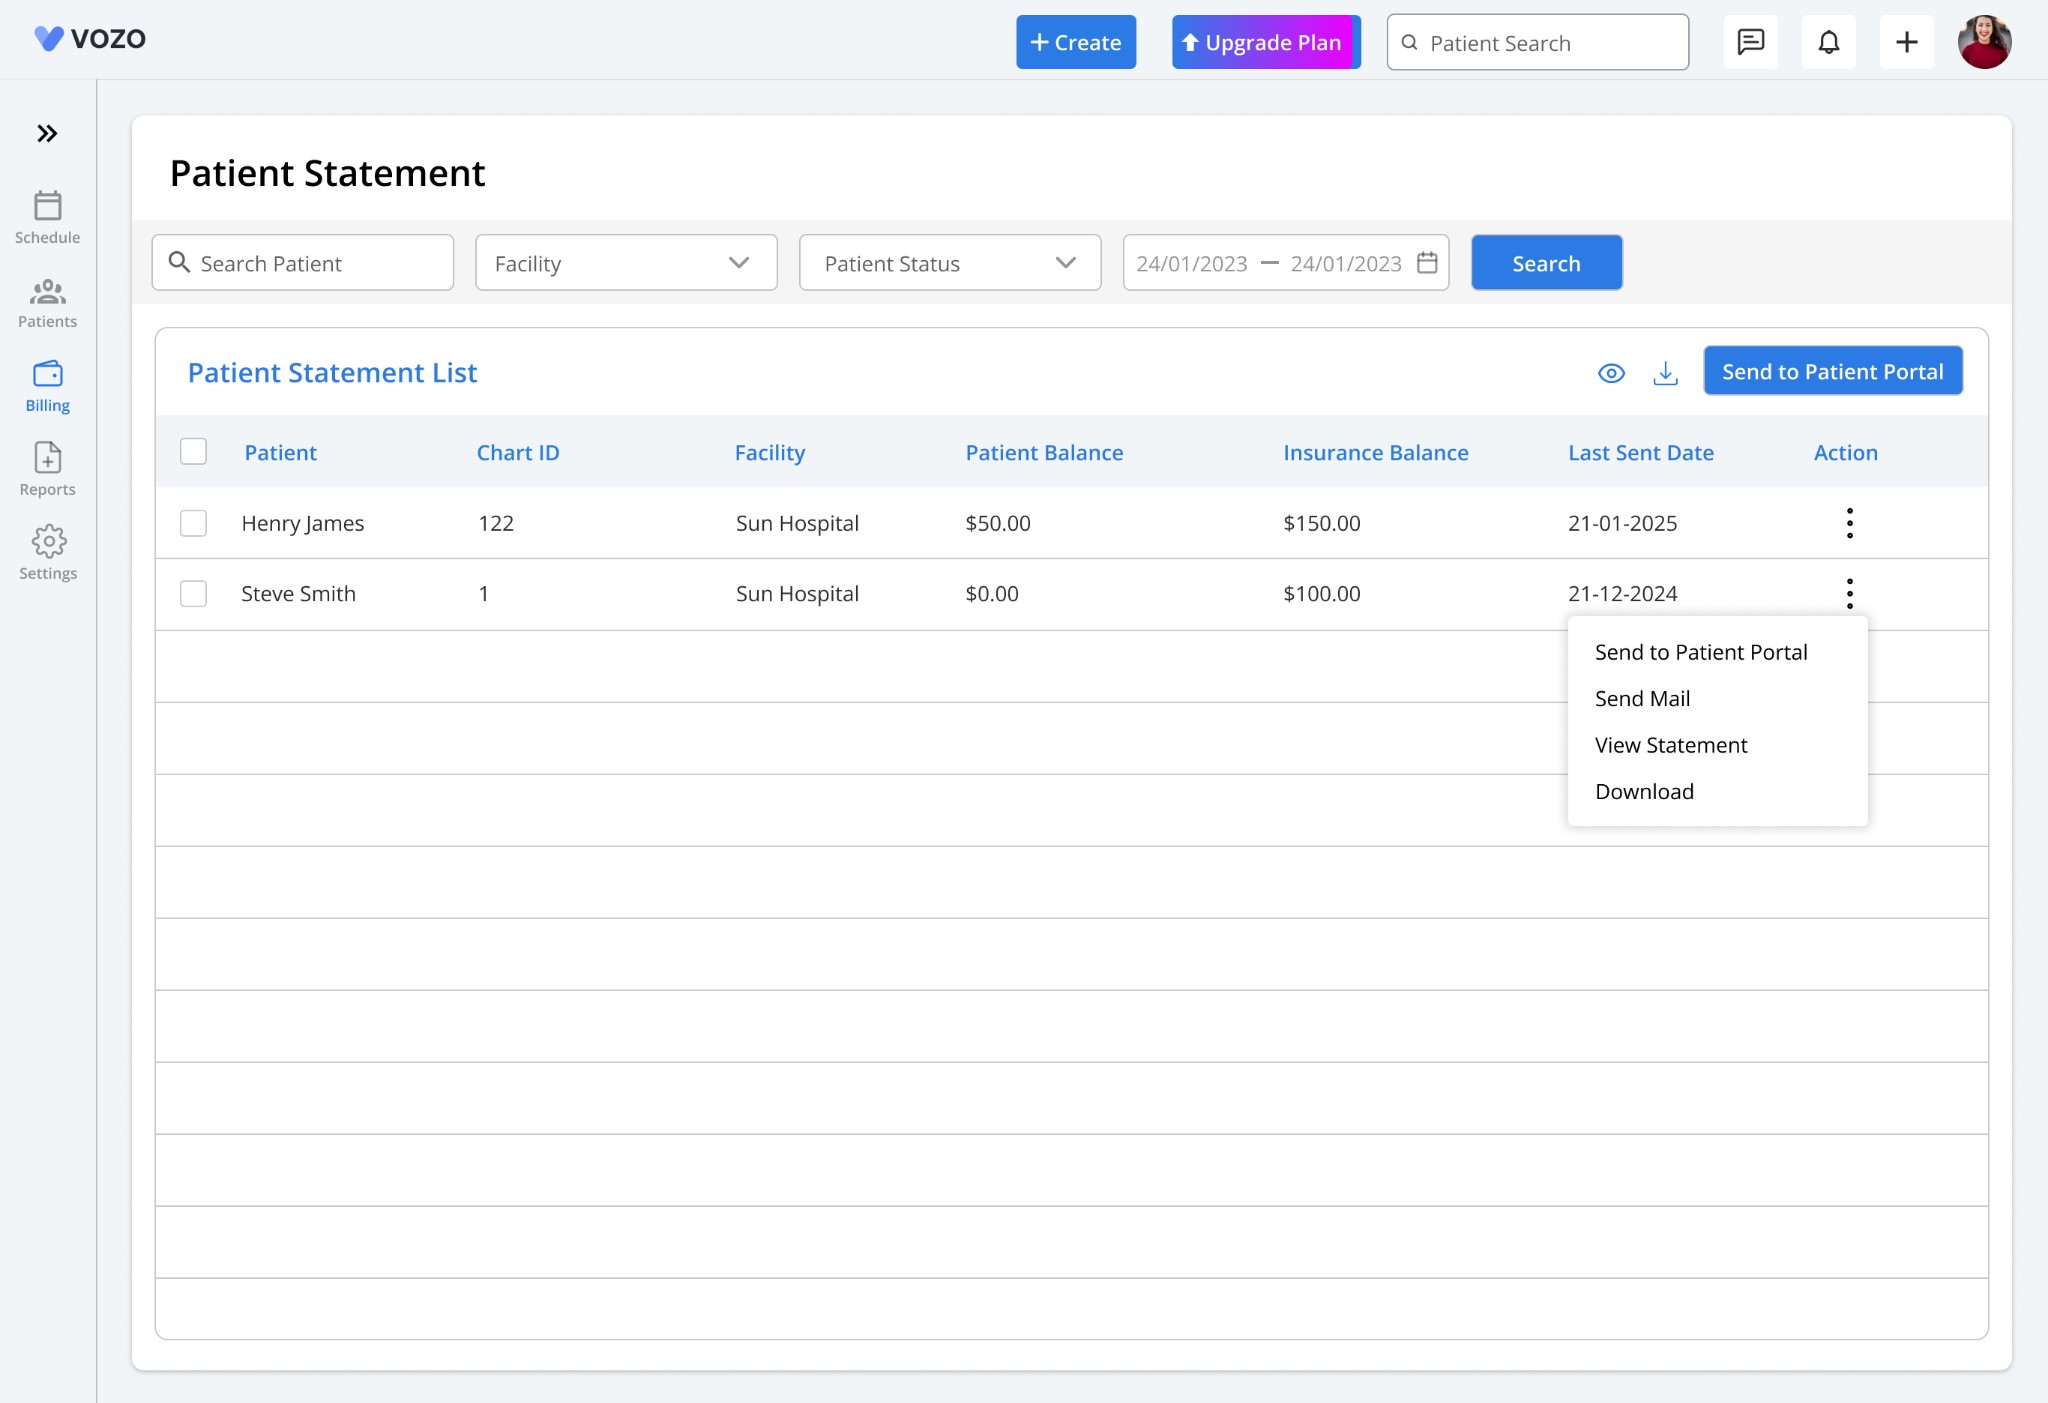
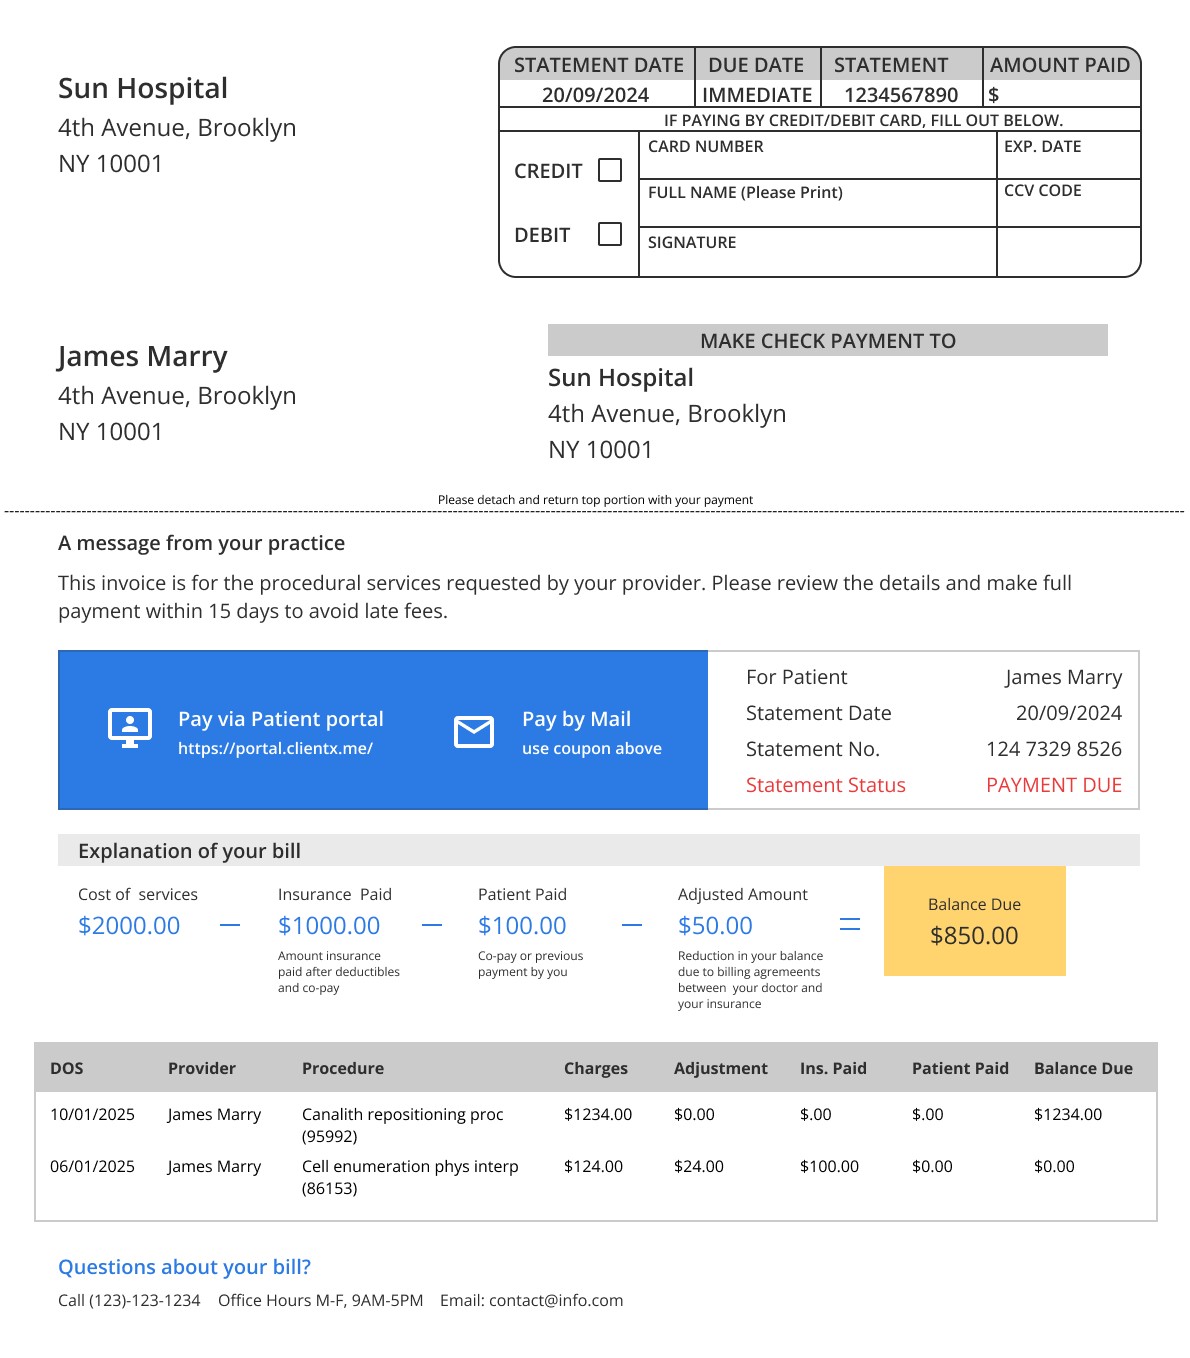
Patient Statement
The Patient Statement update in the Vozo EHR Billing Module introduces enhanced search filters, improved statement management, and seamless patient communication options.
Additional filters like Facility, Patient Status, and Date Range (From & To) have been added to refine patient statement searches.
The Patient Statement list headings have been updated for better clarity and information access.
Checkbox Selection for Bulk Actions:
A checkbox is now available before each patient’s name in the statement list.
Users can select multiple patients to perform bulk actions.
Bulk Actions for Patient Statements:
Click the Eye Icon to view statements of selected patients.
Click the Download button to download all selected patient statements in a single file.
Click "Send to Patient Portal" to send statements directly to the patient's portal.
For individual patients, click the Dotted Action Button to access options:
Send to Patient Portal – Automatically sends the statement to the patient’s portal.
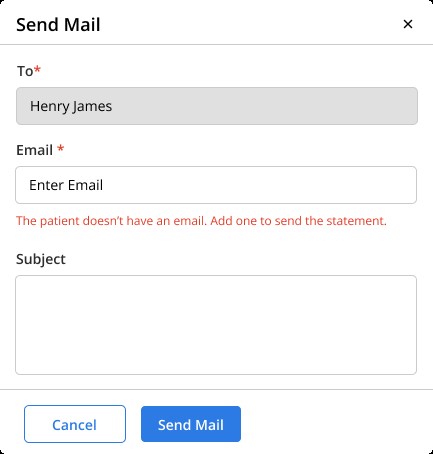
Send Mail – Opens a popup with the patient's name and email, allowing users to send the statement via email.
View Statement – Previews the patient’s statement.
Download – Download the statement as a file.
Send to Patient Portal – Automatically sends the statement to the patient’s portal.
If the patient does not have an email or a patient portal, the system will display: “Patient Portal is disabled for this patient. Provide an email to enable Patient Portal.”
Automatic Monthly Statement Processing
Statements will be automatically sent to the patient portal at the end of each month.
A new “Statement” tab will be available in the patient portal, displaying all sent statements.
Patient Access to Statements in the Portal
In the “Statement” tab, patients can:
Click "View" to preview their statement.
Click "Download" to save a copy.
Contact details at the bottom of the statement will reflect the clinic’s information.
Patient Module Update
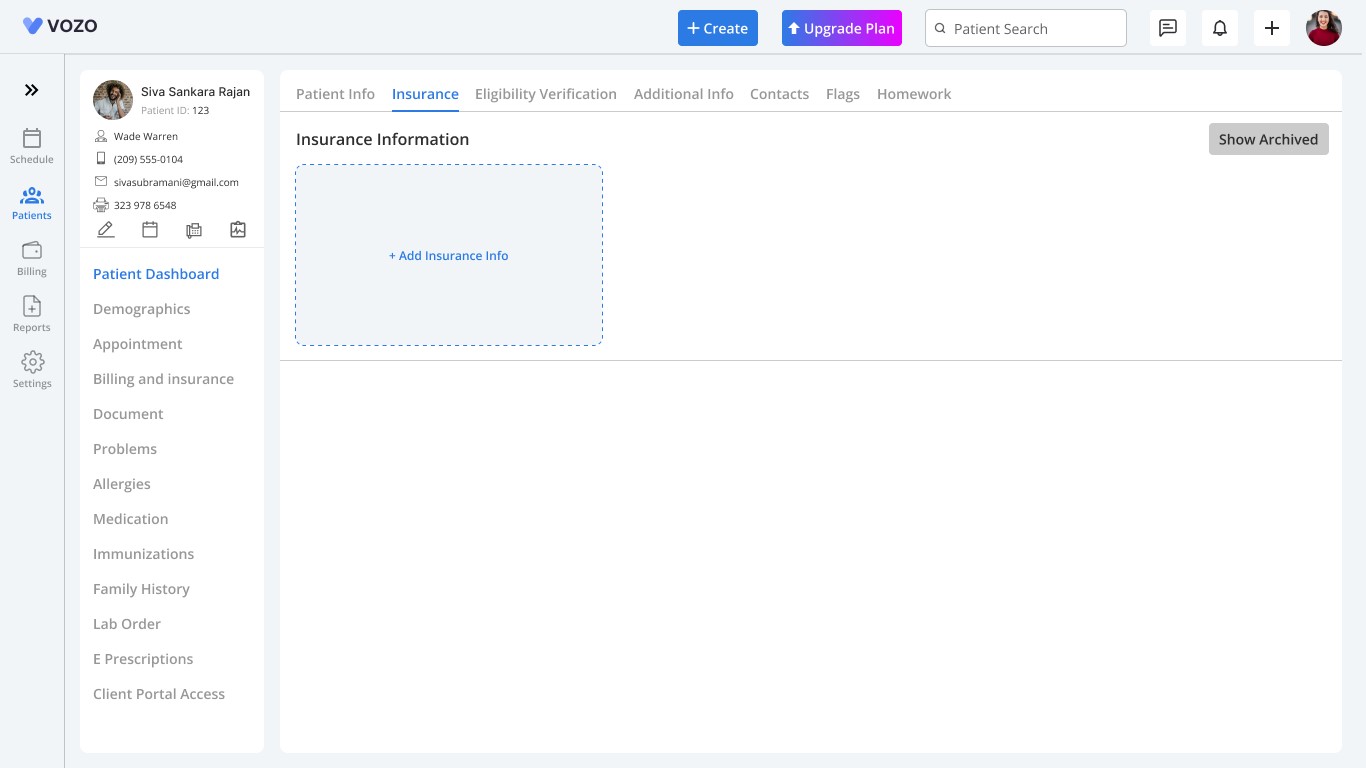
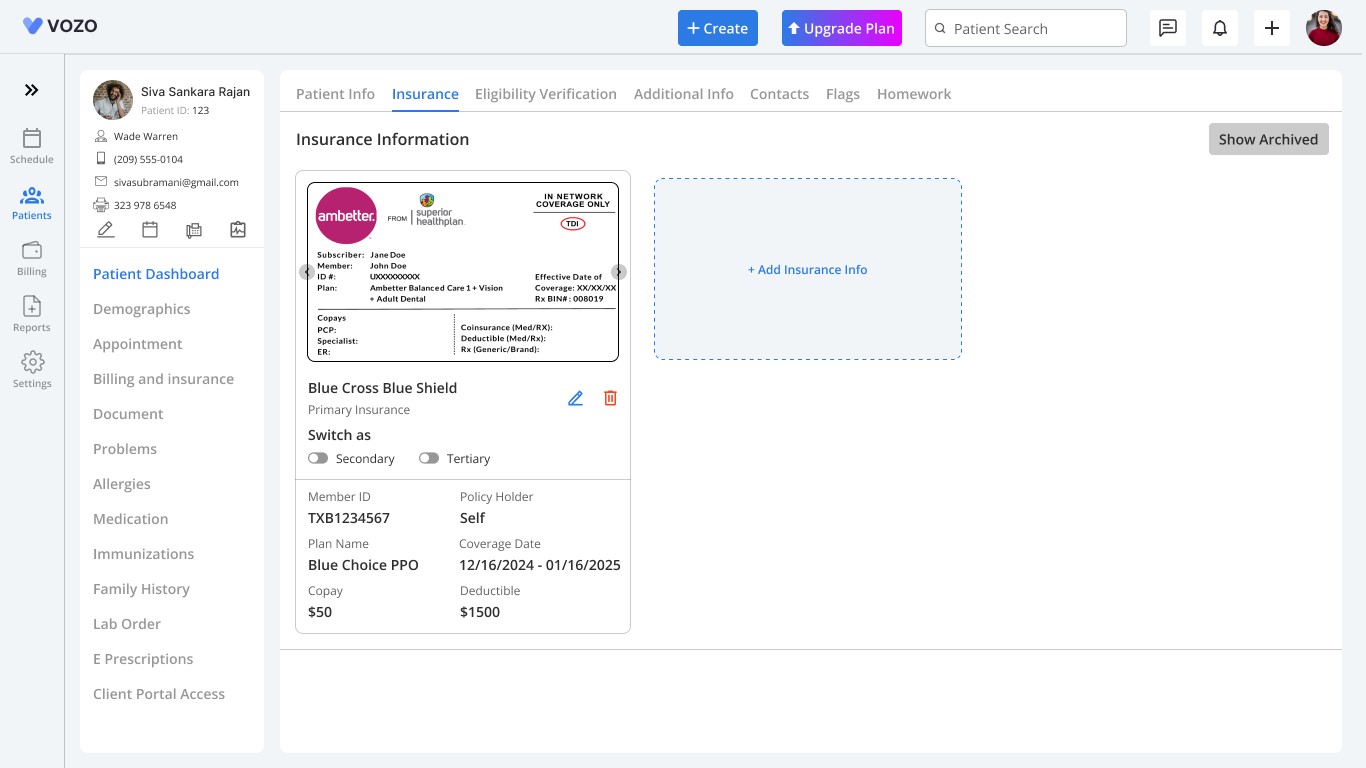
Insurance Information
This update includes a new card layout, input field modifications, editing and archiving restrictions, and an improved insurance switching process.
The Insurance tab under Patient Demographics has been redesigned for better usability and data organization.
If no insurance details have been added, an “Add Insurance Info” card will be displayed.
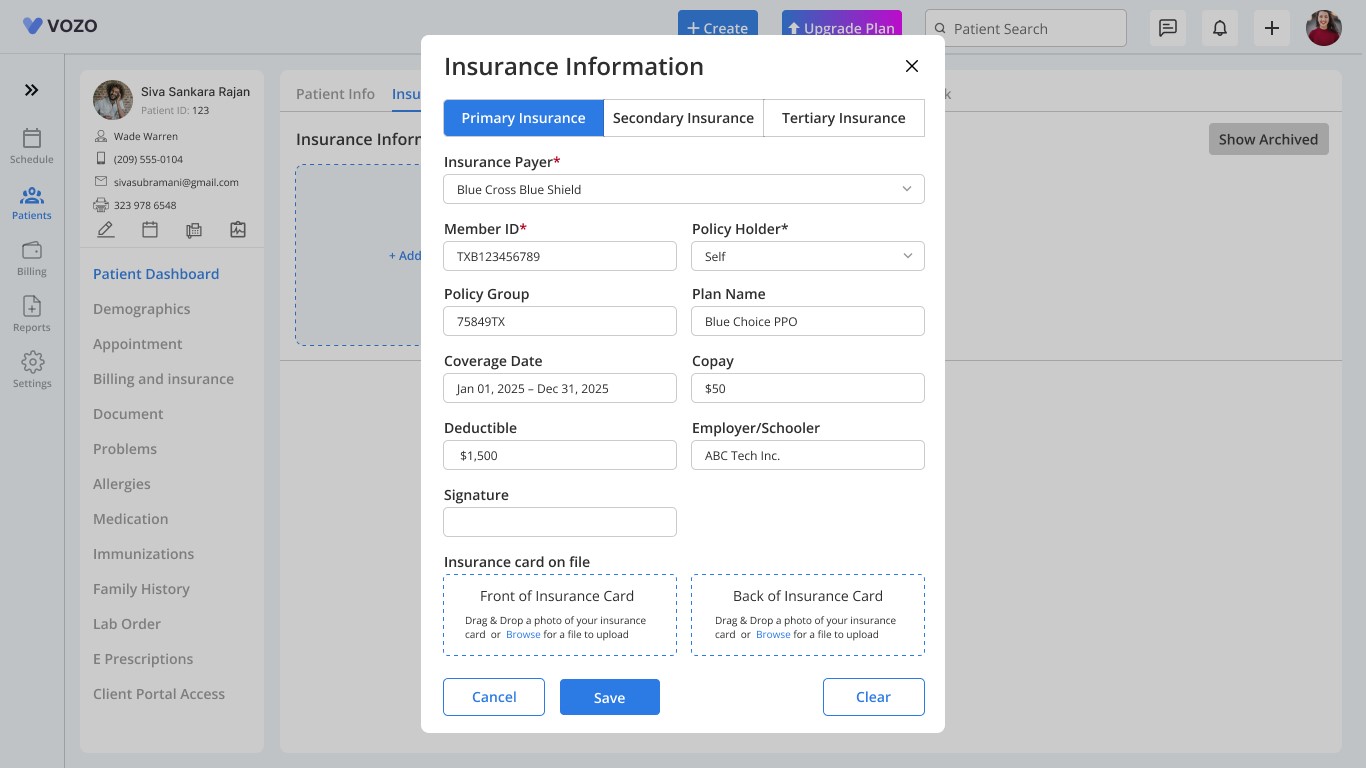
Clicking this card opens a pop-up where users can enter patient insurance details.
In the Insurance Information pop-up, users can input details for Primary, Secondary, or Tertiary insurance.
The form is structured to improve data input accuracy and minimize redundant fields.
Some input fields have been added, removed, or modified to enhance usability:
Retained & Added Fields:
Insurance Payer
Member ID
Policy Holder
Policy Group (Group ID removed)
Plan Name (Plan ID removed)
Employer/Schooler
Signature (New Field Added)
Removed Fields:
Group ID (Replaced with Policy Group)
Plan ID
For Superbills, Send Payment To
Insurance Payer Phone
Insurance Fax
Insurance Payer ID
After entering details, clicking Save will store the insurance information and display it in a card view.
If an insurance photo is uploaded, it will appear at the top of the card.
Users can click the left and right arrows to toggle between the front and back views of the insurance card.
To edit insurance details:
Click the Edit icon on the insurance card.
The Insurance Information pop-up will open, allowing modifications.
Users cannot edit insurance details if an insurance claim has been submitted until the payment for that appointment is completed.
Alternatively, users can delete the insurance claim and then edit the insurance details.
Users can switch between the Primary, Secondary, or Tertiary tabs and edit the respective insurance details.
The same claim submission restrictions apply when editing insurance details.
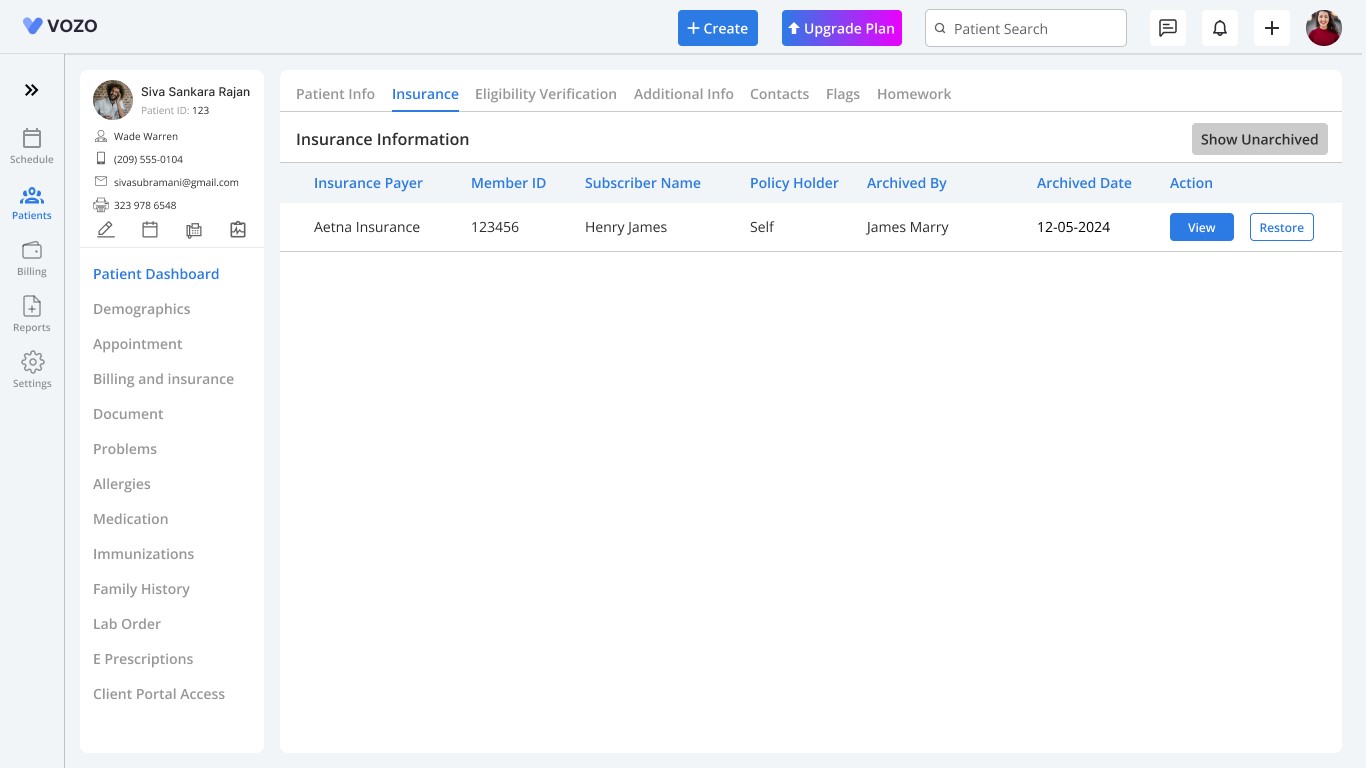
Users cannot permanently delete insurance information but can archive it using the Delete icon.
Archived insurance remains accessible and can be restored when needed.
Insurance cannot be archived if a claim is pending payment.
Users must either complete the payment or delete the insurance claim before archiving.
Only one Insurance info can be achieved per insurance type (Primary, Secondary, or Tertiary).
Clicking Show Archived allows users to view archived insurance information.
Archived details are displayed in read-only mode in a pop-up.
Users can restore insurance by clicking the Restore button.
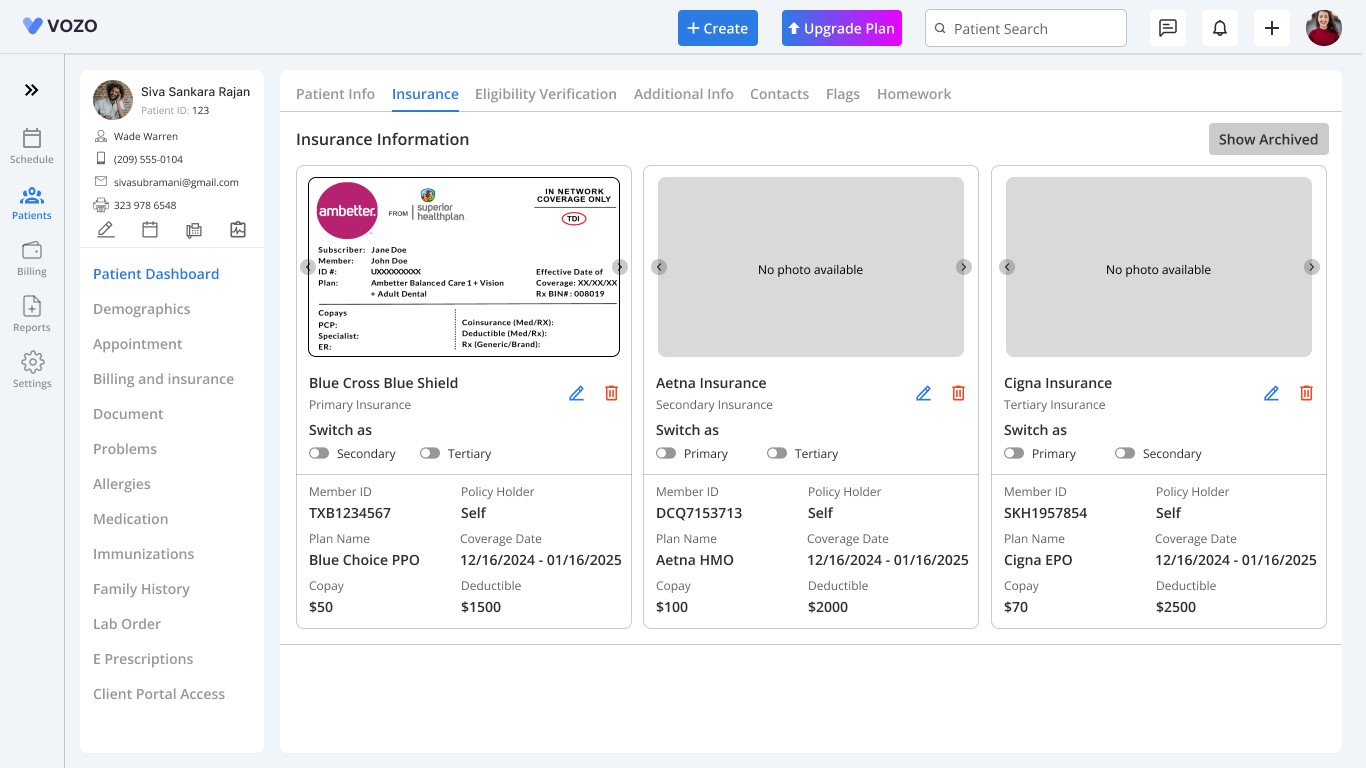
After adding Primary insurance, users can click “Add Insurance Info” again to add Secondary or Tertiary insurance.
Users cannot add multiple entries for the same insurance type.
Users can switch an insurance entry between Primary, Secondary, and Tertiary using toggle switches on the insurance card.
Example: Selecting the Secondary toggle switch on a Primary insurance card will reload the page, swap the positions, and save the changes automatically.
The insurance payer's name and type will update automatically when switching insurance types.
The toggle switch labels will also change based on the selected insurance type.
Insurance type cannot be switched if a claim has been submitted for that insurance.
Users must complete the payment or delete the insurance claim before switching insurance types.
These conditions apply to all insurance types.
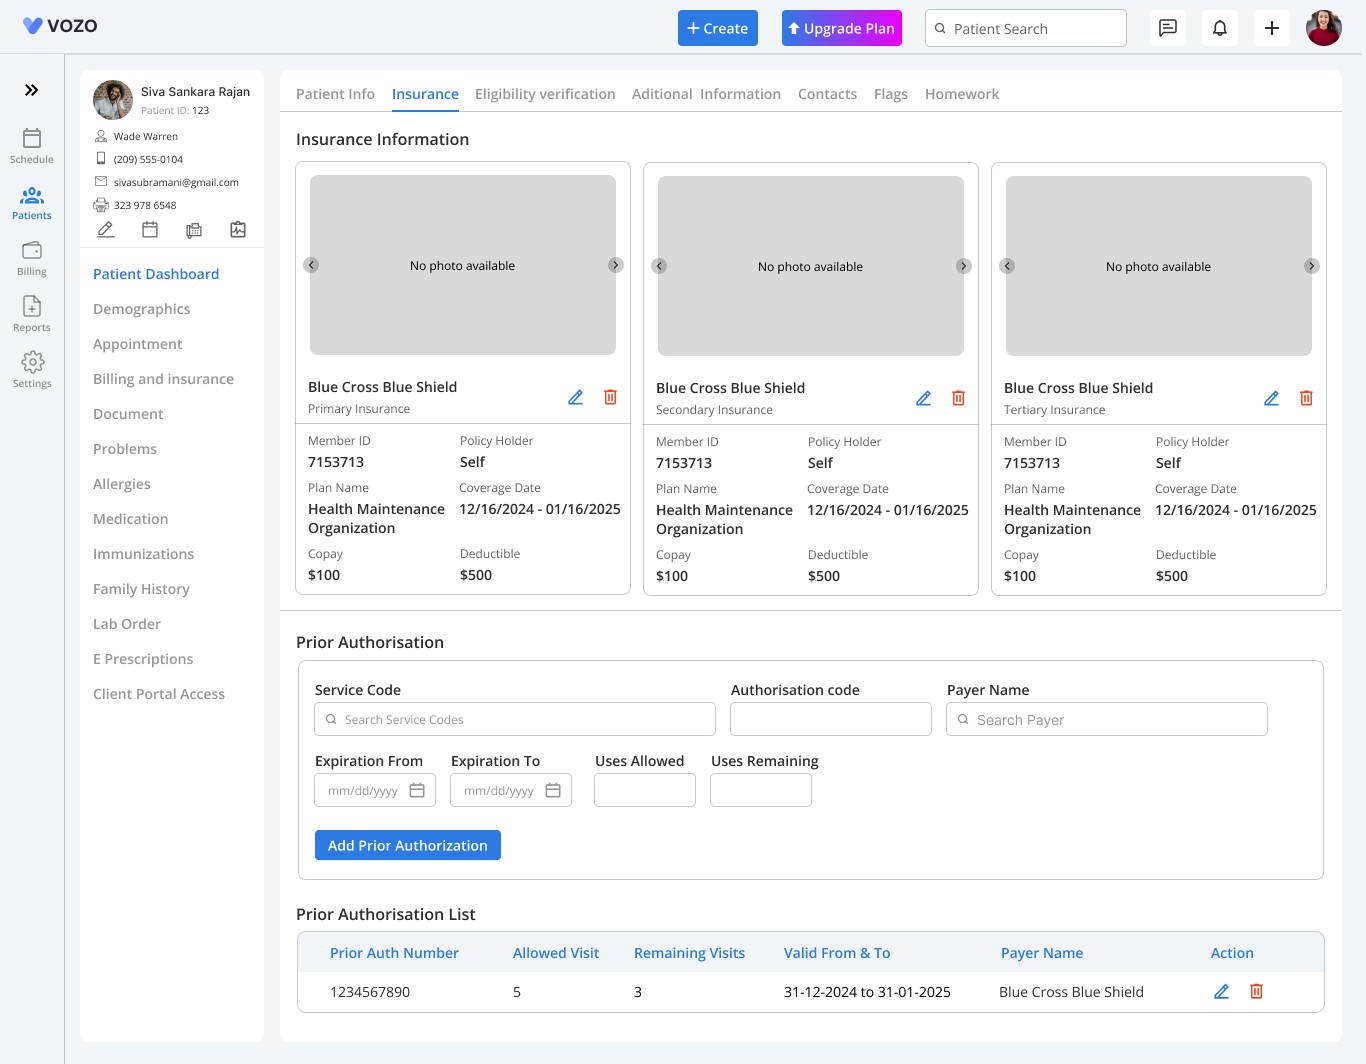
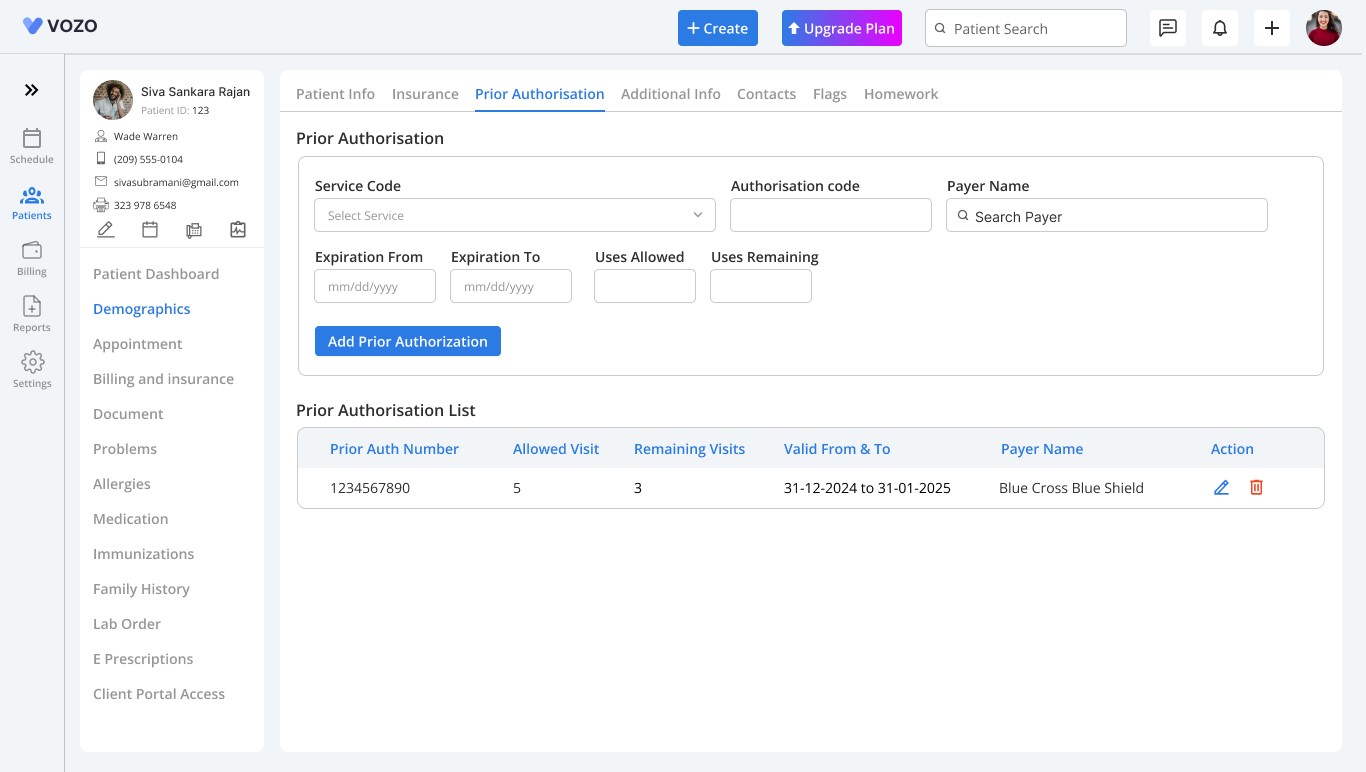
Prior Authorization
Below the Insurance section in the patient’s profile, there was previously an Eligibility Verification section.
This section has now been renamed to Prior Authorization, and the Eligibility Verification feature has been moved to a new tab.
Navigate to the Prior Authorization section.
Enter the required details in the input fields, including:
Service Code
Authorization Number
Expiration Date Range
Number of Usages
After entering the necessary details, click on the "Add Prior Authorization" button.
The entered details will be saved and listed in the Prior Authorization List.
To edit an existing authorization, click on the Edit icon next to the listed authorization.
The data will automatically populate in the input fields above.
Modify the details as needed and save the changes.
Users can add multiple authorization numbers.
All added authorization numbers will be listed under the Prior Authorization List for easy reference and management.
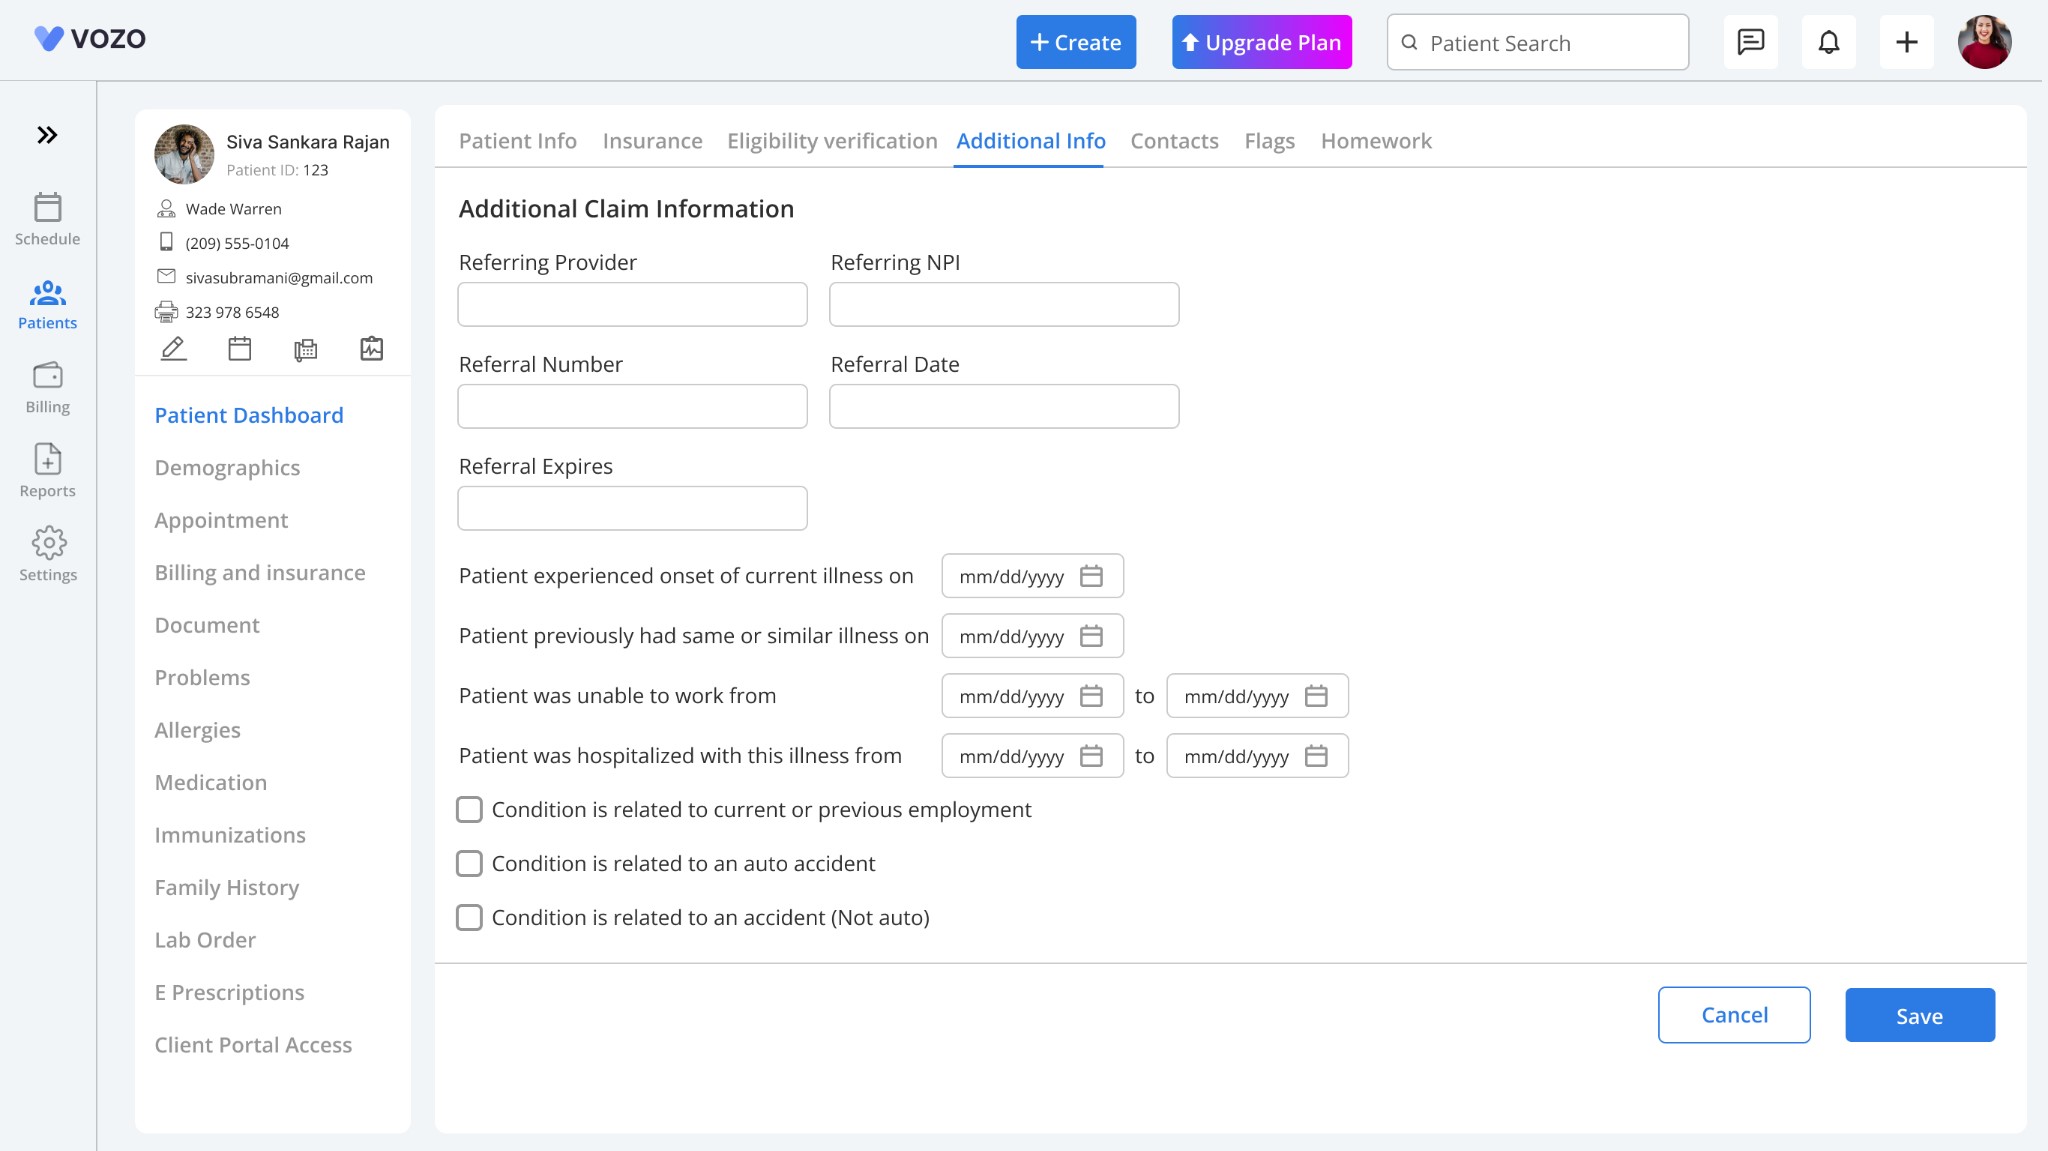
Additional Information
For every appointment, users are required to enter specific details related to the appointment. These details are captured in the claim form if the provider opts for insurance payment.
To eliminate the need for entering the same details at every appointment, the information has been separated and placed under a new "Additional Information" tab in the Patient Demographics menu.
The details added to the Additional Information tab will automatically populate in the editable claim form whenever the provider chooses to make an insurance payment. This ensures that all required details are pre-filled, saving time and reducing manual data entry.
The details that are pre-filled in the claim form will remain the same for every appointment. However, users can manually edit the information in the editable claim form as needed to accommodate any changes.
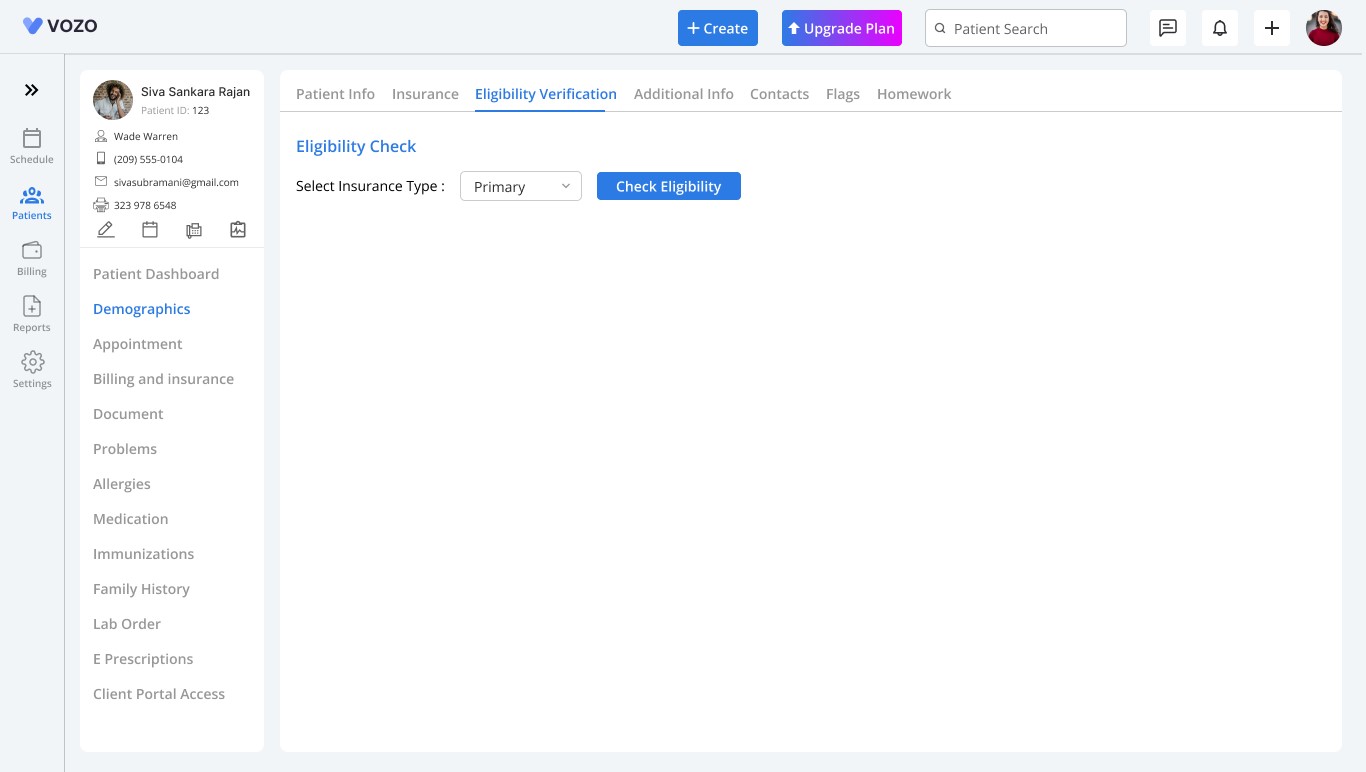
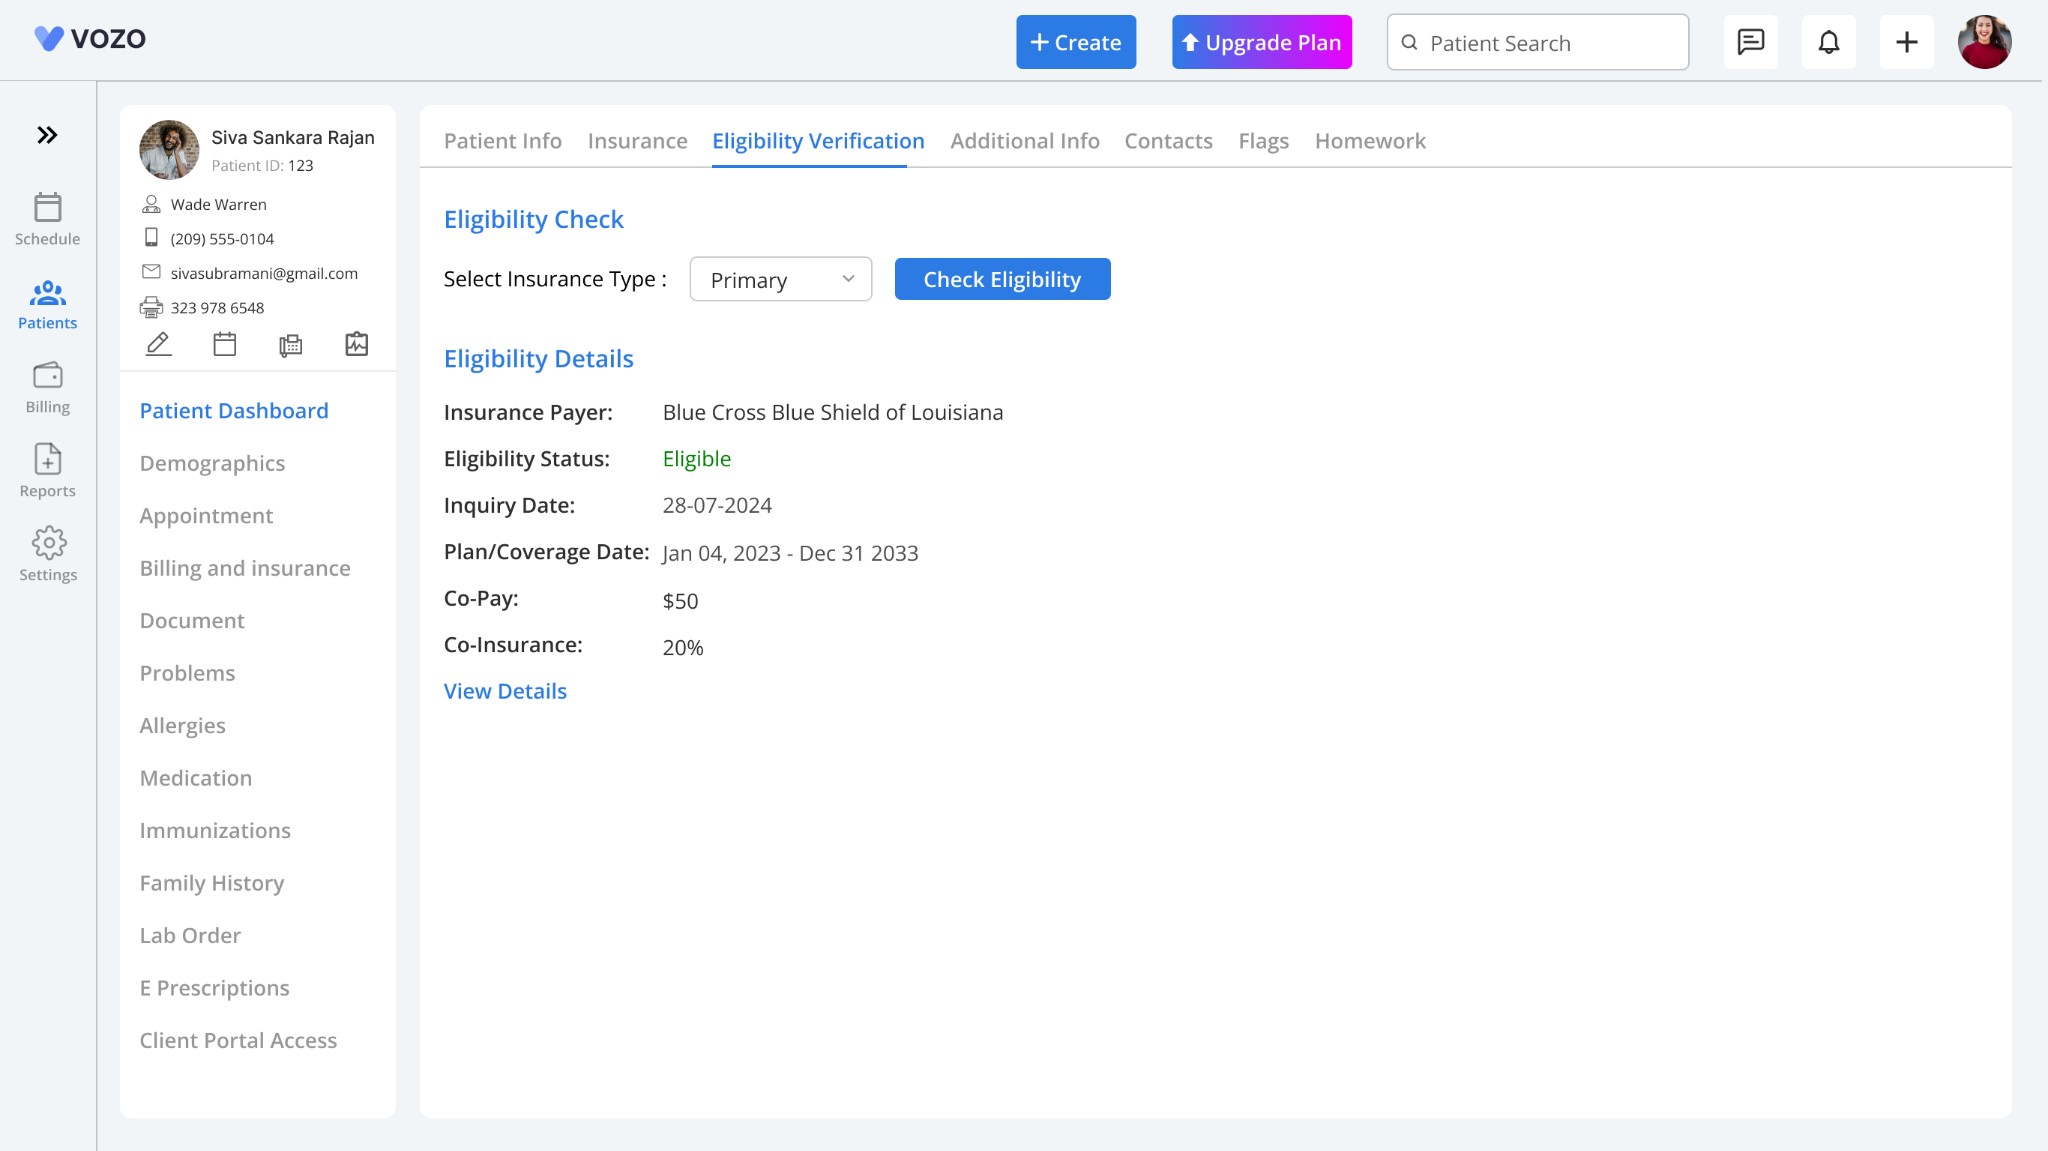
Eligibility Verification
A separate tab for Eligibility Verification has been added in the Patient Demographics page, replacing the previous location in the Insurance tab.
When opening the Eligibility Verification tab, the system will automatically set the insurance type to Primary for eligibility checks.
Users can manually select other insurance types for verification, but insurance information must be saved in Patient Demographics before proceeding.
Click the Check Eligibility button to initiate the verification process.
After clicking Check Eligibility, the button will change to Waiting for Response, and it will be disabled until the system retrieves the eligibility details.
Initially, only a summary of eligibility details will be displayed.
Click the View Details button to see the complete eligibility details.
Users can also verify patient eligibility directly from the Appointment Details page.
In the top section of the Appointment Details page, select the insurance type and click the Check Eligibility button to begin the verification process.
The verification process works the same as in the Eligibility Verification tab.
Click the View Details button to see the detailed eligibility information in a pop-up window.
Once a patient’s insurance information is saved and an appointment is scheduled, the system will automatically run eligibility verification for the primary insurance and retrieve the verification details.
This process will occur every time a patient’s appointment is scheduled, ensuring up-to-date eligibility verification for all patients who have saved their insurance information.
Report Module Update
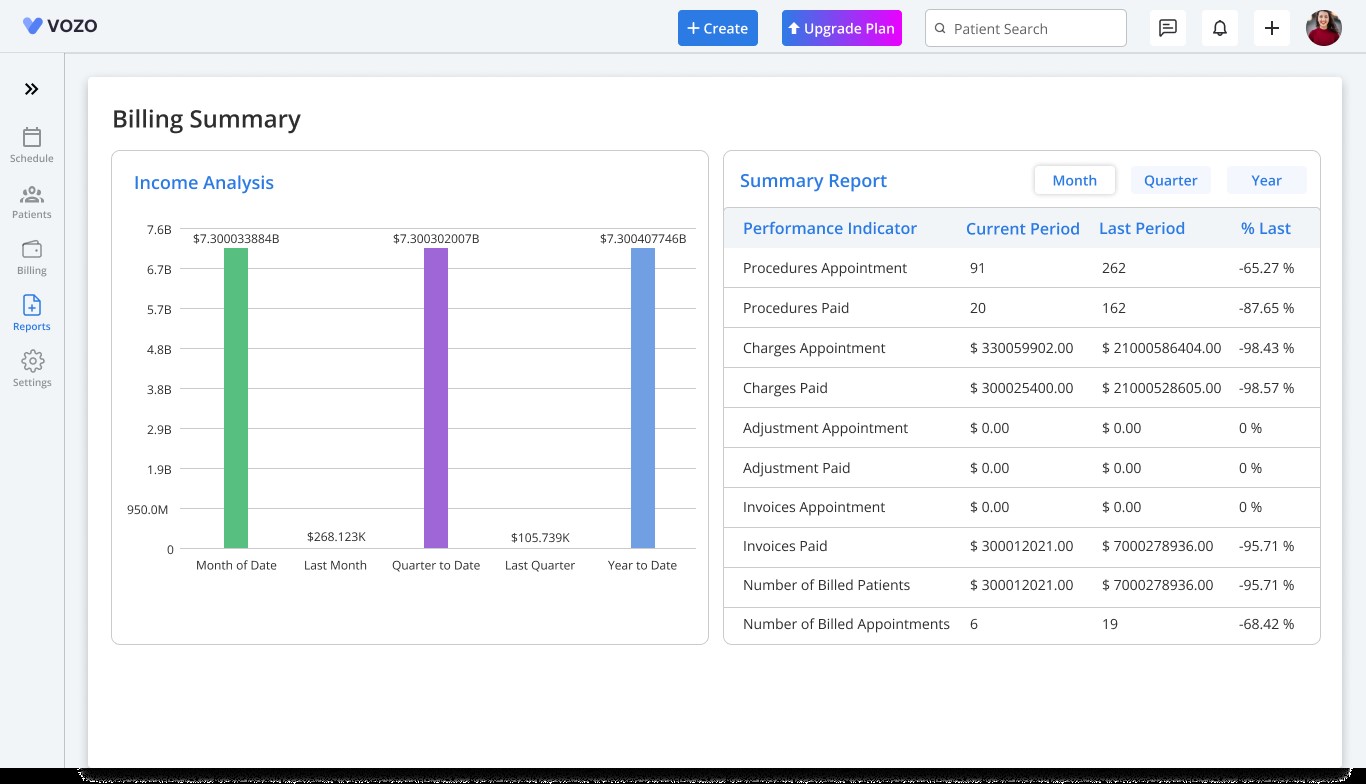
Billing Summary
The Billing Summary page has been redesigned with UI updates and the renaming of key elements in the Summary Report:
Procedure A & Procedure P renamed to Procedure Appointment & Procedure Paid.
Receipts are renamed to Invoices.
Other naming conventions updated for consistency.
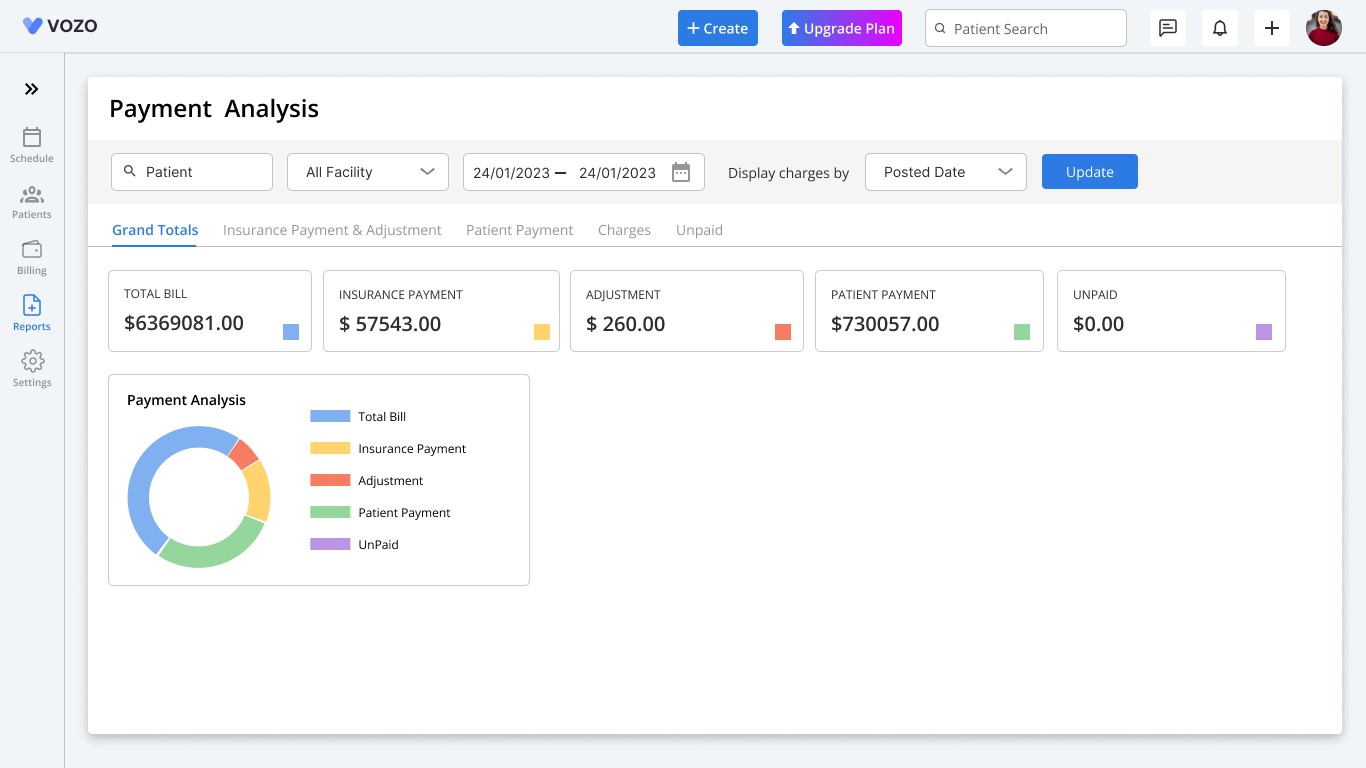
We have improved the Payment Analysis report to provide clearer insights into financial data:
The “Credit & Adjustment” tab was renamed to “Insurance Payment & Adjustment”.
In the Grand Total section:
“Debit” was renamed to “Total Bill”.
“Credit” was renamed to “Insurance Payment”.
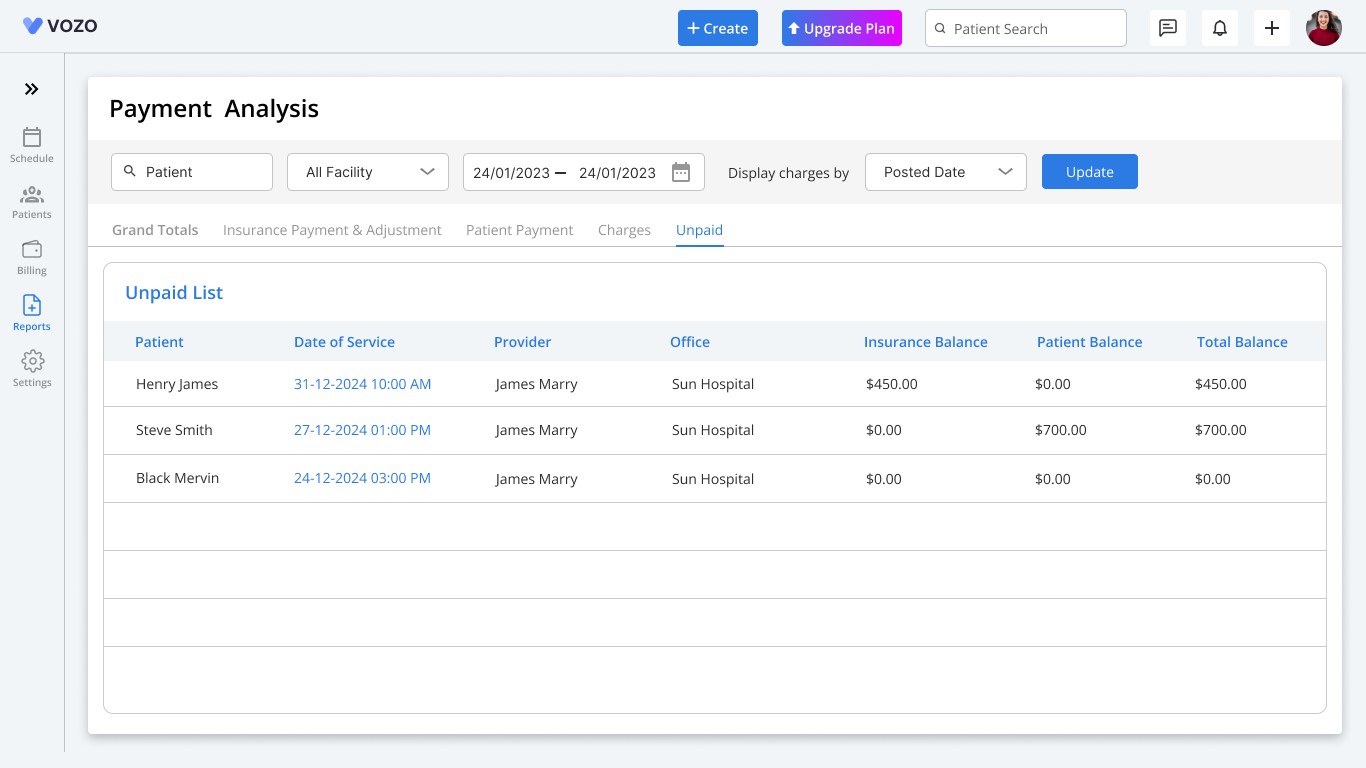
Added a new “Unpaid” tab and card, the unpaid balance details of patients will be listed along with the total balance.
Clicking the Unpaid tab reveals patient balance and insurance balance details.
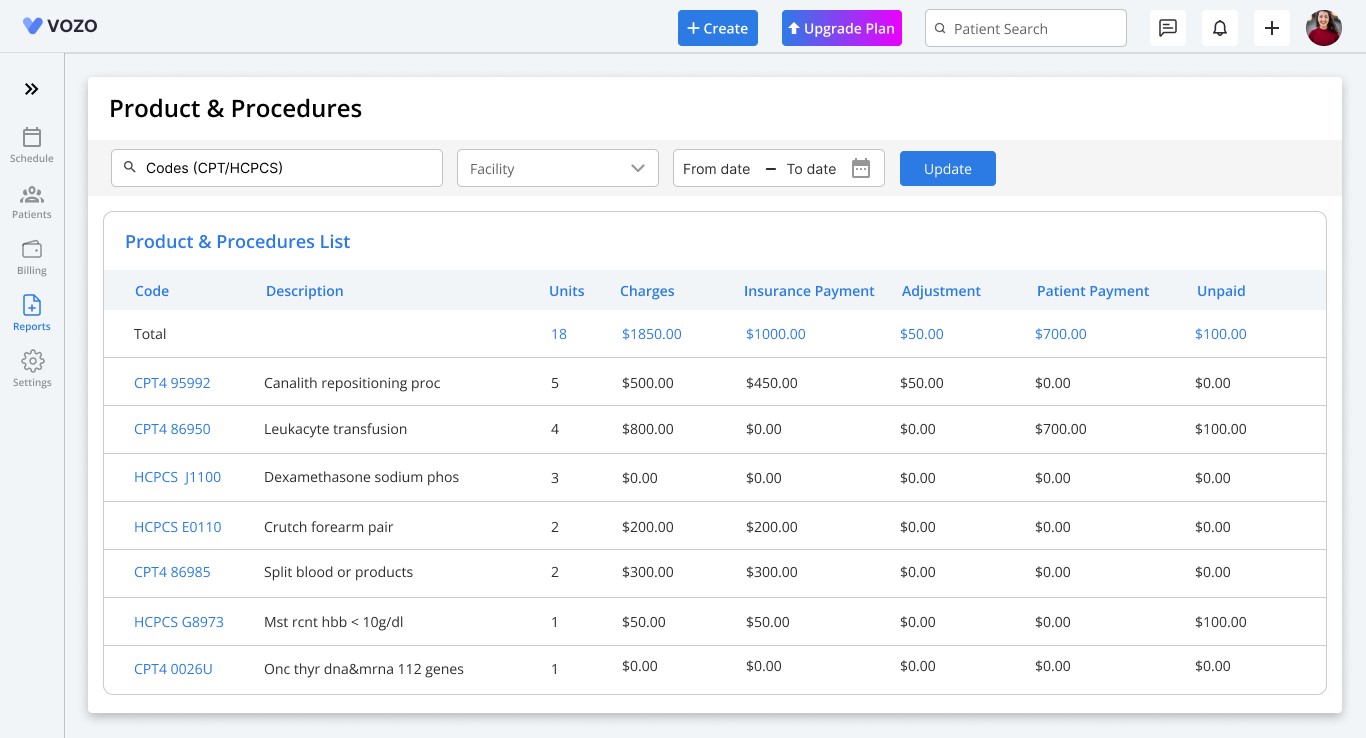
Enhancements to Product & Procedure reports include:
ICD-10 codes were removed from the list.
Added “Patient Payment” and “Unpaid” columns in the list.
Reports are now sorted in descending order based on the number of units used.
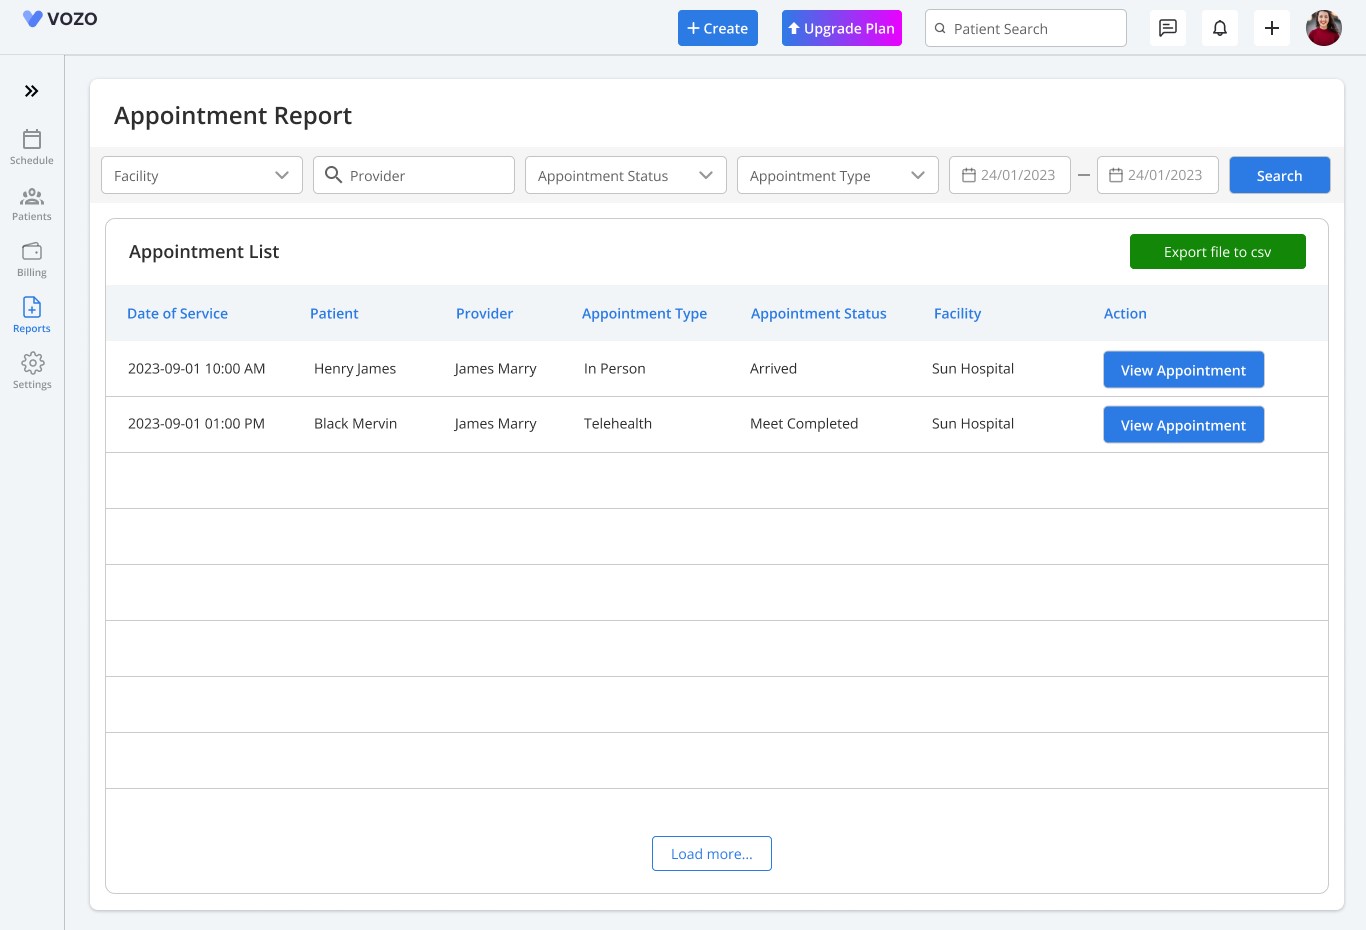
The Appointment Report has been restructured, including:
The Telehealth Report was removed and has been merged with the Appointment Report. The report list and filters have been changed based on the above changes.
New table headings:
Date of Service
Patient
Provider
Appointment Type
Appointment Status
Facility
Action
Users can now filter data based on appointment type and status.
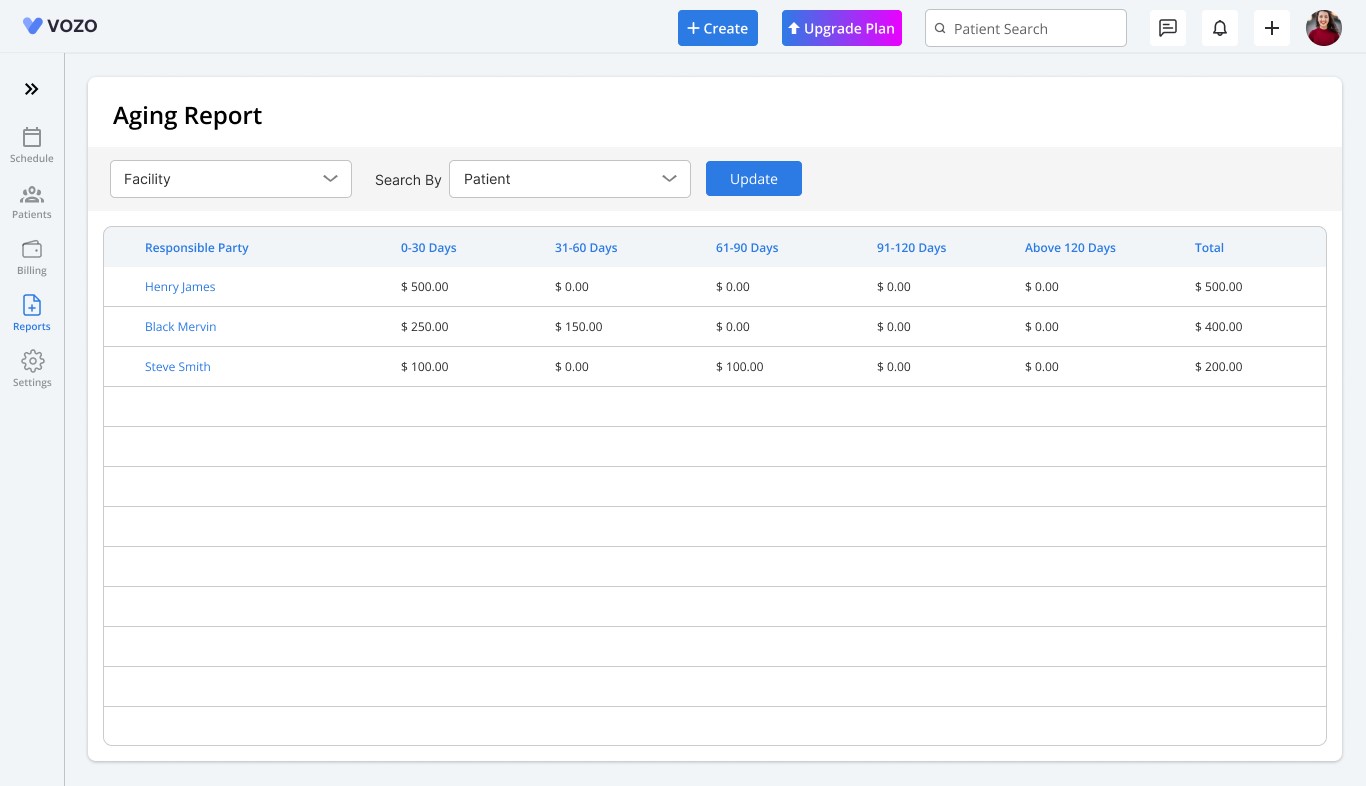
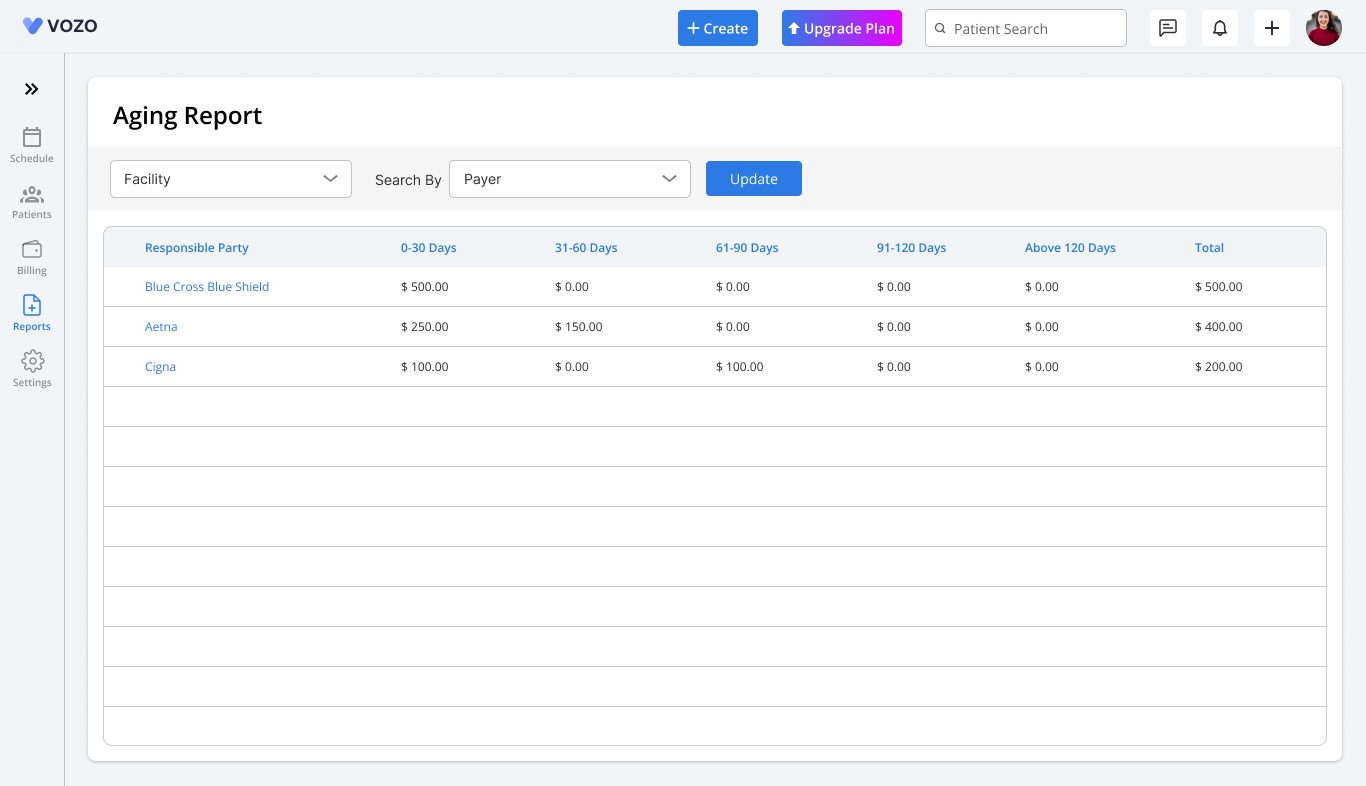
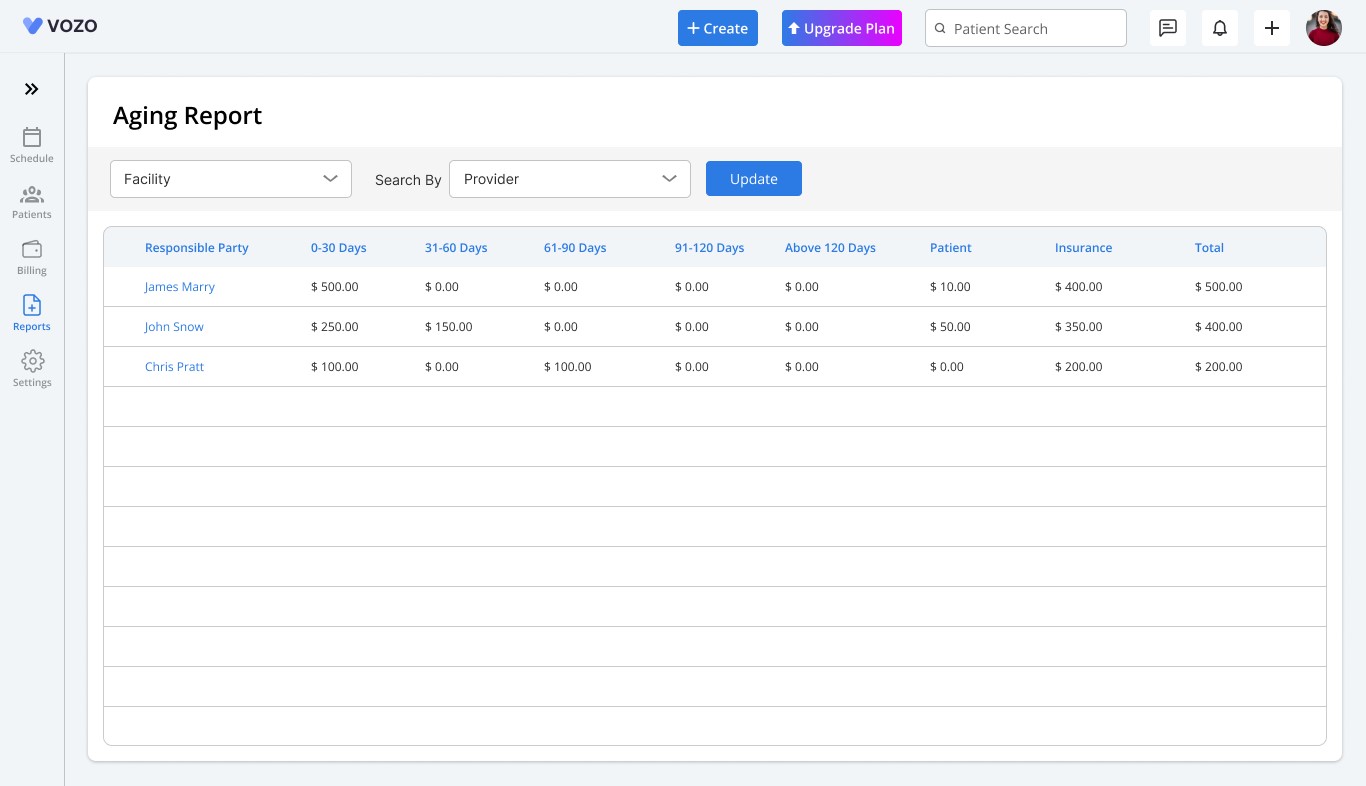
A new Aging Report menu has been added to track outstanding balances:
Filter options include Patient, Payer, and Provider with a facility.
When selecting Patient, the report lists patient balances to be paid due by 30-day intervals.
When selecting Payer, the report lists insurance balances to be paid by the payer due by 30-day intervals.
When selecting Provider, the report shows both patient and insurance balances to be paid by the patient and insurance payer to the provider.
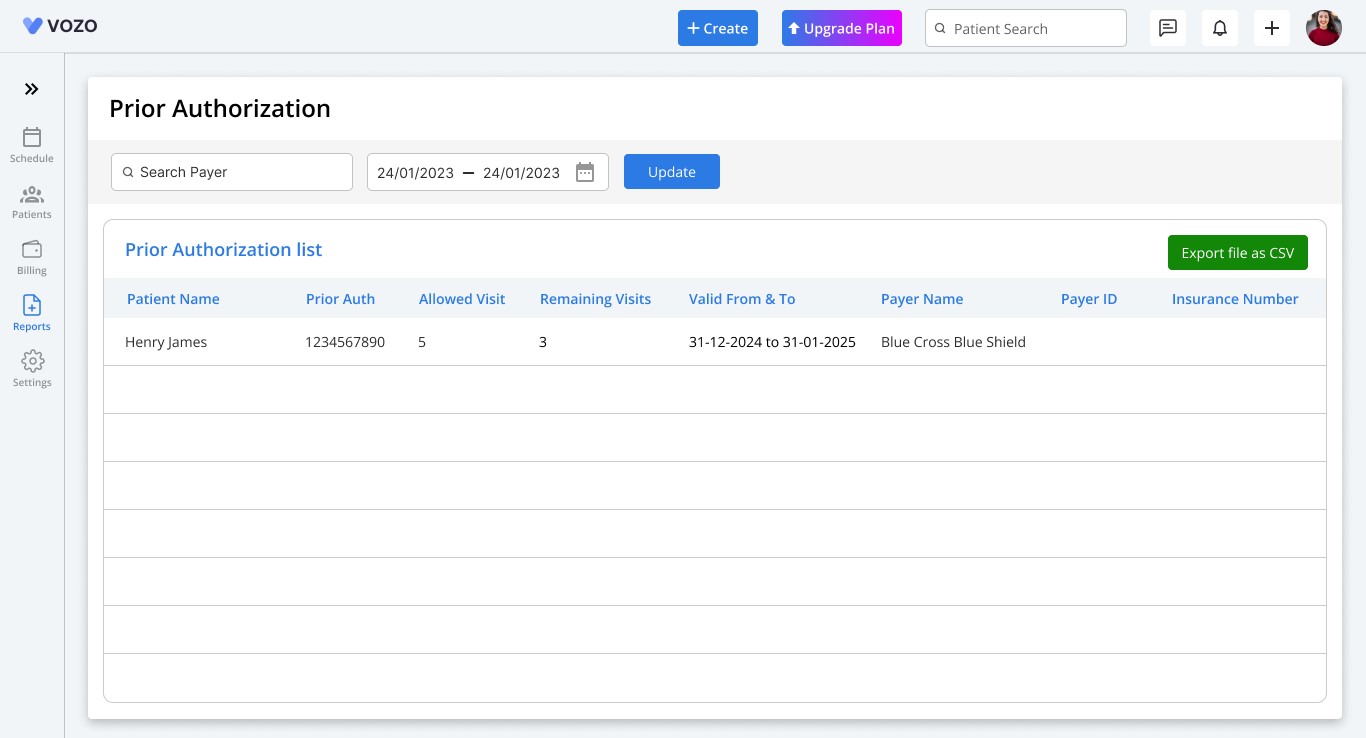
Prior Authorization Report
We have added a new menu named Prior Authorization Report and Prior Authorization List in the Patient Demographics Menu to track service authorizations:
Providers can now add authorization numbers for specific services provided to the patient.
Required fields include:
Service Code
Authorization Number
Expiration Dates
No. of Users Allowed and Remaining
After entering all these details and clicking the 'Add Prior Authorization' button, the information will be saved in the list below the input details card.
The added prior authorization number will also be listed in the new Prior Authorization Report menu to view all authorization codes based on the patients, expiration dates, and payer approvals.
Eligibility Verification Report
A new Eligibility Report has been introduced to list every eligibility check performed for insurance:
The report lists patient coverage details, including:
Date Requested for Coverage Check
Patient Name
Provider
Payer
Coverage Date
Status
This update allows providers to verify insurance coverage status efficiently.
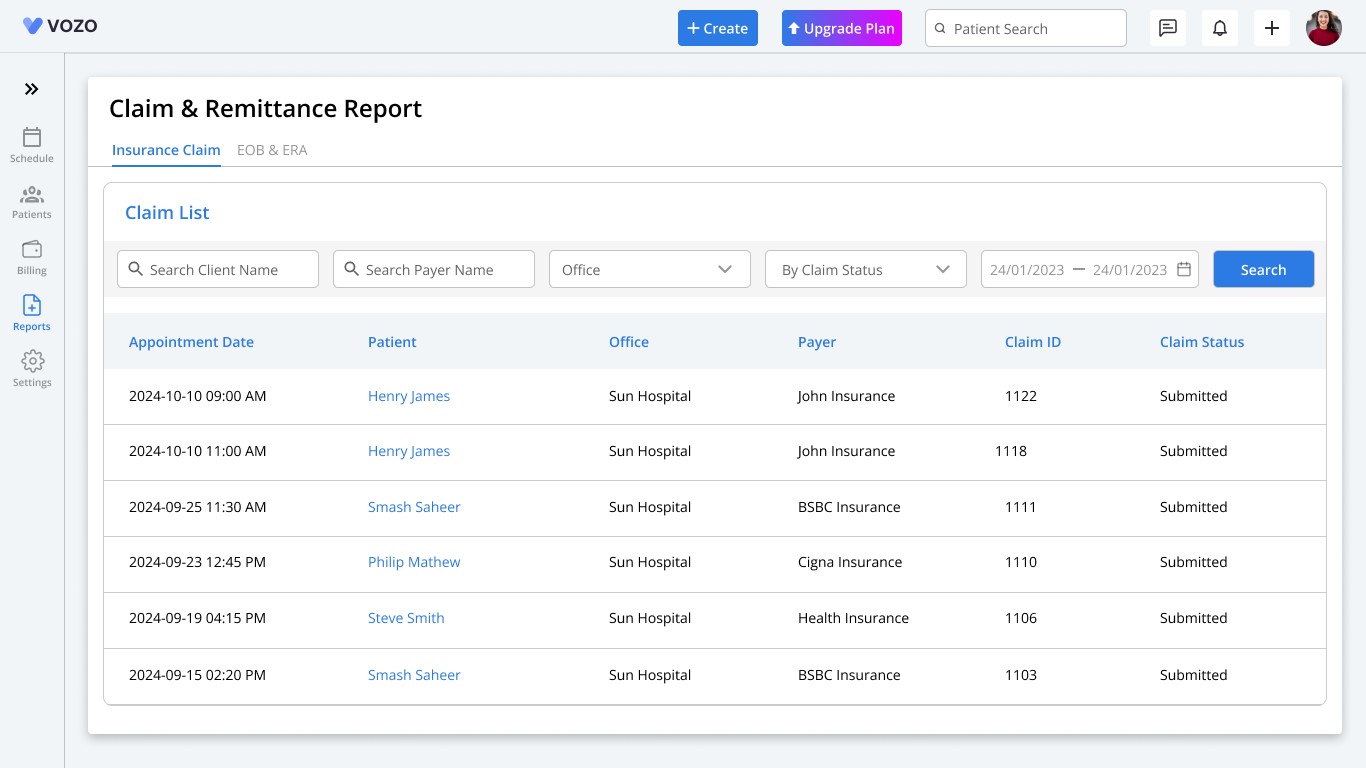
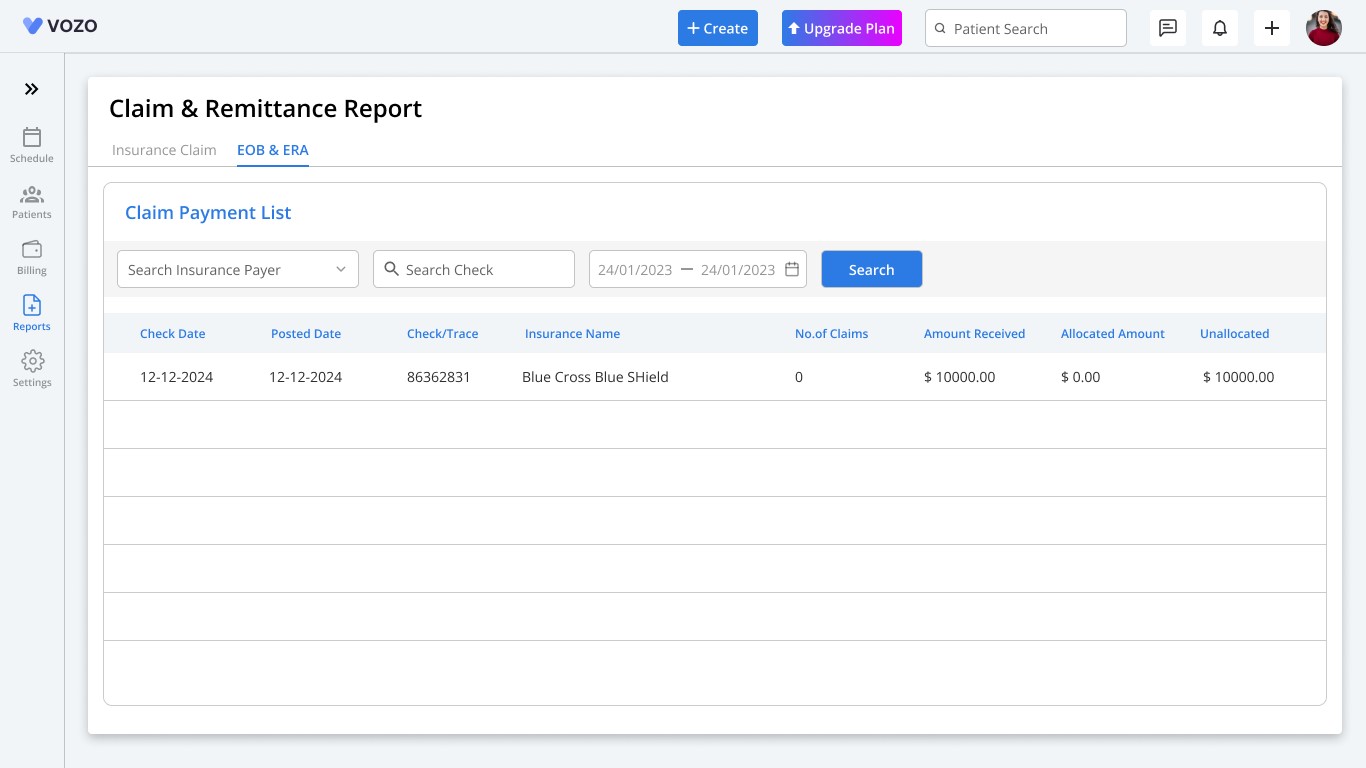
Claim & Remittance Report
The Remittance Report has been renamed to Claim & Remittance Report, integrating Insurance Claims and EOB/ERA details.
Two new tabs:
Insurance Claim – Lists claims generated for patients.
EOB & ERA – Displays Explanation of Benefits (EOB) and Electronic Remittance Advice (ERA) details. Includes allocated and unallocated amounts used for the payment for insurance-based appointments.
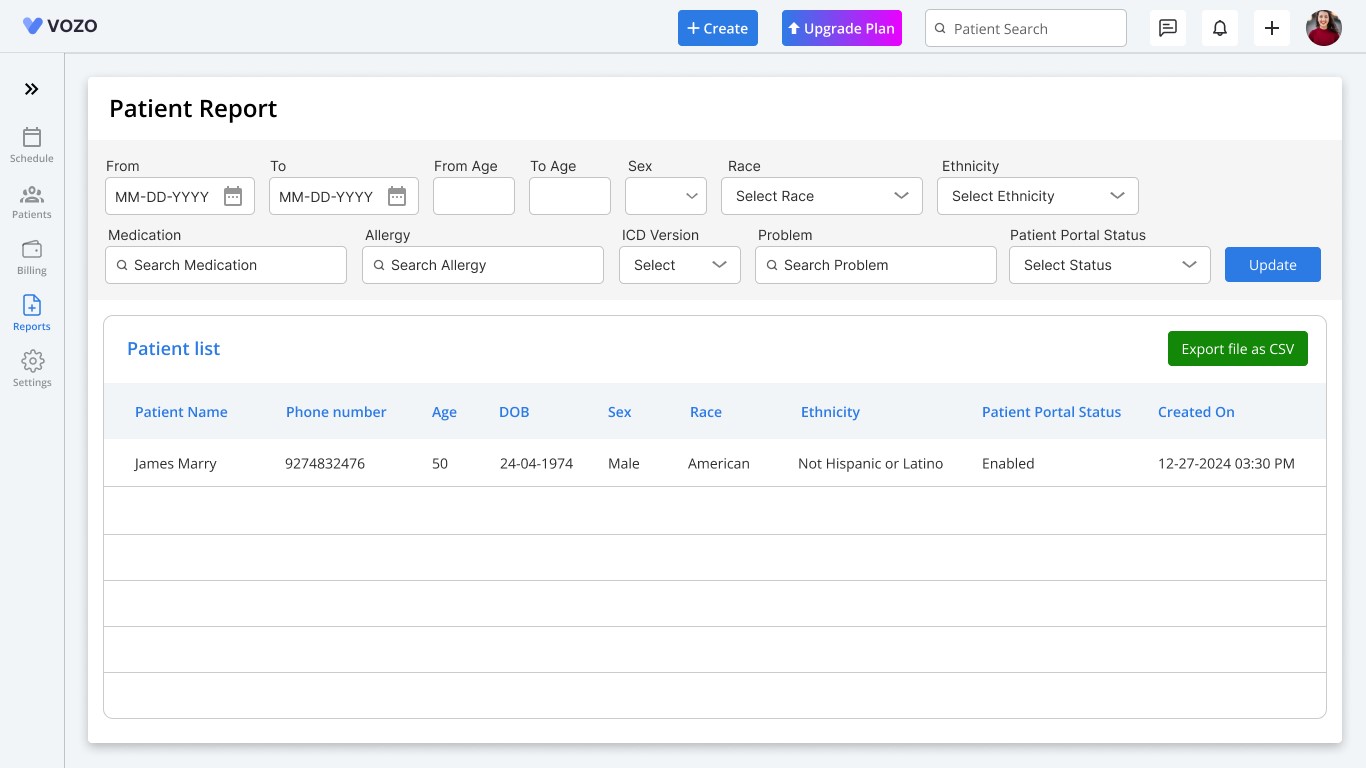
Patient Report
Enhancements to the Patient Report include:
A new filter for “From Age” and “To Age” has been added. Previously, only a single-age filter was available.
The "Prefd Language" column has been removed and replaced with "Patient Portal Status", which includes a dropdown selection:
Enabled
Disabled
Settings Module Update
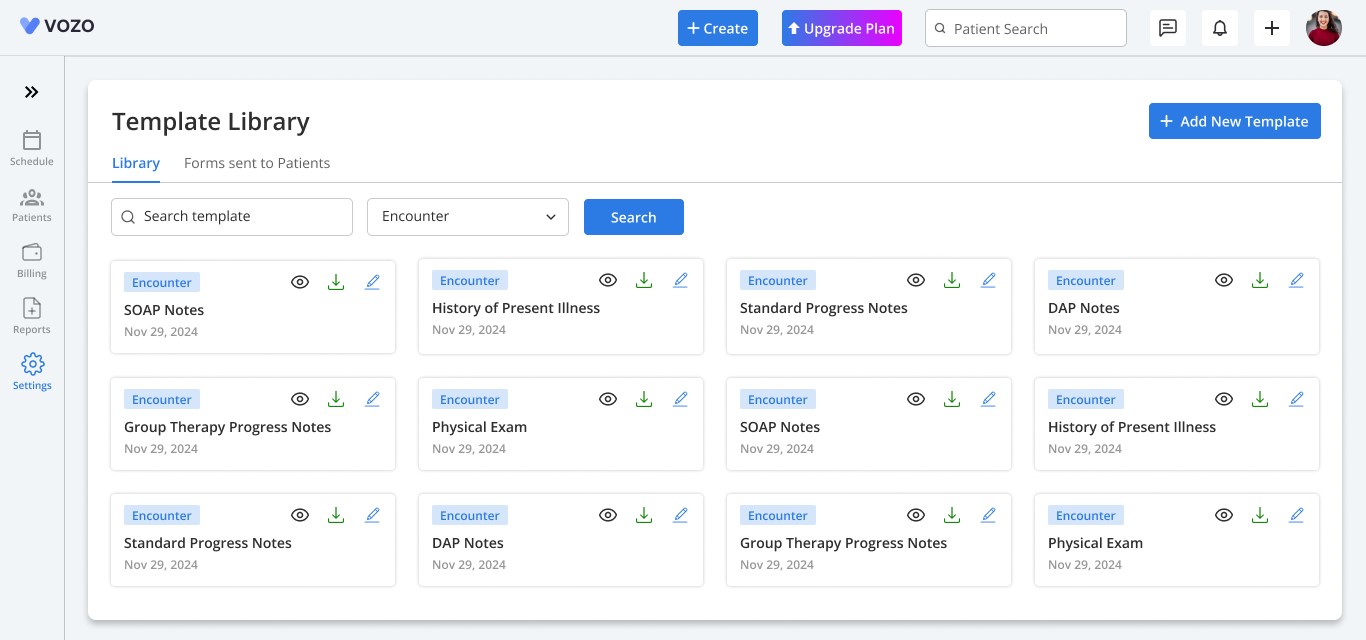
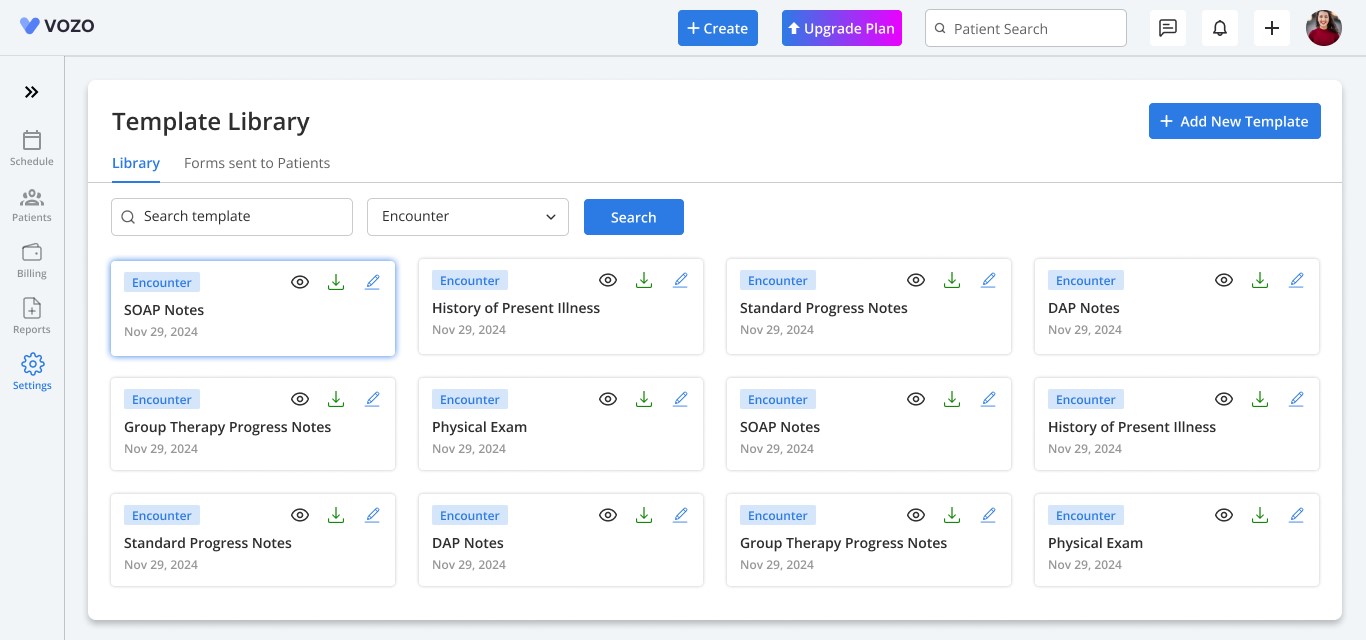
Template Library
Our EHR initially had both the form builder and document template, but the workflow was cumbersome. After analysis, we chose to use only the document template module, with modifications, as a single editor for notes and clinical documentation.
The Template Library menu has been renamed and relocated to Settings > Administration > Templates for better accessibility.
The Template Library now consists of two tabs:
Library – Displays all pre-built default templates that providers can use for documentation.
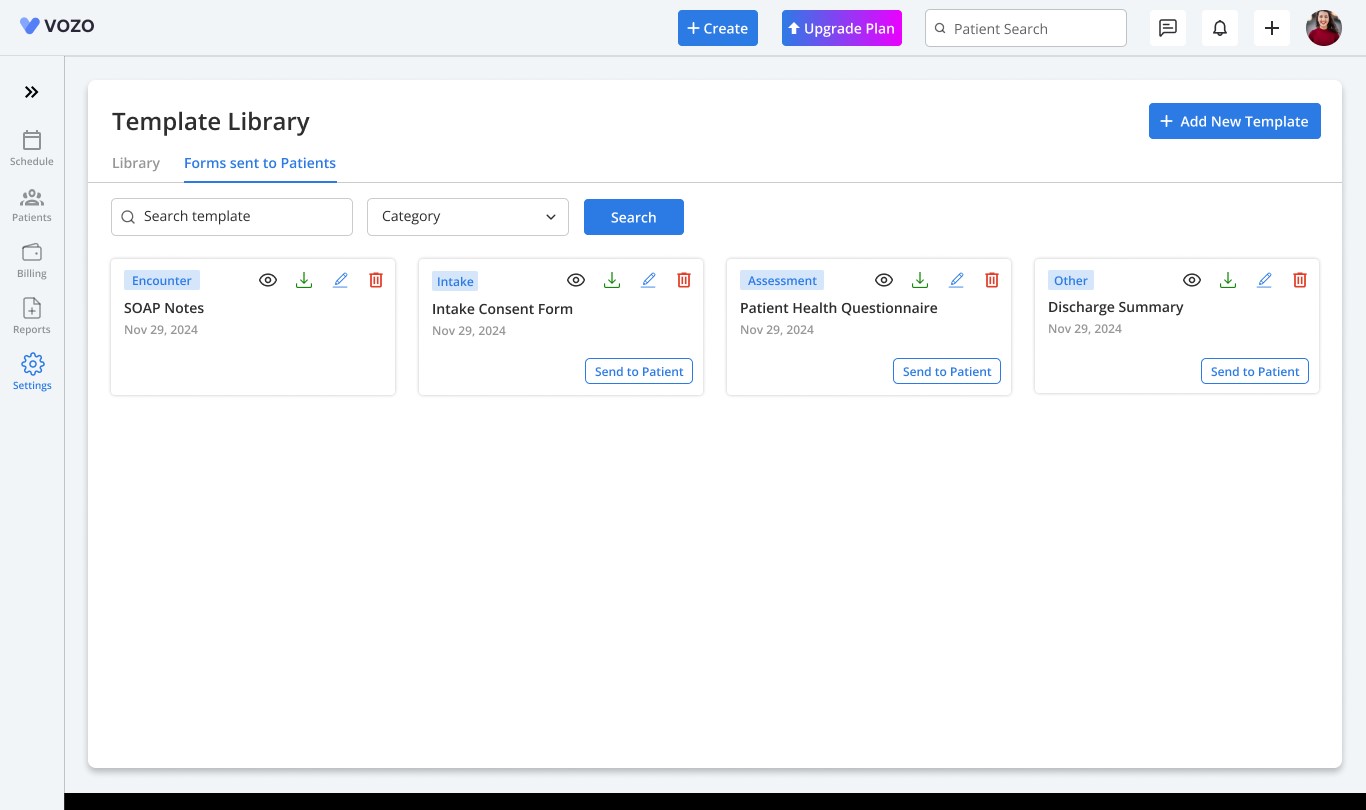
Forms Sent to Patients – Lists all templates and forms that have been sent to the patient portal for review or signature.
Default Template Listing and Card View
By default, templates are categorized under Encounter and displayed in a card view.
Each template card includes multiple options:
Eye icon – Preview the template before use.
Download icon – Save the template as a file.
Edit icon – Modify the template as needed.
Set as Default toggle (visible on hover) – Set a template as the default note when adding clinical notes.
When a template is set as default, the card will have a blue border to highlight its selection.
Templates from Encounter, Intake, Assessment, and Other categories are available, but only Encounter templates can be set as default.
If a provider selects a template under Intake, Assessment, or Other, a Send to Patients button appears.
Clicking this button will trigger the Assign Document pop-up, allowing users to send the form directly to the Patient Portal.
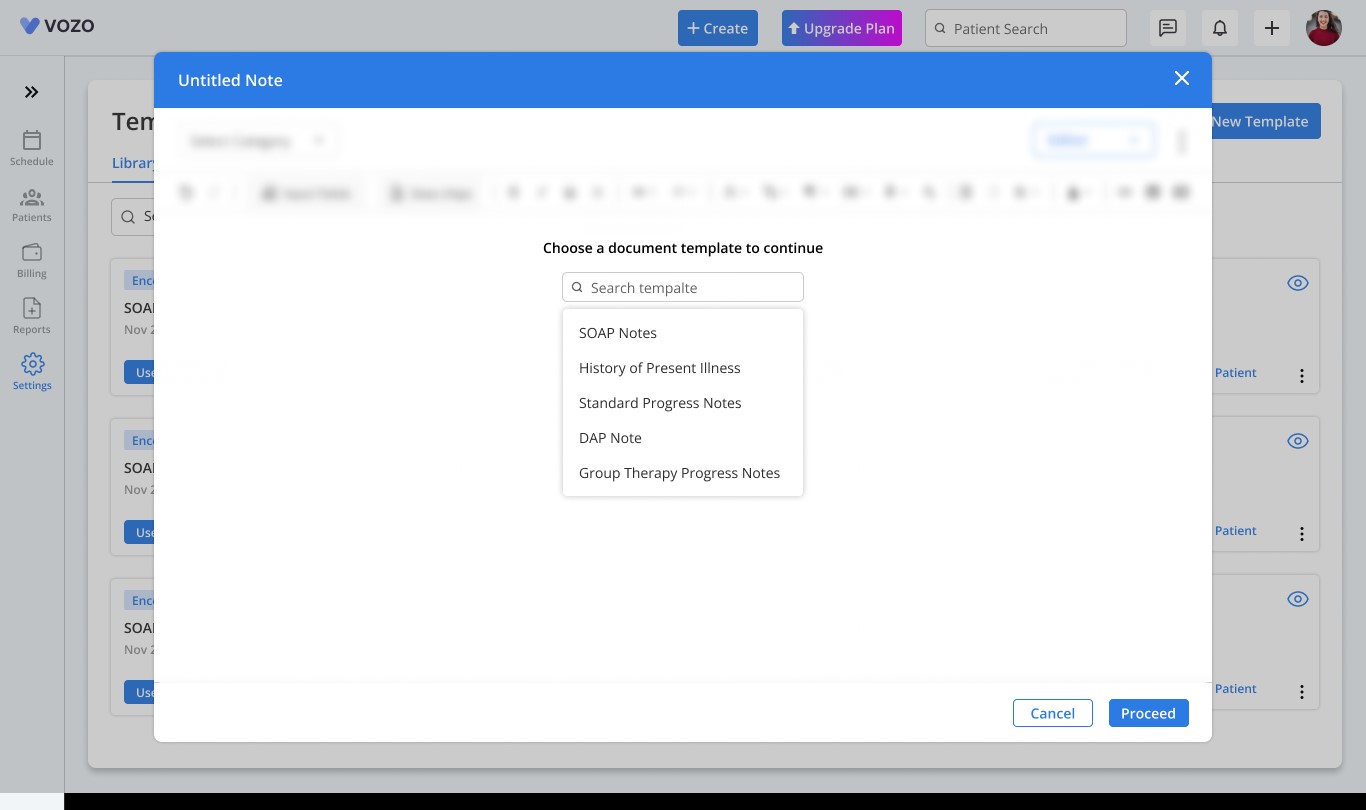
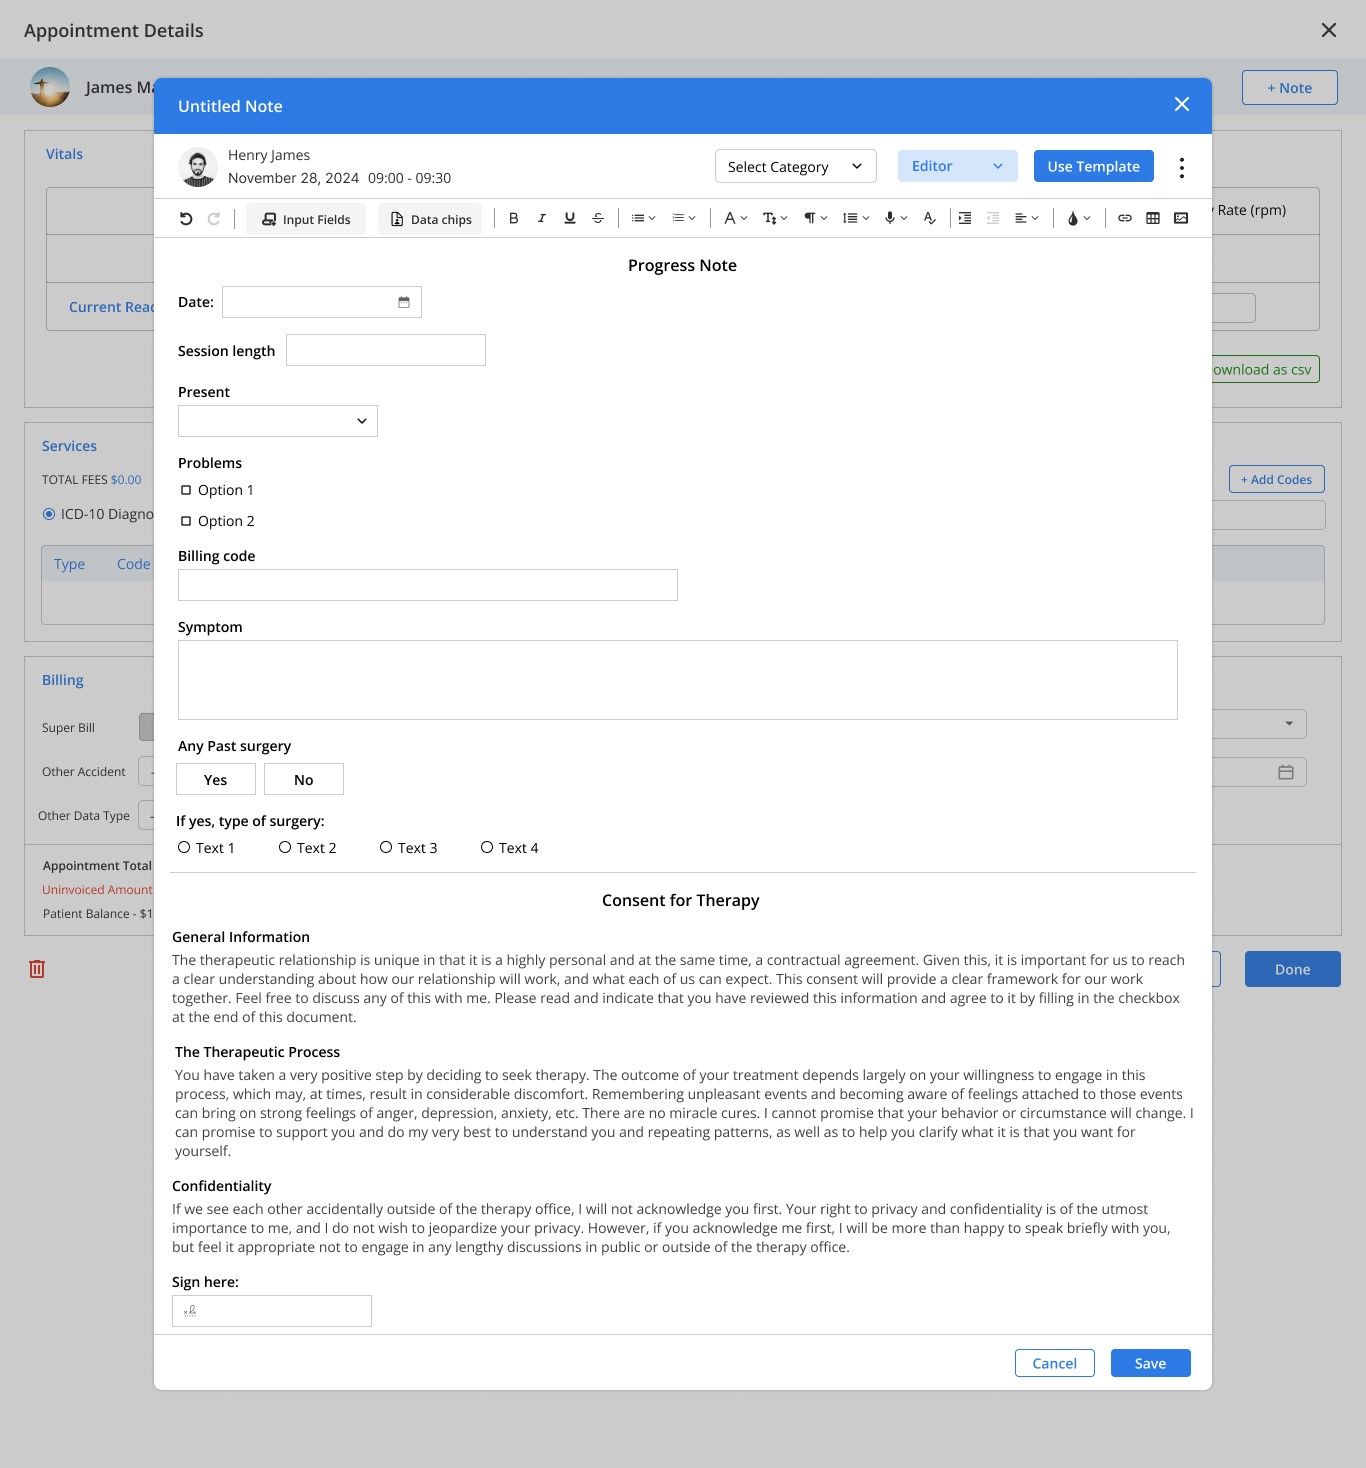
Clicking "Add New Template" opens the Notes Editor in Editor Mode, where users can:
Create notes based on the following categories: Encounter, Intake, Assessment, and Others.
Freely type template content.
Add structured input fields such as text boxes, date pickers, and multi-select options by clicking on the Input Fields button.
Select pre-built note templates from a searchable list of frequently used or recently accessed templates using the Use Template button.
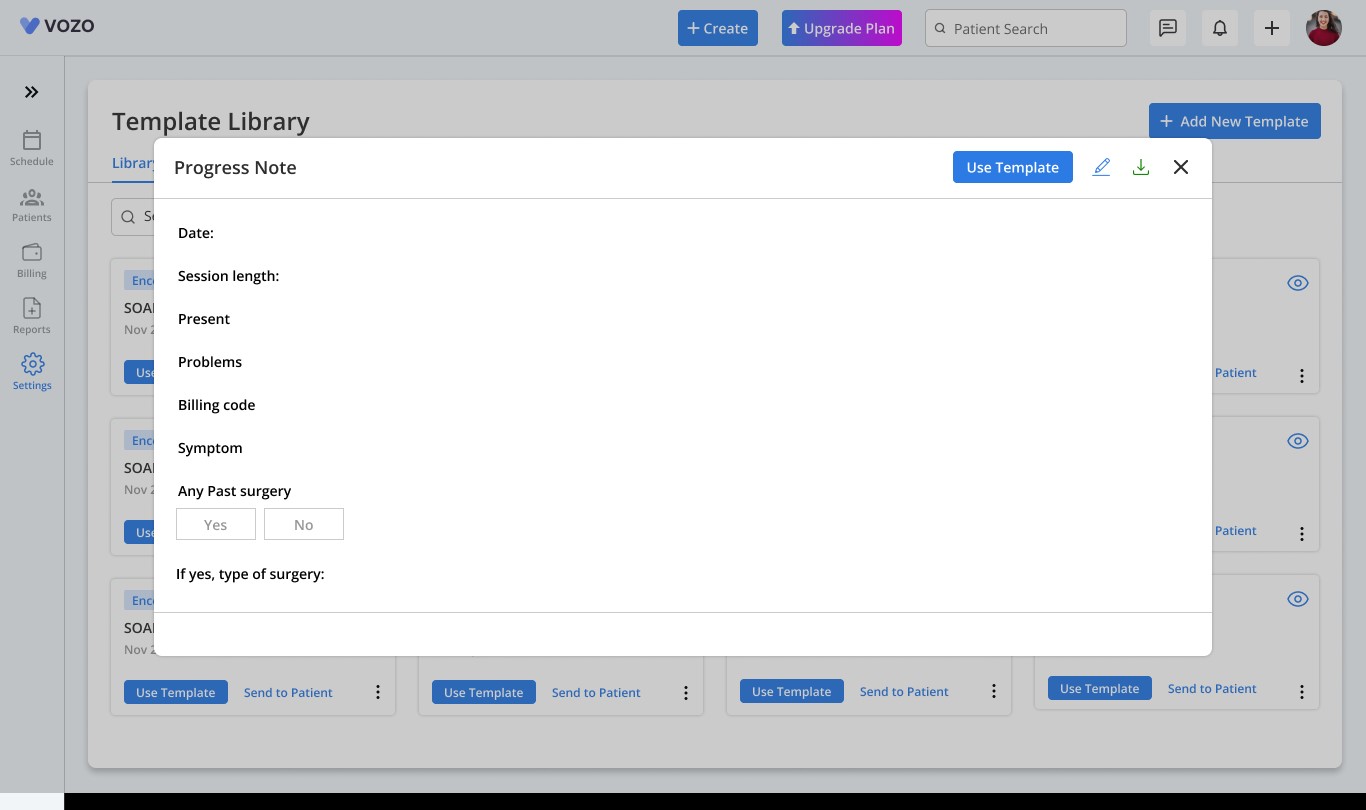
From the Library tab, clicking the Preview (Eye) icon opens a pop-up preview of the template.
The pop-up includes the following options:
Use Template – Apply the template for note-taking.
Edit Template – Modify the existing template
Download – Save the template locally.
Close – Exit the preview window.
By clicking on the edit icon, users can edit the templates in the text editor with pre-populated templates.
The Forms Sent to Patients tab displays all notes & forms assigned to patients.
Providers can take the following actions:
Preview – View the form before making changes.
Download – Save a copy for offline use.
Edit – Modify the form before sending it.
Delete – Remove a form from the patient’s records.
Send to Patient – Share the form with the patient via the portal.
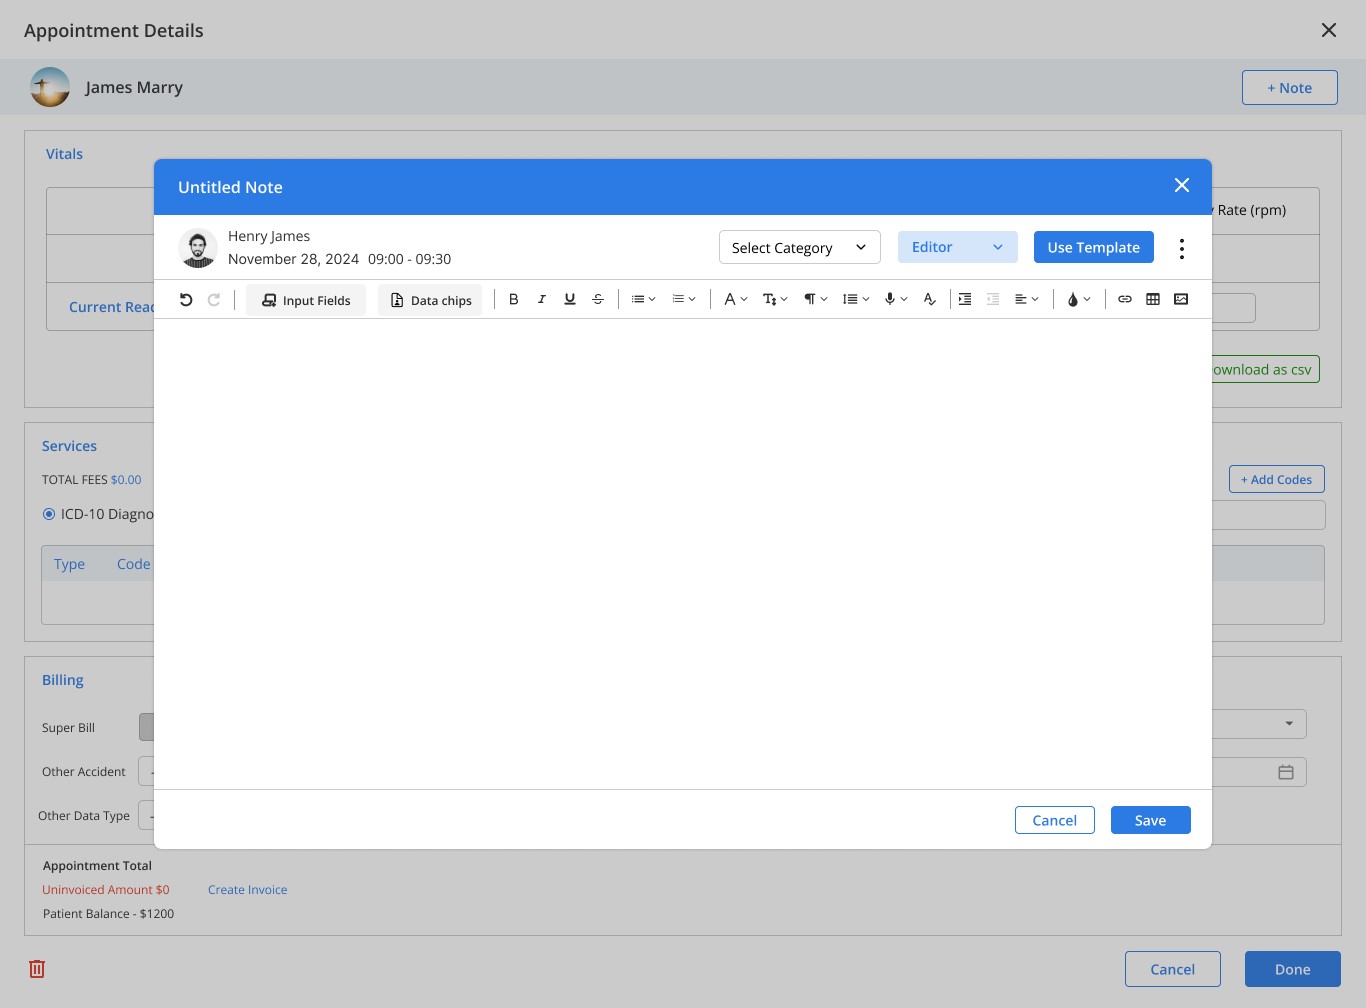
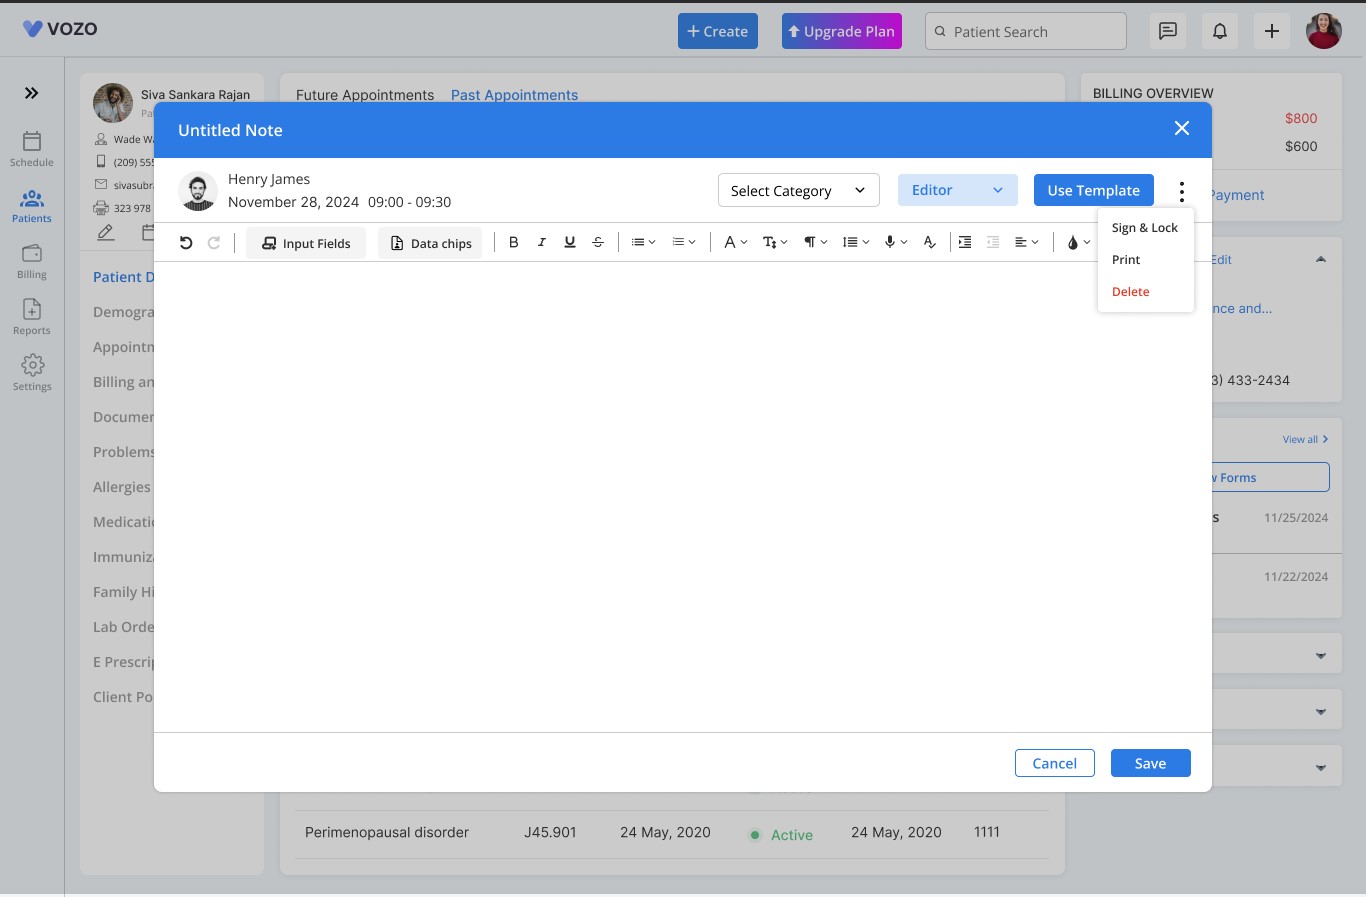
From the Appointment Details page, clicking the "Add Note" button opens the Notes Editor pop-up.
Providers can:
Create a new note from scratch.
Use an existing template from the Library by clicking on the “Use Template” button to streamline documentation.
Providers can now add multiple templates to a single clinical note.
If a user starts with either a pre-built default template or a custom new template, additional templates can only be selected from pre-built templates by clicking the “Use Template” button.
After creating or adding clinical notes, users can switch from "Editor Mode" to "Viewer Mode".
Viewer Mode allows providers to preview how notes will appear when shared with the Patient Portal.
Users can also create non-encounter notes such as:
Intake Forms
Assessment Forms
Other Documentation
This can be done by clicking the "Add New Form" button on the Patient Dashboard.
When the "Add New Form" button is clicked:
The Notes Editor pop-up opens.
Users can either create a new note or select an existing template from the Library using the "Use Template" button.
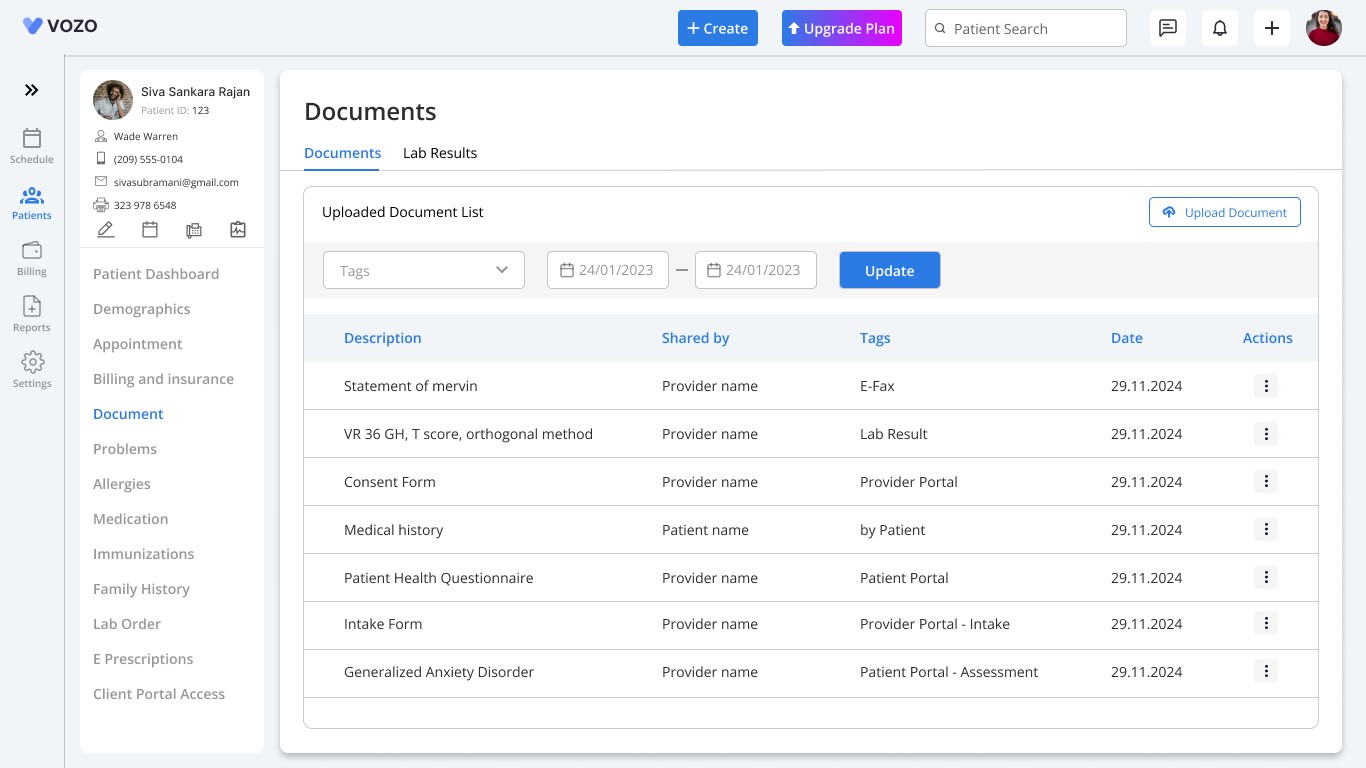
Once forms are added, they will appear in the Forms Card under Patient Demographics, organized by the date they were added.
Users can access all added forms by clicking the "View All" button, which redirects to the Documents Menu.
All added documents will now have tags based on their origin:
Provider uploads document via Upload Document → Tag: Provider Portal
Provider adds a form from Patient Dashboard → Tag: Provider Portal - Intake/Assessment/Other
Patient uploads document via Patient Portal → Tag: Patient Portal
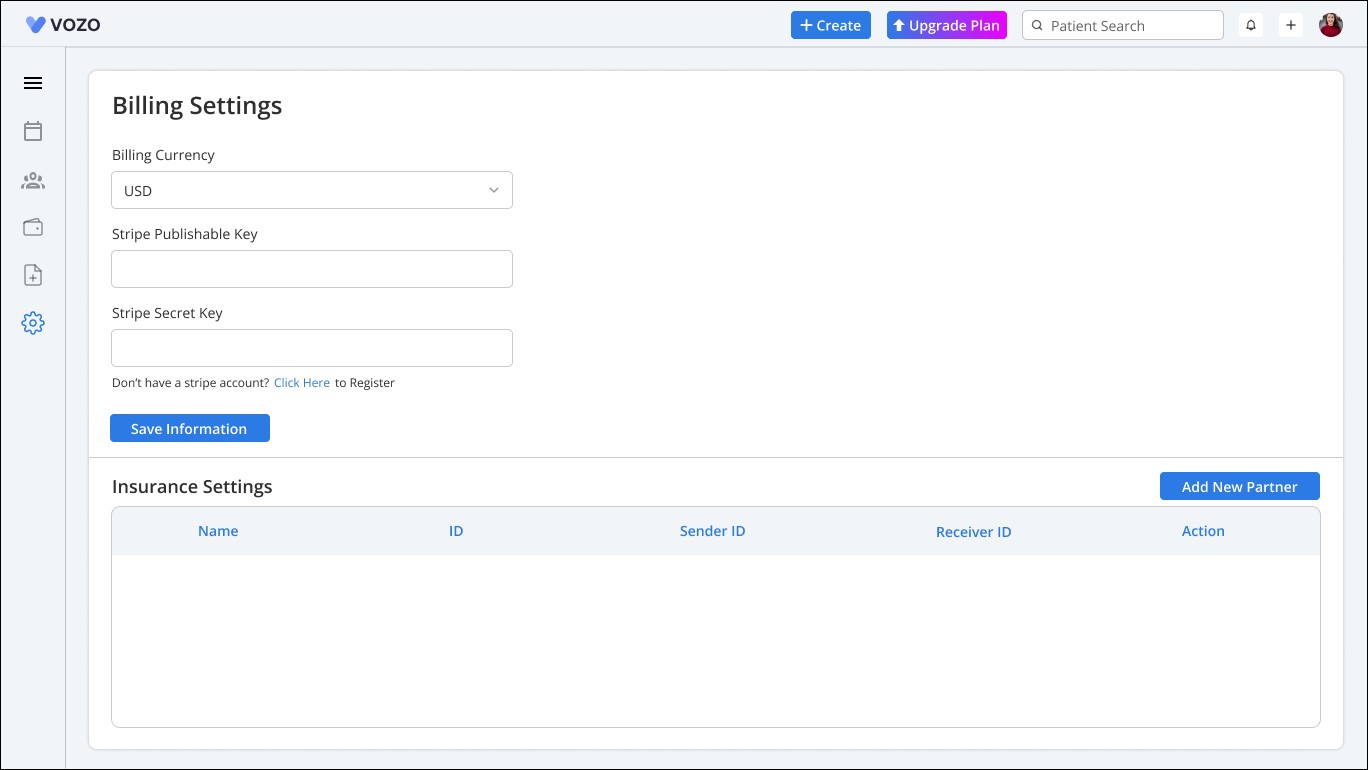
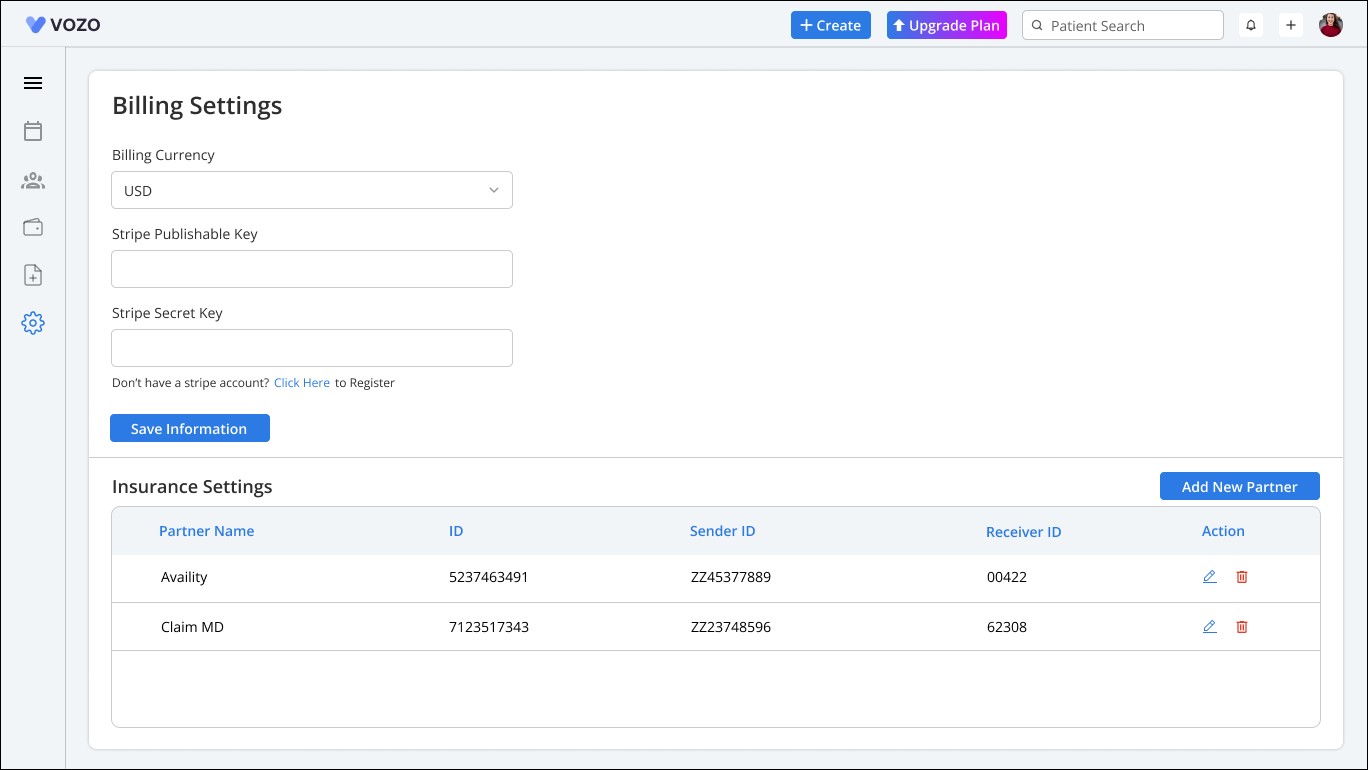
Navigate to the Settings Module and click on Billing Settings.
A new section named Insurance Settings has been added for configuring clearing houses with credential details.
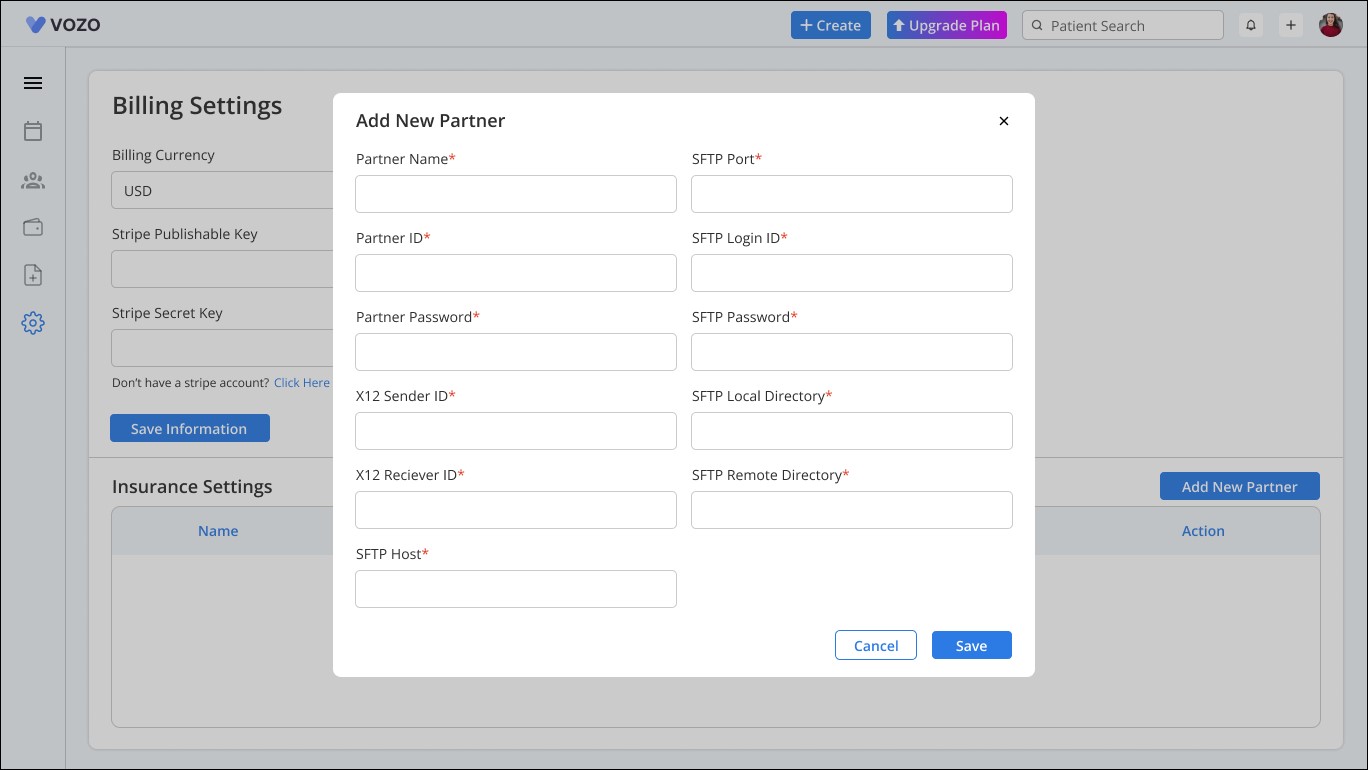
Click the Add New Partner button.
A pop-up window will open, displaying input fields required for clearing house configuration.
Fill in the required credential details in the provided fields.
Click the Save button to store the clearing house information securely.
Once saved, the clearing house details will be listed under the Insurance Settings section for easy access and management.
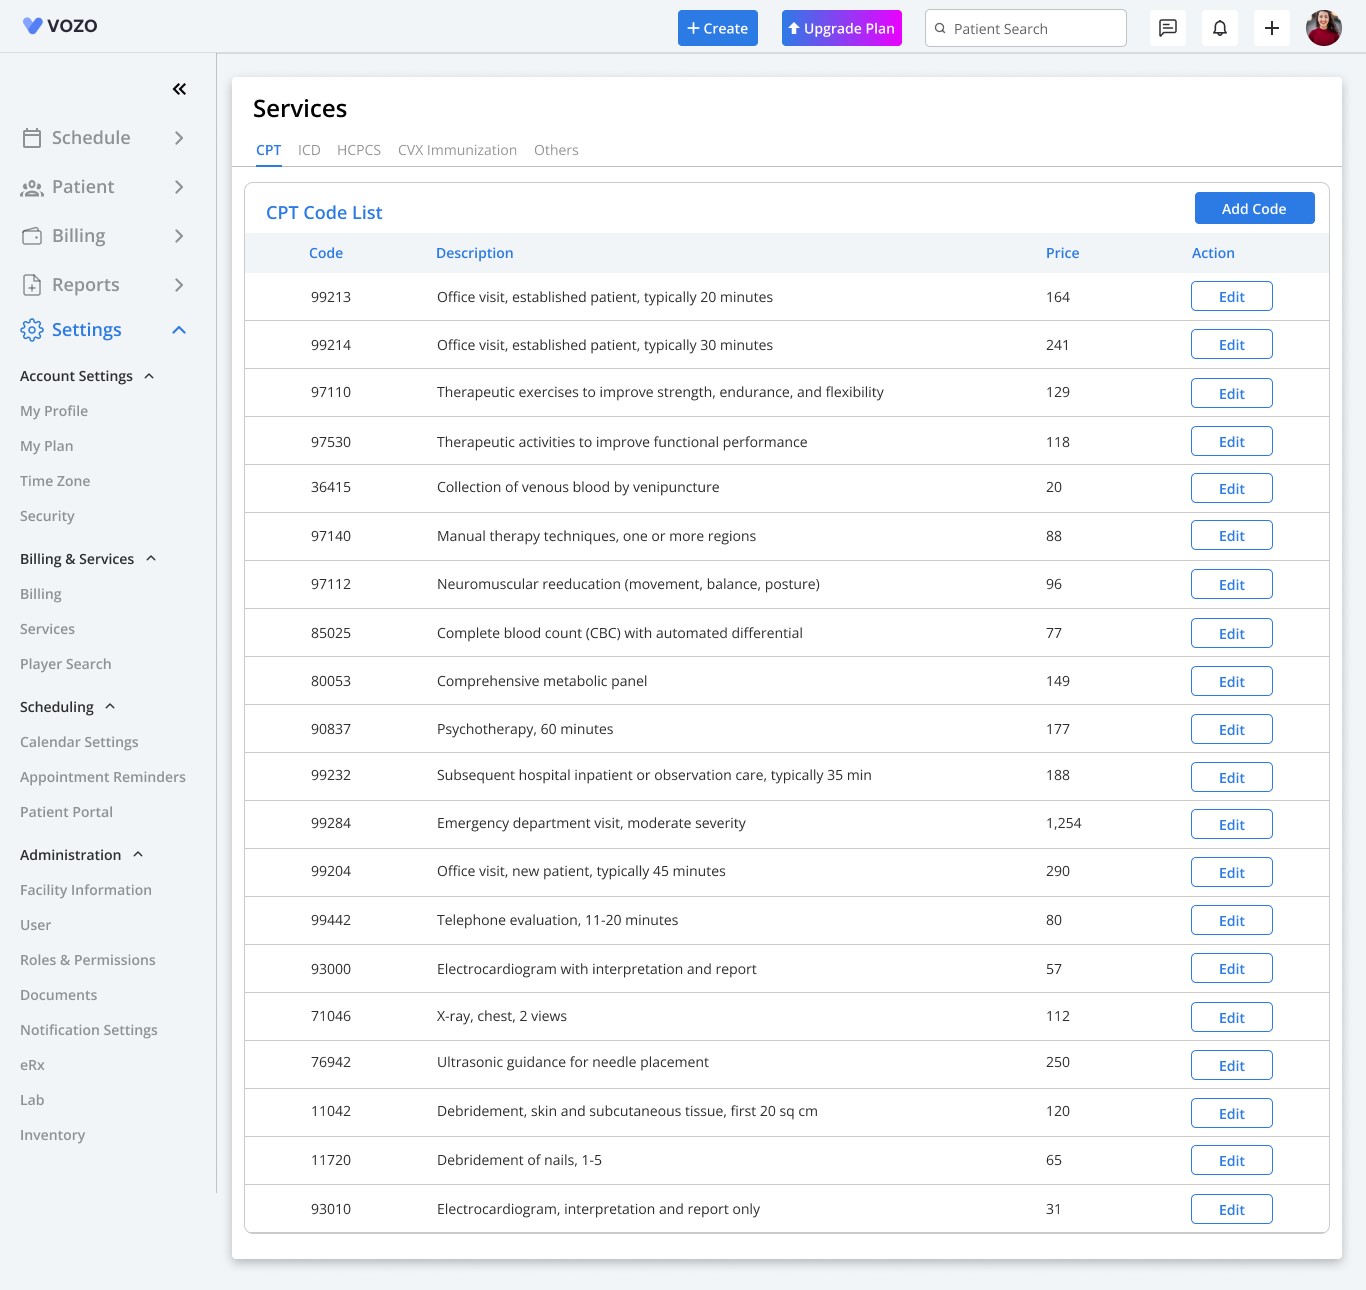
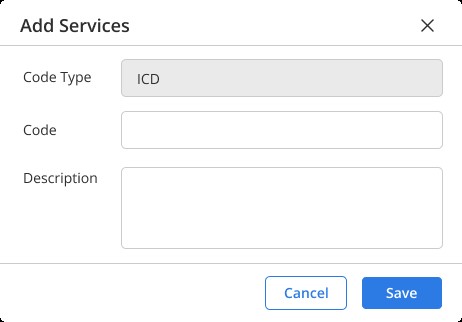
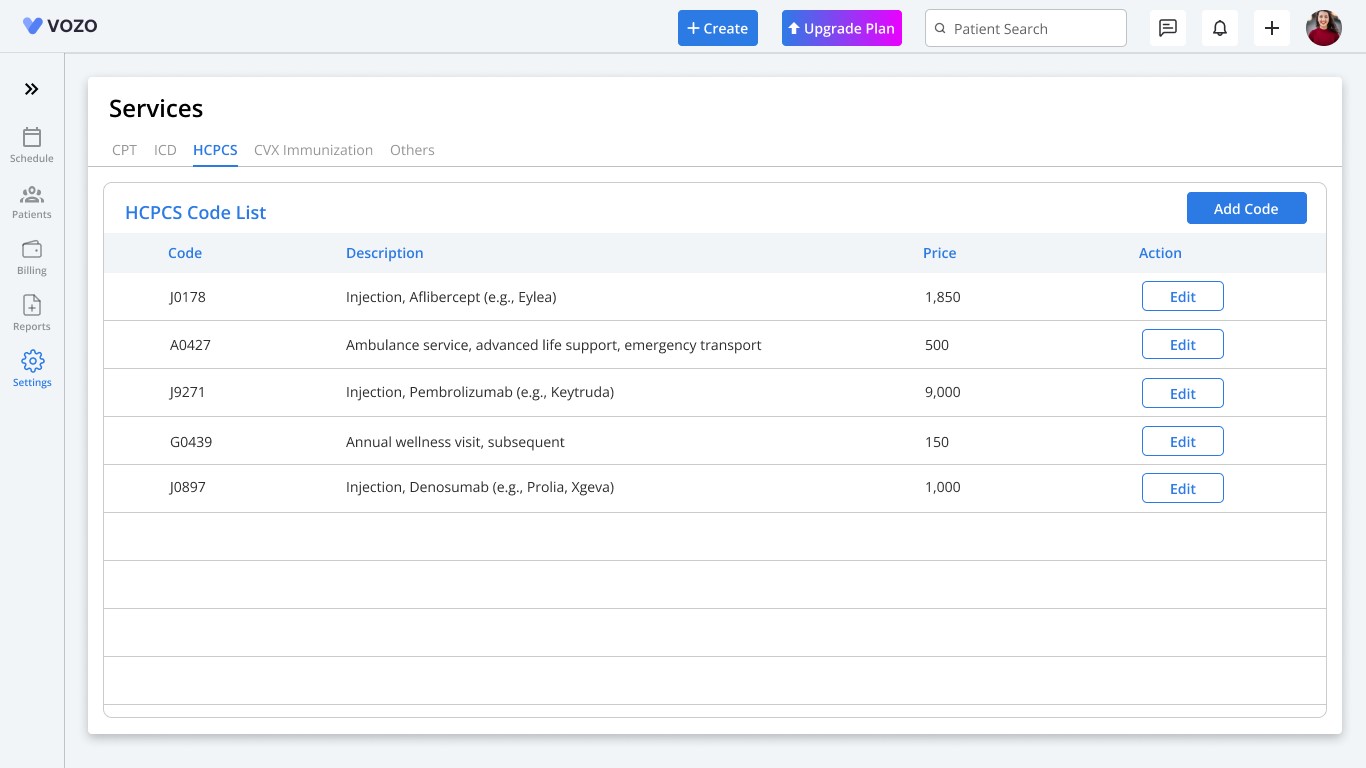
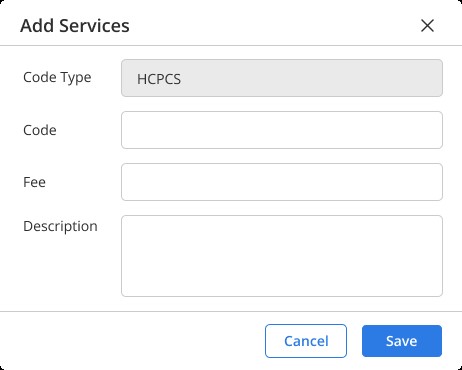
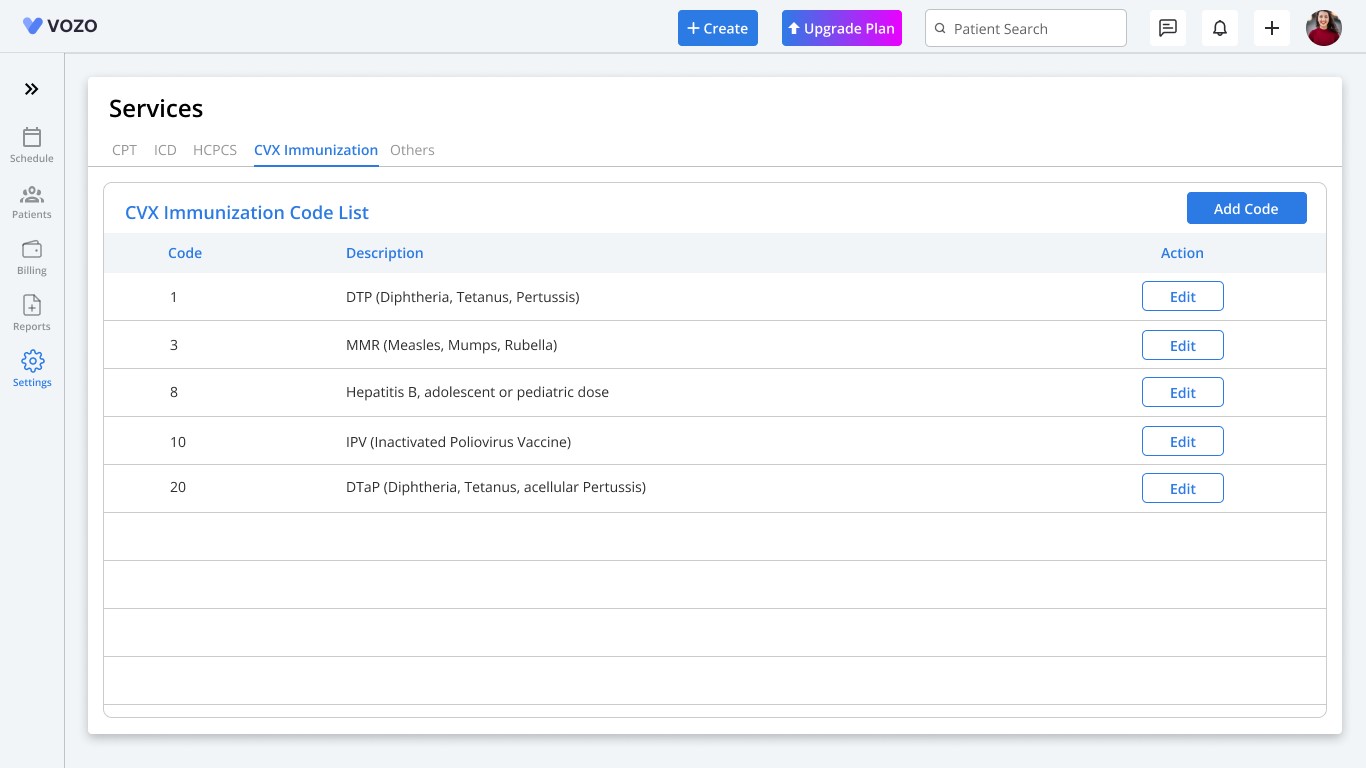
Services
We have split service codes into distinct tabs based on their type.
This allows users to navigate seamlessly while adding or managing codes. Additionally, we have listed some of the most commonly used codes within each category.
The CPT Codes tab displays a default list of 20 CPT codes frequently used in the EHR system.
To edit an existing CPT code, click the Edit button and update the necessary details.
To add a new CPT code, click the Add Code button. A pop-up will appear with CPT as the default code type.
Enter the required code details and click Save to finalize the addition.
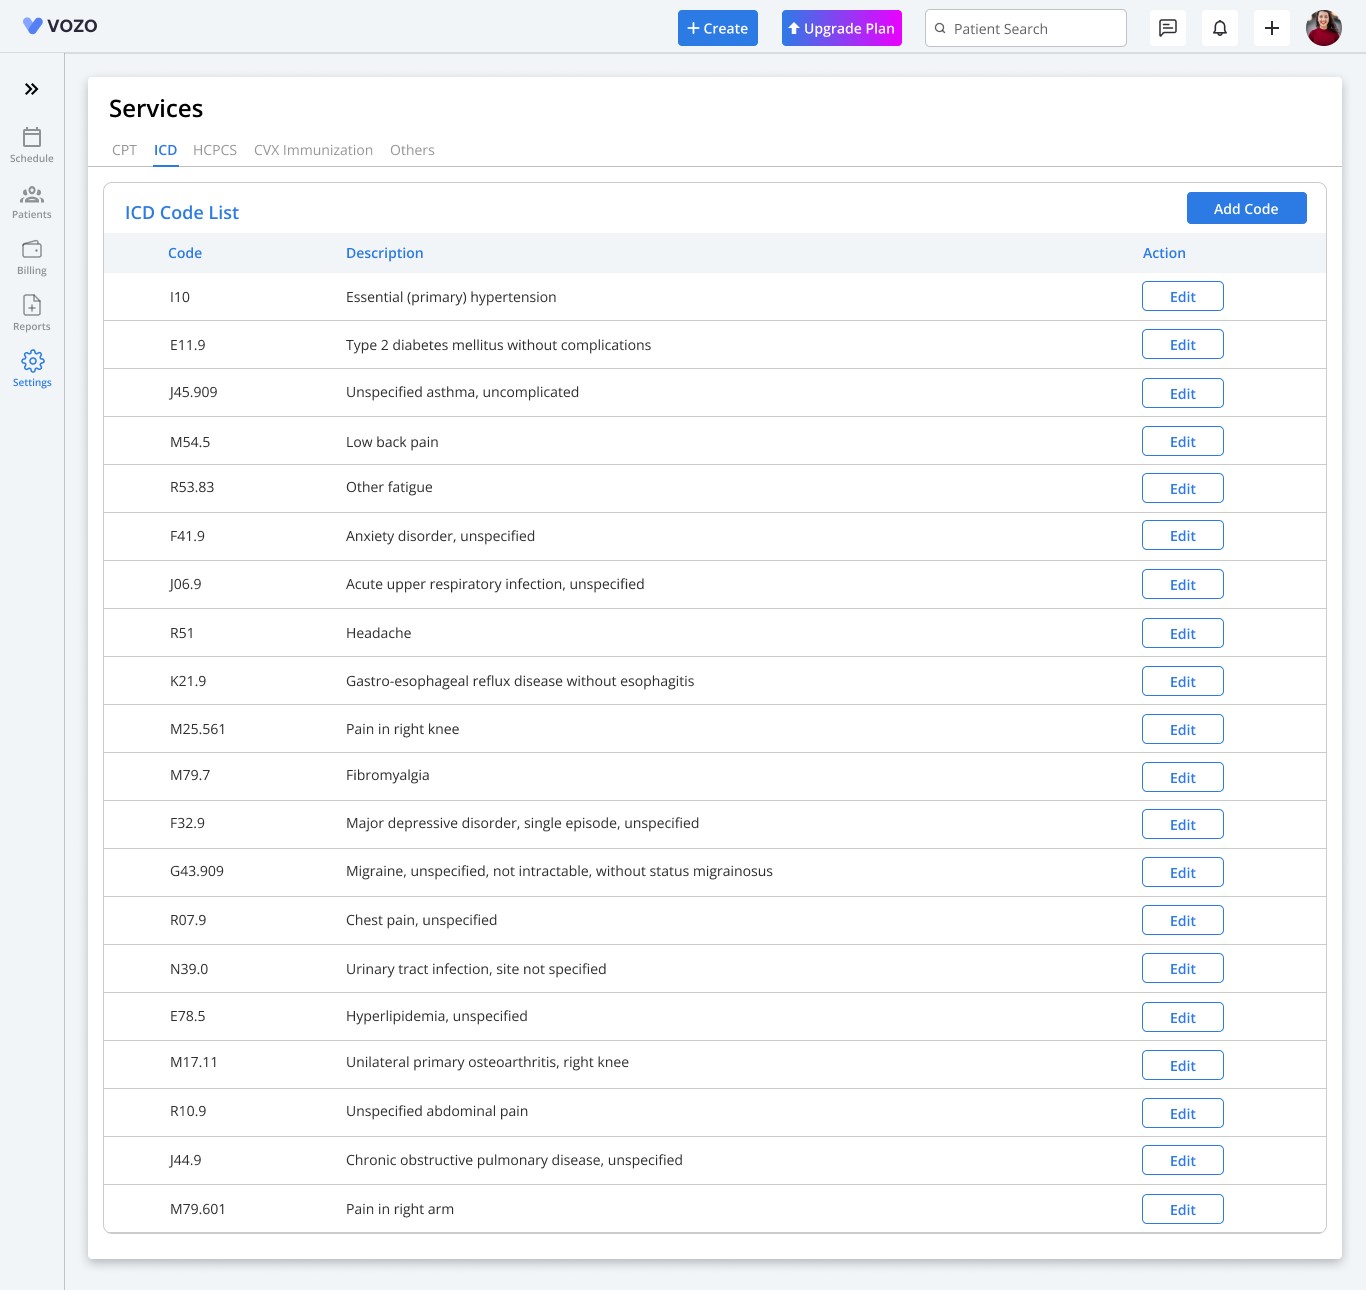
This tab lists the top 20 ICD codes used in the system.
The editing and adding process follows the same steps as the CPT Codes tab.
Displays 5 default HCPCS codes based on their usage in services.
Users can edit and add HCPCS codes using the same method as CPT and ICD codes.
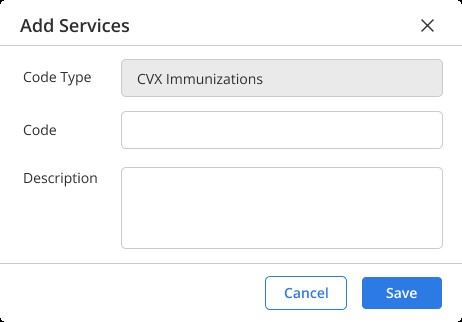
This tab contains 5 default CVX codes for immunization records.
Users can edit and add new CVX codes as needed.
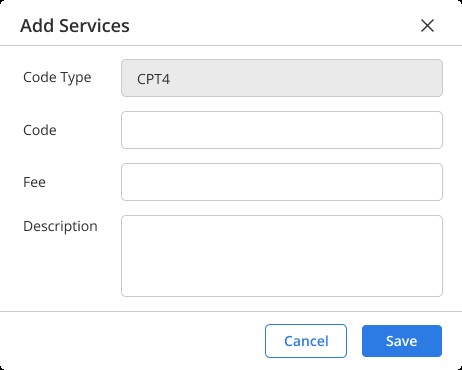
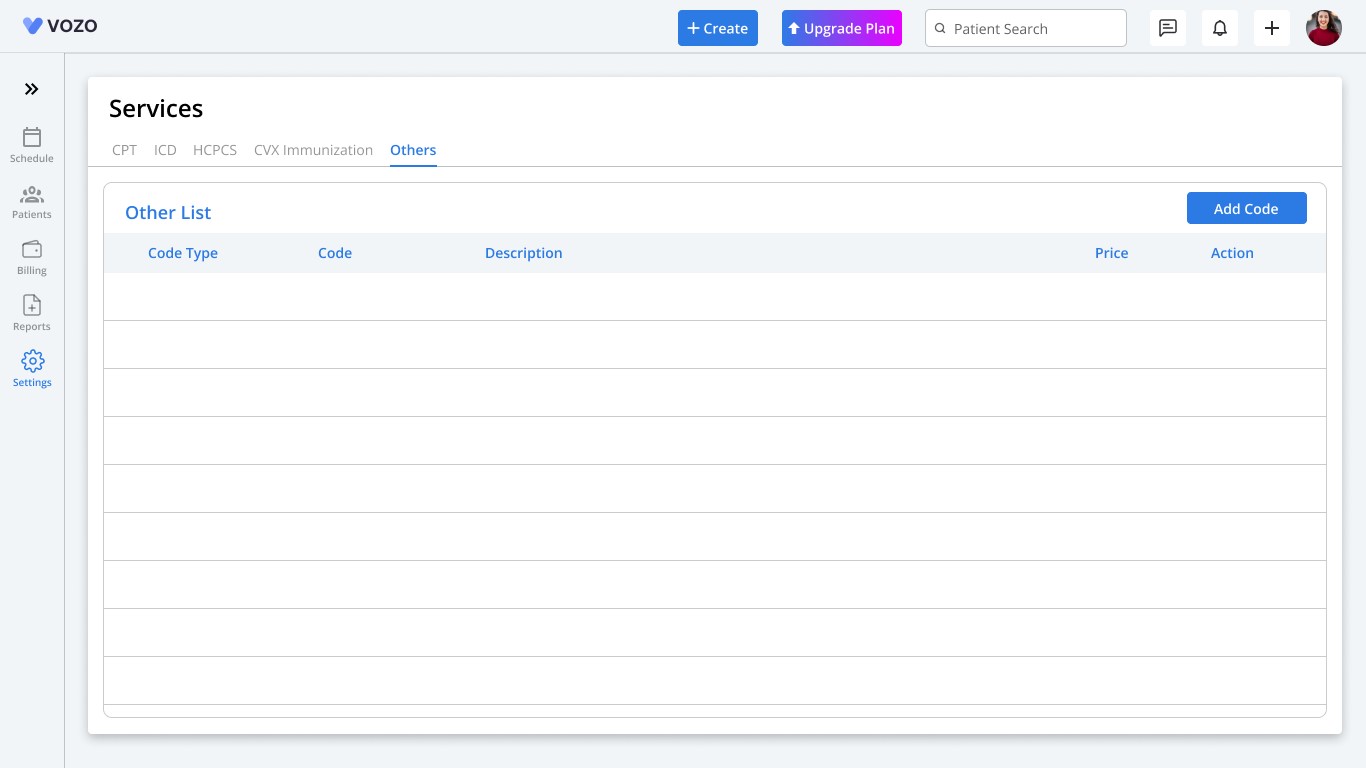
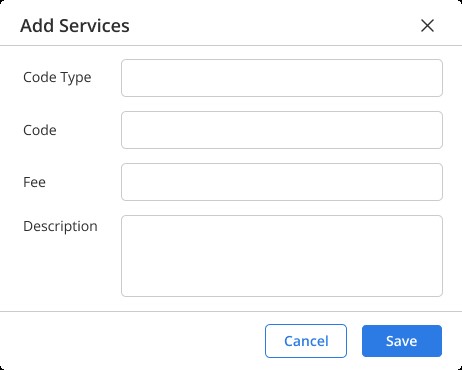
This tab allows users to manually enter additional codes, such as SNOMED, LOINC, or other coding systems used in the application.
No default codes are listed in this tab.
To add a new code, click the Add Code button. In the pop-up window, enter the code type, code, fee, and description, and click Save to store the new entry.
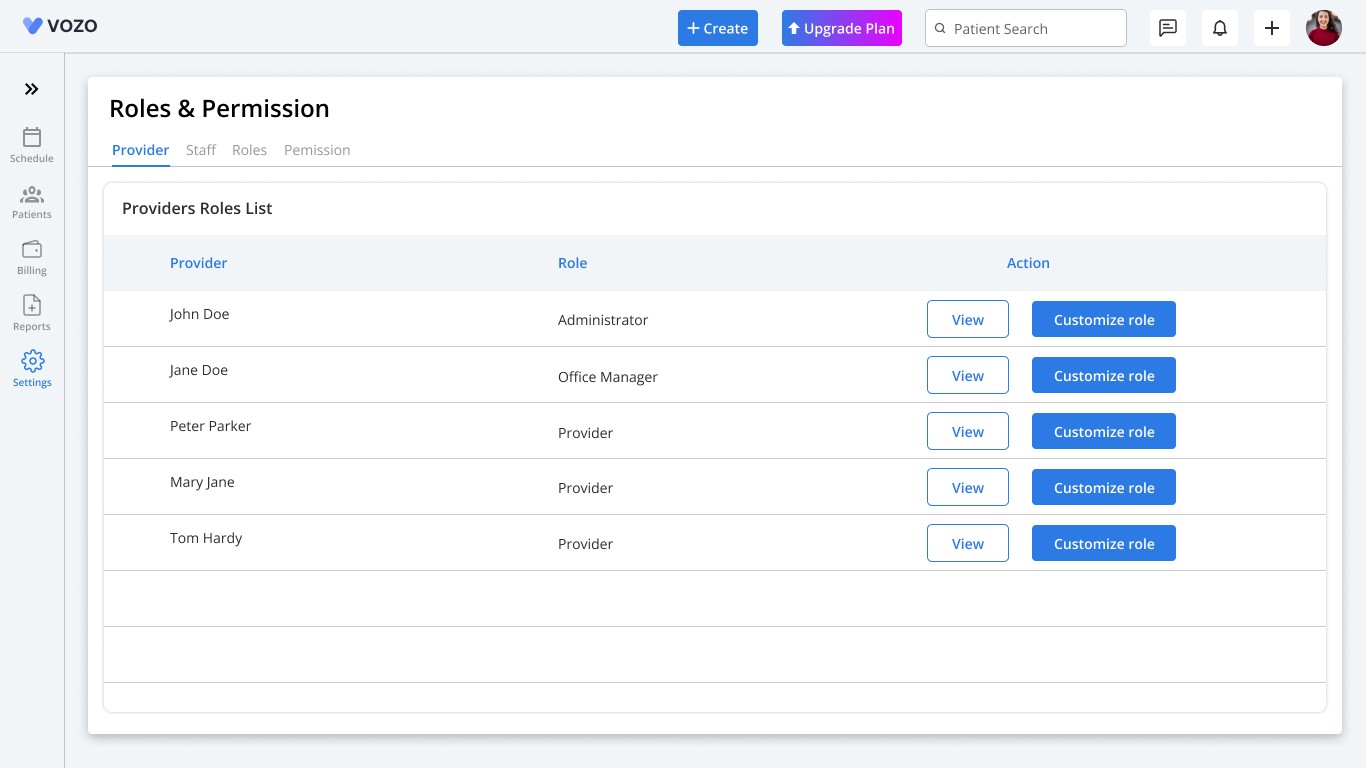
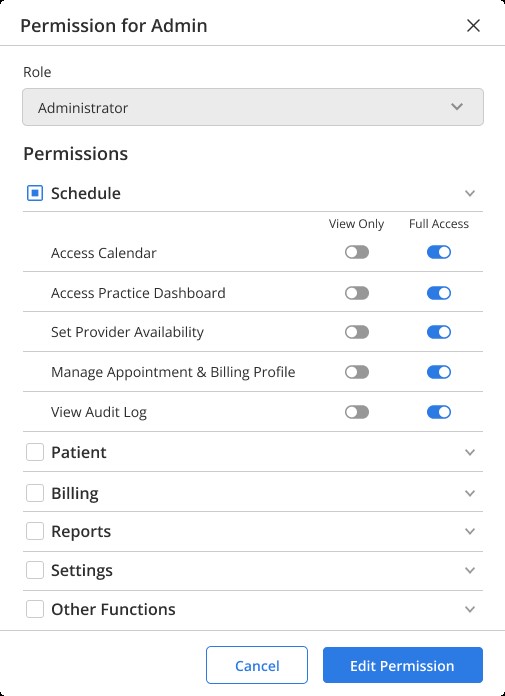
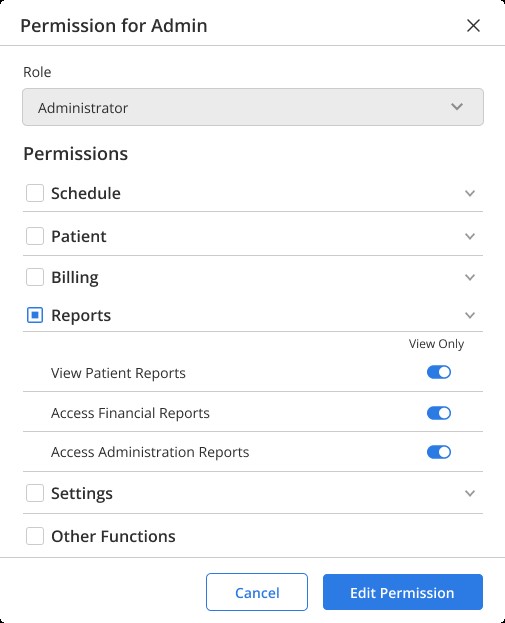
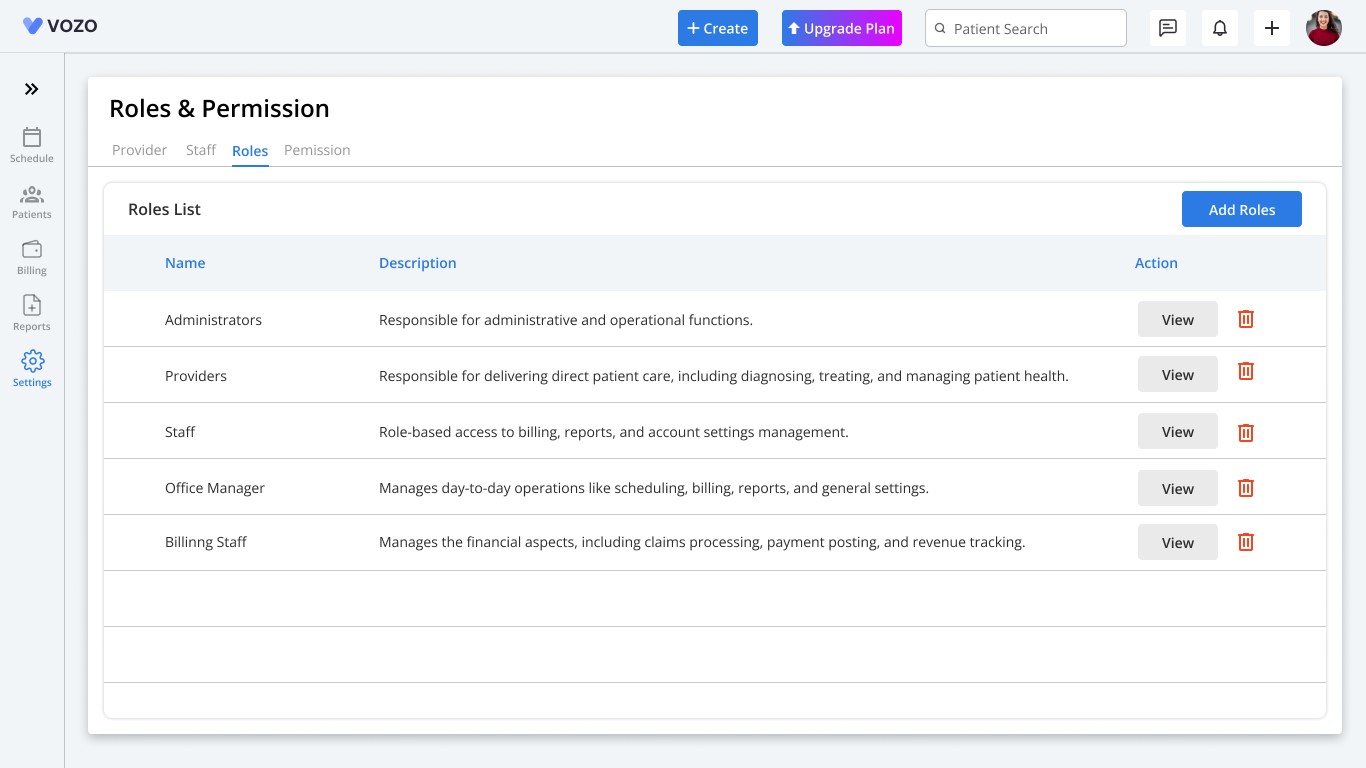
Roles and Permissions
We have made changes to the “Provider”, “Staff”, and “Roles” tabs, including an updated View & Customize Role popup and modifications in the Permission tab. The permission descriptions have also been revised for better clarity.
When users click “View” or “Customize Role”, the popup will display a redesigned UI with an improved structure for permissions, making it easier to manage access levels.
The Edit Permission popup now categorizes permissions based on their menu modules using an accordion-style layout. This enhancement makes navigation more intuitive.
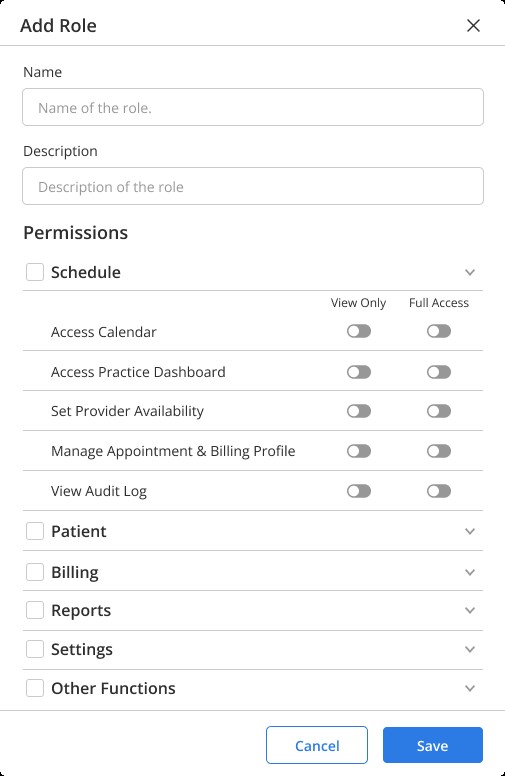
Users can select whether they want to grant View Only access or Full Access (Edit, Add, View, Delete) for each permission.
A checkbox is now available next to every menu module. When a user selects this checkbox, all permissions under that module will be automatically selected with default full access.
If users need to restrict access, they can simply uncheck the checkbox for Menu modules or toggle the View Only switch button to limit access to viewing permissions only.
The Customize Role popup now includes the same permission functionalities as the Edit Permission popup, with an additional feature to allow users to create a new role.
The workflow for Staff’s “View” & “Customize Role” functions follows the same structure as the Provider’s View & Customize Role process.
Within the Roles tab, clicking “Add Roles” or “View” opens a popup that follows the same changes and functionalities as the Customize Role section in the Provider and Staff tabs.
In the Permissions tab, we have:
Updated the permission descriptions for clarity.
Added a new table heading named Module, which categorizes permissions based on their respective menu modules for better organization.
form
Need Help? We're Here!
Didn’t find what you were looking for? Submit your query below, and
our support team will get back to you shortly.